Table of Contents
Advertisement
Available languages
Available languages
Quick Links
IN STAL LA TION AND OP ER AT ING IN STRUC TIONS
IN STAL LA TION UND GEBRAUCHSANWEISUNG
Cristalys Date
MOBALINE
Réf.: 605873 C
When receiving goods please check nothing is broken otherwise make a claim near shipping company.
Bitte, vergewissern Sie sich am Empfang der Waren, daß diese keine Schaden erlitten.
Advertisement
Chapters
Table of Contents

Related Manuals for Mobatime MOBALINE Cristalys Date


Summary of Contents for Mobatime MOBALINE Cristalys Date
- Page 1 IN STAL LA TION AND OP ER AT ING IN STRUC TIONS IN STAL LA TION UND GEBRAUCHSANWEISUNG Cristalys Date MOBALINE Réf.: 605873 C When receiving goods please check nothing is broken otherwise make a claim near shipping company. Bitte, vergewissern Sie sich am Empfang der Waren, daß diese keine Schaden erlitten.
-
Page 2: Table Of Contents
Table of contents ENGLISH....... . 3 I - INITIAL VERIFICATION ......3 1.1 Unpacking the clock . -
Page 3: English
I - INITIAL VERIFICATION Thank you for choosing a Cristalys clock. We advise you to read this manual thoroughly before attempting to manipulate the clock. These indicate important comments. Keep this booklet during all the life of your clock, so that you can refer to it each time it is necessary. -
Page 4: Introduction To The Cristalys Clock
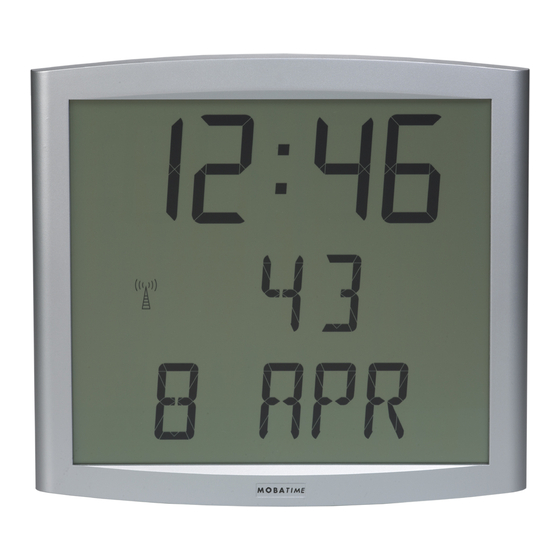
II - INTRODUCTION TO THE CRISTALYS CLOCK The Cristalys Date clock is a calendar clock for indoor use. It displays the hours (in 12 hr or 24 hr mode), minutes and date. It automatically manages summer-winter time changeovers. An ECO function enables the display to be switched off at night between 11.00pm and 06.00am. -
Page 5: Setting In Operation - Installation
III - SETTING IN OPERATION - INSTALLATION 3.1 Link-up to a Mobaline distribution network The Cristalys clocks Mobaline are synchronised by the Mobaline signal. Time distribution type has to be configured in the technician menu (see “sync” page 20) -
Page 6: Installation
3.2 Installation Diag.: 2 Anti-theft locking screw Setting of the table bracket (if supplied) (in the 2 notches of the wall bracket). Fit the wall bracket using the plugs and screws supplied. Clip the clock in place on the bracket and secure with the anti-theft locking screw provided (see Diag.2). -
Page 7: Time Setting Menu
IV - TIME SETTING MENU 4.1 Mobaline synchronised clock After the clock has been connected to the Mobaline, the screen remains blank during 8-10 seconds before displaying 0h00. The radio pictogram flashes every seconds. The time on the slave clock Cristalys Mobaline will be set automatically over a period of 4-5 minutes and the radio pictogram is fixed. - Page 8 Press [+] until the current year is displayed. 4. a Validate the year by pressing [SEL] : the month flashes. Press [+] until the required month is displayed. 5. a Press [SEL] to validate the month : the day flashes. Press [+] until the chosen day is displayed (Scrolling of the days takes account of the month and year selected (leap years)).
-
Page 9: Configuration Menu
V - CONFIGURATION MENU This mode enables you to select the different modes : 12 /24 hr, Eco, language selection, type of display, summer-winter time zone and time difference. With the different languages, there are no less than 4 million display possibilities offered by your calendar clock. We only give the simple functions below, but by combining them, you can find them all. - Page 10 Alternating display between 2 functions on the second line To alternate the display between 2 functions, go to point “4” (page 11). A single alternating mode is possible, this is why you cannot display alternating information in 2 languages. But the alternating display of functions is compatible with the options (date "DT", event "EV"...
-
Page 11: Configuration Menu
Configuration menu To go to Configuration mode, press the [SEL] button and while holding it down press [+] for more than 3 seconds. The 12/24 menu is displayed. Press [+] to choose between “12h” mode (display of AM/PM from 1 hr to 12 hrs) or “24 h” mode (display from 0,00 to 23.00 hrs). - Page 12 The display language flashes. Choose the language with [+] (table below) and validate with [SEL]. b The sub-menu Language2 is displayed. Choose with [+] from the different options : “--”, to validate the first language only, Display of a second language alternating with the first language selected.
- Page 13 Display of the week number : Display of the seconds : Display of the temperature Celsius or Fahrenheit (limited at 99°) : Press [SEL] to validate. b The Display sub-menu appears : it enables you to obtain : a fixed display, choose FIX with [+] an alternating display, choose ALT with [+], alternating between the day of the week or the World function and the information selected above.
- Page 14 Summer to Winter time = last Sunday in October at 1am UTC (that is 3am local time). Western Europe Zone “mode_eu-1” (England, Portugal, Ireland). Winter to summer time = last Sunday in March at 1am UTC (that is 1am local time). Summer to Winter time = last Sunday in October at 1am UTC (that is 2am local time).
- Page 15 Without seasonal change “mode_gmt”. No summer/winter changeover. The GMT function imposes an offset between the time received in coded time and the time displayed. Validate this option with the [SEL] button. Setting the offset in GMT mode. The offset can be adjusted by pressing [+]. The value to be chosen is between -12 h 30 and +12 h 30 by increments of 0 h 30.
- Page 16 between 1 and the last day of the chosen month 4) Press [SEL] : the number of the month flashes. Give the start of the winter period. Press [+] to select the month. Then continue as described in points 2 and 3 to set the start of the summer period. Countdown “Event”...
- Page 17 - If validating PRG. Enter the name of the city or site, you are allowed up to seven characters. a) the first character is chosen by pressing [+] and validating it with [SEL]. b) proceed in the same way for the subsequent characters. When the last character has been chosen, validating it with [SEL].
-
Page 18: Principle Of Time Setting
VI - PRINCIPLE OF TIME SETTING 6.1 Mobaline receiver model On the initial powering up, the time is initialised at 00h00mn00ss on 01/01/2000 over a period of 8-10 seconds. After a powering up, a time setting, a reset or a new configuration, the clock search to be synchronised. -
Page 19: Annex For Time Difference
6.2 Annex for time difference Choose the reference country for the summer/winter time changeovers, as well as the time difference, according to the city in which you wish to display the local time. If the time is set manually, do not take the time difference into account. CITY Zone Reference zone... -
Page 20: Technician Menu
VII - TECHNICIAN MENU Access to the technician menu is via the two push buttons [SELECT] and [+] located on the back of the clock. The [SELECT] button is above the [+] button. Proceed in two stages. Press the [SELECT] button, and while holding it down, press [+] for more than 3 seconds to go initially to Configuration menu. - Page 21 display. On the Cristalys Date clock, the [+] button enables you to scroll the character table. Press [SELECT]. The Correction menu appears. This enables you to correct the time base manually. On leaving the factory, the value of the offset is 0. The value of this offset may vary (using the [+]) between -9s99 and +9s99 per 10ms step (#0.12 ppm).
-
Page 22: What To Do If
VIII - WHAT TO DO IF...? ...CHECK. WHAT TO DO IF...? … CHECK. The clock does not display the day of The clock is programmed in week number or day the week but a number. number display mode (reread the note on page 12, §... -
Page 23: Technical Features
IX - TECHNICAL FEATURES The Cristalys Date clock complies with electromagnetic compatibility directive 89/336/EEC. It is intended for a residential or commercial environment. It complies with the European standards in force. Power supply : 6V to 24 V AC or DC, 10 mA maximum. Operating temperatures : from 0 °C to +50 °C. - Page 24 Inhalt sver zeich nis ENGLISH....... . 3 DEUTSCH ....... 25 I - VORWEG - ÜBERPRÜFUNG .
-
Page 25: Deutsch
I - VORWEG - ÜBERPRÜFUNG Wir danken Ihnen sehr, eine Cristalys Uhr ausgewählt zu haben. Dieses Produkt war dem Qualitätsstandard ISO9001 entsprechend für Ihre Befriedigung sorgfältig entwickelt. Wir empfehlen Ihnen dieses Handbuch aufmerksam zu lesen, bevor Sie die Uhr bedienen. Die Symbole weisen Sie auf die wesentlichen Anmerkungen hin. -
Page 26: Vorstellung Der Cristalys Uhr
II - VORSTELLUNG DER CRISTALYS UHR Die Cristalys Date Uhr ist eine Uhr für den Innenbereich. Sie zeigt die Stunden (12 od 24 Modus), die Minuten und das Datum an. Sommer-Winterzeitumstellungen werden automatisch verwaltet. Im ECO Modus ist das Display in der Nacht von 23:00 bis 6:00 ausgeschaltet. Sie hat drei Einstellungsmenüs : Uhrzeiteinstellungsmenü... -
Page 27: Inbetriebnahme - Installation
III - INBETRIEBNAHME - INSTALLATION 3.1 Anschluß an ein Mobaline-Verteilungsnetz Die Cristalys Mobaline Empfängeruhren werden von dem Mobaline Signal synchronisiert. Der Verteilungs-Typ muß im technischen Menü parametriert werden (Siehe “Sync” Seite 41). 3.2 Installation Abb. 2 Gegen Diebstahl Verriegelungsschraube Den Tischträger aufstellen (Option) (In den 2 Kerben des Wandträgers). -
Page 28: Uhrzeit Einstellung Menü
Die Uhr auf ihren Träger klippen und sie mit der gegen Diebstahl Verriegelungsschraube blockieren (siehe Abb.2). Die Schutzfolie der Uhrenfassade entfernen und mit einem antistatischen Tuch säubern. Anmerkung : Die Uhr kann auf einen Tischträger installiert sein (in Option), siehe Abb. 2 Vorseite. - Page 29 Um die Uhr einzustellen, die folgenden Schritte folgen : 1. a Bei der Einfügung der Batterien und bei der ersten Einschaltung sehen Sie die Uhrzeit um 00:00Mn00Ss und das Datum am 01/01/2000 an. Die Taste [Sel] 2 Sekunden lang drücken: Die Stunde blinkt auf.
-
Page 30: Konfiguration Menü
V - KONFIGURATION MENÜ Mit diesem Menü können Sie die verschiedenen Modi auswählen : 12/24, Eco, Anzeigetyp, Sommer-Winterzeitzone und Zeitunterschied. Mit den verschiedenen Sprachen schlägt Ihnen Ihre Kalenderuhr mehr als 4 Millionen Möglichkeiten von Anzeige vor. Wir stellen Ihnen die einfachen Funktionen vor. Wenn Sie sie verbinden, können Sie alle diese Möglichkeiten wieder finden. - Page 31 Alternierende Anzeige von 2 Funktionen Um die Anzeige von 2 Funktionen zu alternieren, bis zum Punkt "4" gehen (Seite 32). Nur eine Alternierende Anzeige ist möglich. Sie werden also die Informationen in 2 verschiedenen Sprachen alternierend nicht anzeigen können. Die alternierende Anzeige der Funktionen ist jedoch für die ausgewählte Sprache mit den Optionen (Datum "DT", Ereignis "EV"...
-
Page 32: Konfigurationsmenü
Konfigurationsmenü Um den Konfigurationsmodus, auszuwählen, die Tasten [Sel] und [+] mindestens 3 Sekunden lang gleichzeitig drücken. Das 12/24 Menü ist angezeigt. Die Taste [+] drücken, um zwischen dem "12" Modus (angelsächsische Anzeige der Stunden AM/PM von 1:00 bis 12:00.) und dem "24" Modus (Anzeige von 0:00 bis 23:00) auszuwählen. - Page 33 auswählen und sie durch einen Druck auf die Taste [Sel] bestätigen. b Das Untermenü Sprache2 zeigt sich an. Mit Hilfe der Taste [+] zwischen den verschiedenen Optionen auswählen : “--”, um nur die erste Sprache zu bestätigen, Die Anzeige einer zweiten Sprache alternierend mit der ersten ausgewählten Sprache.
- Page 34 Anzeige der Sekunden : Anzeige der Temperatur in Grad oder Fahrenheit (beschränkt auf 99°) : Durch einen Druck auf die Taste [Sel] bestätigen. b Das Untermenü Anzeige erscheint : Für eine feststehende Anzeige, FIX mit Hilfe der Taste [+] auswählen. Für eine alternierende Anzeige, ALT mit Hilfe der Taste [+] auswählen: die vorgewählte Anzeige wird alternierend mit dem Wochentag angezeigt.
- Page 35 S > W = Am letzten Sonntag von Oktober um 1 Uh UTC (um 3 Uhr Lokalzeit) Westeuropa “Eu-1_Modus” (Grob Britannien, Portugal, Irland). W > S = Am letzten Sonntag von März um 1 Uhr UTC (1 Uhr Lokalzeit). S > W = Am letzten Sonntag von Oktober um 1 Uhr UTC (um 2 Uhr Lokalzeit).
- Page 36 Keine Umstellung “Gmt_Modus” . Keine Sommer-/Winterzeitumstellung. Für die Funkuhren sollen Sie die Zone programmieren. Die GMT Funktion zwingt einen Unterschied zwischen der empfangenen Uhrzeit in codierter Zeit und der angezeigten Uhr. Diese Option mit Hilfe der Taste [Sel] bestätigen. Die Einstellung des Unterschieds wird durch einen Druck auf die Taste [+] geführt.
- Page 37 ausgewählten Monats auswählen 4) Die Taste [Sel] drücken: Die Nummer des Monats blinkt auf. Den Anfang der Winterperiode hinweisen. Die Taste [+] drücken, um den Monat auszuwählen. Die Punkte 2 und 3 wiederholen, um den Anfang der Sommerperiode einzurichten. 5) Dieses Menü funktioniert nur für die Funkuhren. Nachdem Datum vom Anfang der Winterperiode definiert wurde, die Taste [Sel] drücken.
- Page 38 "Benutzer : Konfiguration" (Seite 33) Anmerkung : Wenn das Datum des Ereignisses vorbei ist, das heißt T + 1, verschwindet die Abzählung und das Datum wird feststehend angezeigt. Die “Welt” Option ermöglicht die Anzeige der Stadtnamen auf der dritten Anzeige. - Wenn das Weltuntermenü...
-
Page 39: Uhrzeiteinstellungsprinzip
VI - UHRZEITEINSTELLUNGSPRINZIP 6.1 Empfängeruhr mit Mobaline Modul Bei der ersten Inbetriebnahme sehen Sie nach 8-10 Sekunden die Uhrzeit 0h00Mn00Ss und das Datum 01/01/2000. Die Uhr sucht die Synchronisation bei der Einschaltung, sowie nach jeder manueller Zeitänderung, einem Reset oder einer neuen Konfiguration der Uhr, sobald 3 korrekte Meldungen nacheinander empfangen worden sind, passt sich die Zeitbasis an. -
Page 40: Anhang Für Die Zeitunterschiede
6.2 Anhang für die Zeitunterschiede. Wählen Sie das bezügliche Land für die Sommer-/Winterzeitumstellungen und den Zeitunterschied je nach der Stadt, deren Ortszeit Sie anzeigen möchten, aus. STADT Zone Bezügliches Land Zeitunterschied/ GMTUhr LOS ANGELES USAP USA /Kanada MEXIKO USAC USA / Kanada CHICAGO USAC USA / Kanada... -
Page 41: Techniker Menü
Auf die Taste [SELECT] drücken, je nach dem Modell Ihrer Uhr und Ihrer Wahl : Ind : die Uhr gibt sofort die Testanzeige an. Sync (Mobatime) : Das Funkpiktogramm blinkt während der Suche auf. Die Anzeige stellt die Zusammensetzung der Zeitmeldung im Kommen der Daten dar. - Page 42 Cristalys Date Uhr ist es möglich mit der Taste [+] die Zeichentabelle zu blättern. Die Taste [SELECT] drücken. Das Korrektur Menü erscheint. Es ermöglicht die Basiszeit manuell einzustellen. Im Werk ist die Temperatur auf 0 eingestellt. Die Taste [+] drücken, um den Wert der Einstellung von -9s99 bis +9s99 mit Schritten von 10ms (#0.12ppm) zu schwanken.
-
Page 43: Was Tun, Wenn
VIII - WAS TUN, WENN...? ...PRÜFEN. Was tun, wenn...? … Prüfen. Die Uhr zeigt kein Datum aber eine Die Uhr ist eingerichtet, um die Nummer der Nummer an. Woche anzuzeigen (siehe Seite 33, § 5). Die Anzeige der Uhr überschreitet Die Uhr ist in 12 Modus statt 24 Modus nicht 12:00. -
Page 44: Technische Daten
IX - TECHNISCHE DATEN Die Cristalys Date Uhr entspricht der europäischen Richtlinie über die elektromagnetische Kompatibilität 89/336/EG. Sie ist für eine kommerzielle oder Wohnumgebung geeignet. Sie entspricht den europäischen Normen. Versorgung : Schwachstromversorgung von 6V bis 24V AC oder DC, 10 mA. Betriebstemperatur : von 0 °C bis +50 °C.
Need help?
Do you have a question about the MOBALINE Cristalys Date and is the answer not in the manual?
Questions and answers