
Related Manuals for Polimaster PM1401K-3


Summary of Contents for Polimaster PM1401K-3
- Page 1 MULTIPURPOSE HAND-HELD RADIATION MONITOR/IDENTIFIER РМ1401К-3 OPERATION MANUAL Modifications: PM1401K-3 PM1401K-3М PM1401K-3Р PM1401K-3A www.polimaster.com...
- Page 2 Corporation. All other product or service names are the property of their respective owners. Product Improvements Continuous improvement of products is a policy of Polimaster Ltd. and its affiliates. All specifications, operating and maintenance instructions are subject to changes that do not make substantial effect on the product functionality...
-
Page 3: Table Of Contents
Display and control buttons ................ 16 CHAPTER 2: OPERATION ................19 Belt clip installation/removal ..............19 Batteries installation ..................19 Powering PM1401K-3 from external power supply ......21 Turning the instrument On/Off ..............22 Alarms ........................ 25 High ambient temperature indication ............. 26 Indication of counting statistics .............. - Page 4 Appendix A: Detectors’ positions ............... 86 Appendix B: Dependence of measurement time on flux density of α and β- particles ....................87 Appendix C: Typical energy dependence of the PM1401K-3 sensitivity to β- radiation energy ..................88 Appendix D: Technical specifications ............89...
-
Page 5: Welcome
Monitor/Identifier. Before operating the instrument, please read this guide thoroughly, and retain it for future reference. PM1401K-3 belongs to a new family of Polimaster extremely sensitive and compact multipurpose hand-held radiation monitors. The user need not be an expert in health physics to operate this instrument;... -
Page 6: Chapter 1: General Description
All operation history is stored in the instrument non-volatile memory and may be downloaded to a personal computer through a USB interface. PM1401K-3 is also equipped with built-in GPS to enable saving the readings to instrument memory with tied measurement location coordinates. -
Page 7: Delivery Kit
Delivery kit The standard delivery kit is shown in the figure below: The following items are included into the PM1401K-3 standard delivery kit: The PM1401K-3 instrument Protective case Set of spacer rings (3 pcs.) is used for α and β- radiation measurement Set of α-radiation filters (2 sets) is used for α... -
Page 8: Accessories
Belt Clip Operation Manual and Software Guide (CD-ROM) Calibration and Warranty Certificates Accessories The following optional accessories can be used with PM1401K-3: External vibrator with the wristband is used for operation in noisy environment and/or performing a hidden search Calibration cap is used for energy calibration check... - Page 9 Connect the external vibrator cable to the instrument. The vibrator cable has a secure push/pull connector to hold into the position. To connect the vibrator, locate the port on the bottom of PM1401K-3, as depicted in the figure below. Guide the connector until it locks into the position.
- Page 10 1.3.2. Telescopic extension pole Optional telescopic extension pole can be used with PM1401K-3 to operate the instrument in remote and hard-to-reach areas. Adjust the length of telescopic extension pole by using two clamps located on the handle. Clamps Fig. 3 - Telescopic extension pole It also allows connecting the external vibrator to the pole handle and the instrument socket.
- Page 11 1.3.3. Neutron moderator Additional neutron moderator can be used to increase the instrument sensitivity to neutron radiation significantly. The PM1401K-3 neutron moderator is supplied with a shoulder belt for wearing comfort. Takedown screws Fig. 5 - PM1401K-3 Neutron moderator To install the instrument into the neutron moderator: •...
- Page 12 1.3.4. Tripod and set of Marinelli beakers The tripod and the set of Marinelli beakers are used to measure the activity of Cs in various substances (food, soil, water etc.) in the “Activity γ” mode. To install the instrument to the tripod: •...
- Page 13 Lock the instrument with the retention bar and fix its position with the takedown screw; • Install the Marinelli Beaker on the Scintillation detector of PM1401K-3. PM1401K-3 is now ready to perform the measurement of Cs radionuclide activity.
- Page 14 The optional calibration cap is used for energy calibration check and manual energy calibration. Fig. 6 – Calibration cap 1.3.6. Holster Optionally PM1401K-3 can be delivered with a holster for easy carrying the instrument. It can also be fixed on the waist belt using a belt loop. Fig. 7 – Holster...
-
Page 15: Design
Design Fig. 8 – PM1401K-3 design Display; Button pad; Clip holder (both on the front and on the back sides); LEMO outlet for the external vibrator and USB Power cable; Audible alarm buzzer; Visual alarm LED; Batteries compartment; Batteries compartment cover;... -
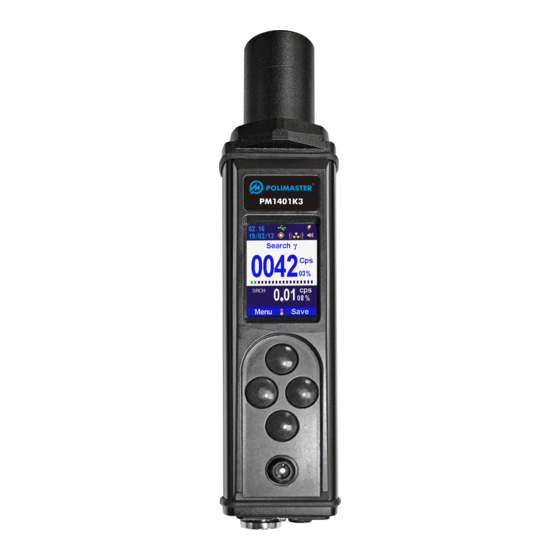
Page 16: Display And Control Buttons
Display and control buttons The instrument display has three main information zones that are used to display the following information: Zone 1. Service panel. This information zone may display the following information: Gamma-neutron modifications Gamma modifications Fig. 9 - Display –... - Page 17 RIGHT DOWN Fig. 10 – Buttons assignment The four buttons of PM1401K-3 will be referred hereinafter in the text of the Manual to as UP, DOWN, LEFT and RIGHT. The following symbols may be displayed in this zone: - backlight timeout disabling/enabling icons. To disable/enable the backlight timeout, press the DOWN button.
- Page 18 Set the necessary brightness by pressing the LEFT or RIGHT button. To close the brightness scale, press the UP or DOWN button. - accessing a submenu icon; - moving the cursor up and down icons; - audible alarm disabling \ enabling icons (see “Alarms” section); - assignment description textboxes for RIGHT and LEFT buttons.
-
Page 19: Chapter 2: Operation
(see Fig. 11) until a click. Fig. 11 - PM1401K-3 clip installation To remove the clip press the clip locker panel (the panel is marked with the red arrow) and move the clip in the direction of the white arrow. - Page 20 Fig. 12 – Batteries installation PM1401K-3 can be powered with either regular alkaline or rechargeable NiMh batteries. CAUTION: Always select the proper type of batteries in the“Power” submenu of “Settings” menu when you install new batteries (see the figure below). Otherwise the batteries may overheat or leak when the instrument is connected to a Power / USB outlet.
-
Page 21: Powering Pm1401K-3 From External Power Supply
Power cable included into the standard delivery kit. In this case, no batteries are required to run the instrument. The installed in PM1401K-3 rechargeable batteries may be charged if the instrument is powered from an active USB outlet and the “Enable charging”... -
Page 22: Turning The Instrument On/Off
Turning the instrument On/Off Once the batteries have been installed or PM1401K-3 has been connected to a PC, the instrument will turn On automatically. If the batteries have already been installed and the instrument is Off, press and hold the DOWN button for 3 seconds to turn it On. - Page 23 To turn the instrument OFF, go to the main MENU and select “Power Off”. After a couple of seconds the LCD goes blank. The instrument is OFF now. NOTE: PM1401K-3 will not turn OFF when it is powered by the USB Power Cable. In this case to turn the instrument OFF disconnect it from the USB outlet and repeat the procedure described above.
- Page 24 The setup is described in “Date/Time” section. Selecting power settings PM1401K-3 can be powered by either regular alkaline or rechargeable NiMh batteries. Therefore, after the first time the instrument is turned On, the user must select the proper power settings (see “Power” section).
-
Page 25: Alarms
Press the DOWN button one more time to enable the alarms. For safety reasons they are automatically enabled when the radiation background drops below the preset thresholds so as PM1401K-3 could warn you about the next potentially dangerous increase of radiation background. -
Page 26: High Ambient Temperature Indication
High ambient temperature indication When the instrument is exposed to high ambient temperatures (≥ +50°C (+122°F)), it will indicate a warning message in the upper part of the display: The scintillation detector of the instrument cannot operate normally in such conditions. -
Page 27: Search Γ (Γn)"Mode
“Search γ (γn)” mode automatically when self-tests and background calibration are completed. When PM1401K-3 is in the “Search γ (γn)” mode the Scintillation detector is used to measure gamma radiation background count rate, therefore the instrument is fast in response to the changes in background radiation. - Page 28 It is not necessary to run the background calibration in this scenario. If PM1401K-3 is exposed to radiation intensities greater than the upper counts indication limits, it will display the overload readings: “OvL”.
- Page 29 2.8.1. Alarms in “Search γ (γn)” mode When one of the alarms is activated, the color of the readings changes to red and the following messages may be displayed: • “Warning: γ count rate alarm” message if Scintillation detector gamma radiation search channel threshold is triggered (see Fig.
- Page 30 The PM1401K-3 can also adjust to gradually changing levels of radiation background automatically to make operation with the instrument more convenient. This function is enabled by default.
- Page 31 Fig. 19 - “Search γ (γn)” mode settings The following options are available in this submenu: “1. Reset statistics” command allows manual restarting of the gamma and neutron radiation count rate measurements; “2. Calibration” command is used to run background calibration manually ; “3.
- Page 32 2.8.7. Automatic identification in the “Search γ (γn)” mode If a gamma radiation source is detected when the PM1401K-3 is in the “Search γ (γn)” mode, the radionuclide identification may be started automatically over the specified period of time - automatic identification start timeout. The timeout may be configured in the instrument “Settings”...
-
Page 33: Measure Γ (Γn)" Mode
To disable the automatic identification in the “Search γ (γn)” mode set the timeout value to “0”. 5 sec. Fig. 21 – Automatic identification “Measure γ (γn)” Mode “Measure γ (γn) ” mode is used for accurate measurement of the dose equivalent rate of gamma radiation within the instrument measurement and energy range. - Page 34 LEFT button – returns to the main MENU of the instrument; • RIGHT button – saves the measured values. If the PM1401K-3 is exposed to radiation intensities greater than the upper measurement limits (200 mSv/h for gamma radiation and 999 cps for neutrons ) it will display the overload readings: “OvL”.
- Page 35 To save the measurement results press the RIGHT button when in the main screen of the mode. Fig. 23 - Saving values with different counting statistics The following information will be recorded in the instrument memory: • Gamma radiation dose equivalent rate value (with the counting statistics in “%”);...
- Page 36 2.9.1. Alarms in “Measure γ (γn)” mode When one of the alarms is activated, the color of the readings changes to red and the following messages are displayed: Fig. 24 – Gamma radiation dose equivalent rate measurement mode alarms • “Warning: γ...
- Page 37 2.9.2. Settings of “Measure γ (γn)” mode To enter the settings submenu press the UP button when in the main screen of the mode: Fig. 25 - “Measure γ (γn)” mode settings The following options are available in this submenu: “1.
- Page 38 rate readings are set to 0.10 µSv/h and neutron count rate readings are set to 0.01 CPS . At that, the values of the counting statistics are set to “99%”. NOTE: The instrument requires certain time to measure a new dose equivalent rate value and compare it with the alarm threshold after starting a new measurement.
-
Page 39: Search Αβγ" Mode
“Search αβγ” mode “Search αβγ” mode is used for search of α-, β- and γ-radiation sources. It allows using the PM1401K-3 as a surface contamination meter. In this mode α-, β- and γ-radiation particles are registered with the Geiger-Muller detector mica window. - Page 40 LEFT button – returns to the main MENU of the instrument; • RIGHT button – saves the measured values. If the PM1401K-3 is exposed to radiation intensities greater than the upper counts indication limit of the “Search αβγ” mode it will display the overload reading “OvL“.
- Page 41 2.10.1. Settings in “Search αβγ” mode To enter the settings of the “Search αβγ” mode press the UP button when in the main screen of the mode: Fig. 29 - “Search αβγ” mode settings When in the “Search αβγ” mode settings submenu press the UP and DOWN buttons to move the cursor.
-
Page 42: Identify Γ" Mode
“Manufactirer’s defaults” section. “Identify γ” mode “Identify γ” mode is used for radioisotope identification. PM1401K-3 is capable to identify a number of radionuclides by analyzing their radiation spectrum that is registered with the Scintillation detector of the instrument. The instrument may be switched to “Identify γ” mode from the main MENU or automatically over the specified time from the “Search γ... - Page 43 Current γ radiation count rate Advice Detector load scale Time left till completion of identification, in seconds Fig. 31 – “Identify γ” mode Current value of gamma radiation count rate in counts per second (CPS); Detector load scale, indicating whether the current gamma radiation count rate is optimal for spectra acquisition;...
- Page 44 Type − type of the matrix material; NOTE: Thickness and the type of the absorber and (or) matrix influence the form of the spectrum acquired by the PM1401K-3. Therefore it is important to set them properly for correct identification results;...
- Page 45 2.11.2. Radioisotope identification For PM1401K-3, as for the majority of identifiers, it is very important to have count rate readings on the display within a certain interval, between 100 cps and 500 cps to acquire good quality spectra.
- Page 46 Medical isotopes group (MED). The instrument may also show “Unable to identify” message if the “Identify” button is pressed before PM1401K-3 finished the spectrum acquisition, or the inspected radionuclides are not included in the selected radionuclide library.
-
Page 47: Spectrum Γ" Mode
They are displayed on the LCD and may be saved for further analysis. This mode is also used for manual energy check and calibration of PM1401K-3 Scintillation detector. Fig. 35 - “Spectrum γ” mode To switch to this mode select “Spectrum γ” in the main MENU. - Page 48 • Calibration - allows calibration of the instrument with the reference source (calibration cap When switched to one of the abovementioned menus the instrument will promptly alert the user if the dose equivalent rate threshold is exceeded with Audible/Visual or Vibration alarms (see the “Alarms”...
- Page 49 The following information will be displayed on the LCD: acquisition time quantity of impulses in a channel channel number marker Y axis mode (logarithmic / linear) detector load scale X axis scale and channel / energy representation X axis end point X axis start point Fig.
- Page 50 LEFT buttons will zoom in (out) on the graph: Fig. 39 – Spectrum zooming 2.12.2. Completion of spectrum acquisition PM1401K-3 accumulates spectra with 1024 channels. The capacity of each channel is 65535 impulses. It is necessary to accumulate at least 10 impulses in the channel with the maximum amount of counts to obtain the high quality spectrum.
- Page 51 Press the RIGHT button to go to the next page with the identification results information. The PM1401K-3 will display the activity of each identified radionuclide in Bq with counting statistical error in “%”.
- Page 52 NOTE: Spectrometric parameters of the instrument (energy resolution) get worse at ambient temperatures above 32–35 С. о It is recommended to avoid conduction of spectrometric surveys at high temperatures (especially, identification of the nuclides with multiply energy peaks and mixtures of radionuclides). Press the LEFT button to go back to the spectrum acquisition display without interruption of the acquisition process.
- Page 53 2.12.4. Viewing saved scintillation spectra To view the list of spectra saved in the PM1401K-3 memory select “Open” in the “Spectrum γ” mode of the main menu. The instrument will display the table with the list of the spectra (see Fig. 43b) with two columns: spectrum name and date of saving (of the spectrum).
-
Page 54: Measure Αβ" Mode
“Measure αβ” mode “Measure αβ” mode is used to measure the value of α- and β-radiation flux density. In this mode, α- and β-particles are registered with the Geiger-Muller detector mica window. Fig. 45 - “Measure αβ” mode Switch the instrument to the “Measure αβ” mode from the main MENU. The main MENU has two options: “Measure α”... - Page 55 RIGHT button to proceed to the next step; Fig. 48 – PM1401K-3 on the surveyed surface NOTE: α- particles are capable to go only through several centimeters of the air. Therefore, the distance between the surface of the mica window and the surveyed surface should be no more than 5 mm.
- Page 56 Spacer ring №1 inside the plastic bag; • α-filter №2 is a polyethylene circle. It should be installed between the mica window and Spacer ring №1; α-filter № 2 Spacer ring №1 Fig. 50 – PM1401K-3 with installed α-filter №2 and Spacer ring №1...
- Page 57 Place the mica window of Geiger-Mueller detector opposite to the surveyed surface and press the RIGHT button to proceed to the next step; The instrument will start the measurement of the α-radiation flux density and the following information will be displayed on the main display area: Current α- radiation flux...
- Page 58 10 mm. Use the Spacer ring №2 from PM1401K-3 standard delivery set to ensure the proper distance. Place PM1401K-3 with installed α-radiation filter and spacer rings on the surveyed surface. Fig. 54 – PM1401K-3 on the surveyed surface...
- Page 59 Press the RIGHT button to start measurement of the β, γ-radiation flux value: Current βγ-radiation flux count rate with counting statistics in “%” Analog bar Fig.55 β-, γ-radiation flux measurement in “Measure β” mode Press the RIGHT button when the counting statistics is less than 10%. The measured value will be recorded into the instrument memory and used in the next step for calculation of the β-radiation flux density.
- Page 60 The instrument will start the measurement of the β-radiation flux density and the following information will be displayed on the main display area: Current β-radiation flux density value with counting statistics in “%” Analog bar Fig. 57 - “Measure β” mode •...
-
Page 61: Activity Γ" Mode
“Activity γ” mode is used to measure the activity of in a sample. The special accessories kit is required to use PM1401K-3 mode in this mode. The kit consists of the tripod and the set of Marinelli beakers. Scintillation detector of PM1401K-3 is used to measure Cs activity in this mode. - Page 62 Cs at the place of measurement: • the radiation background measurement (“3. Background meas.”) is required every time PM1401K-3 is placed in the environment with a new radiation background (e.g., it was moved to another place); • the radiation background checking (“2. Background monitoring”) is recommended after a series of surveys in a presumptively constant radiation environment to make sure it hasn’t change.
- Page 63 Please refer to your local standards to determine this value for various substances. 2.14.2. Background measurement in the “Activity γ” mode When in this mode PM1401K-3 measures the count rate value of Cs in natural background radiation at the place of activity measurement. This procedure should be done before the first activity measurement in a new location.
- Page 64 measurement” in case the background measurement is completed because the settings of the “Activity γ” has been changed (e.g. a lower maximum permissible activity of Cs has been selected) but the environmental conditions have not changed (i.e. the instrument has not been moved to another location).
- Page 65 activity measurement provided the measurements are performed in the same conditions. To start the background monitoring select the “2. Background monitoring” option (Fig. 63а) in the “Activity γ” mode of the main menu. Fig. 63 – Background monitoring mode The LCD will display time left until the end of background measurement in “hh:mm:ss”...
- Page 66 2.14.4. Preparation of sample Observe the following rules to provide the best accuracy of the measurement: • wash fruits, vegetables, herbs, meat, etc. with running water; • wash and gut fish; • remove the food wrap from the inspected foodstuff; •...
- Page 67 (“Act. Intolerance”) is lower than the preset maximum permissible activity (Figure 66b). To save the measurements in the “Activity γ” mode press the RIGHT button when PM1401K-3 finishes the measurement. The following information will be recorded in the instrument memory: •...
-
Page 68: Register N" Mode
“Register n” mode The “Register n” mode is used to display the total amount of neutrons that were registered with PM1401K-3 neutron detector over the specified period. Switch the instrument to this mode from the main MENU. The following information is displayed on the LCD in the “Register n” mode: •... -
Page 69: History" Mode
“History” mode “History” mode allows displaying the records that are saved in the instrument history. To switch to this mode select “History” in the main MENU (see Fig. 68a): Fig. 68 – “History” menu The saved data is displayed in the form of records that are grouped by the date when they are made. - Page 70 • Alarm events checkbox allows displaying the records that have been made when one of PM1401K-3 alarms have activated. • System events checkbox allows displaying the list of the system records (turning the instrument ON/OFF, calibration, PC connection);...
-
Page 71: Chapter 3: Setup
CHAPTER 3: SETUP “Settings” menu Select the “Settings” section in the instrument main MENU to enter the settings of PM1401K-3. Fig. 70 – “Settings” menu When in the “Settings” menu (see Fig. 70b.) press the UP and DOWN buttons to move the cursor and press the RIGHT button to enter a settings submenu. - Page 72 Select “2. Disc utility” to enter the “Disc utility” mode. In this mode a user can check the capacity of PM1401K-3 “DATA” and “SOFT” flash-drives and format them.
- Page 73 3.1.3. Alarm The “3. Alarm” submenu allows enabling or disabling audible, visual and vibration alarms. Fig. 74 – Alarms settings 3.1.4. Display The submenu allows: • Setting the LCD brightness; • Setting the duration of user inactivity (in seconds; within the range of “1-100”) after which the LCD backlight turns OFF (“Backlight timeout”).
- Page 74 3.1.5. Power The submenu allows changing the power settings: “Disable charging” or “Enable charging”. When “Enable charging” is selected, it is possible to recharge the rechargeable batteries in the batteries compartment by connecting the instrument to an external power supply. Fig.
- Page 75 3.1.7. Location The submenu allows switching the GPS module On and Off. Fig. 78 – Location settings When the GPS is On PM1401K-3 saves each record to the history with the location coordinates; 3.1.8. Measurement The submenu allows enabling and disabling the search mode in the “Measure γ...
- Page 76 • Setting the automatic identification start timeout (“Automatic start timeout, sec”) - the period over which PM1401K-3 automatically switches from “Search γ (γn)” mode to the “Identify γ” mode after a gamma radiation source is detected (see “Automatic identification in the “Search γ (γn)” mode section). The timeout may be set within “1-99”...
-
Page 77: Manufacturer's Defaults
UP button → channel n-coefficient “3. Threshold gamma” MENU → “Search γ (γn)” → Neutron radiation search for PM1401K-3 - 5.3 press the UP button → channel n-coefficient for PM1401K-3A - 3.6 “4. Threshold neutron” for PM1401K-3P - 4.2 MENU →... -
Page 78: Language Settings
PM1401K-3 firmware. 3.3.1. Changing language with “PM1401K-3 Built-in Software” 1. Connect PM1401K-3 to a PC; 2. The OS will identify 3 flash drives of PM1401K-3. Find and run “PM1401K3SW.exe” in the root directory of the “SOFT” drive of the instrument;... -
Page 79: Chapter 4: Pc Communication
“PM1401 DATA” – contains saved spectra and history events; “PM1401 INFO” – contains service information. To start “PM1401K-3 Built-in Software”, go to a new PM1401 SOFT drive and run the “PM1401K3SW.exe” application. Remove USB Power cable from the instrument socket only after clicking twice “Safely Remove Hardware”... -
Page 80: Energy Calibration Check And Manual Calibration
PM1401K-3. Each PM1401K-3 is extensively tested and calibrated on the factory. Performing manual energy calibration may overwrite the factory calibration and lead to the instrument malfunctioning if not done properly. Please follow procedure very carefully, and consult the manufacturer or authorized technical center in case of any questions. - Page 81 be set to “itrap”, “Absorber” and “Matrix” list boxes shall be set to “none” (see “Settings of the “Identify γ mode” section). Use the following guidelines to perform energy calibration check: Select “Calibration” in the “Spectrum γ” mode of the main MENU: Fig.
- Page 82 LEFT button to leave the “Calibration” mode without applying new calibration coefficients. Fig. 85 b – Results of energy calibration check CAUTION: Do not perform Manual energy calibration in a preventive manner in case PM1401K-3 successfully passed energy calibration check (i.e the deviation is less than 1%).
- Page 83 5с. If the deviation is displayed in red contact the supplier for technical support. Fig. 86 c – Results of energy calibration check 5d. If “No peaks found” is displayed instead of new calibration coefficients check the identification settings and and retry the energy calibration procedure.
-
Page 84: Storage And Transprtation
TROUBLESHOOTING If PM1401K-3 does not seem to be working properly, follow the instruction in the table below to see if you can identify the problem. Problem... - Page 85 If the mechanical same conditions damage signs are confirmed, contact the supplier for technical support. Instrument is Inspect PM1401K-3 with another contaminated instrument and decontaminate it if necessary. Instrument displays Instrument is Contact the supplier for...
-
Page 86: Appendix A: Detectors' Positions
APPENDIX A: DETECTORS’ POSITIONS... -
Page 87: Appendix B: Dependence Of Measurement Time On Flux Density Of Α And Β- Particles
APPENDIX B: DEPENDENCE OF MEASUREMENT TIME ON FLUX DENSITY OF α AND β- PARTICLES Table B.1 - Dependence of measurement time on β- particles flux density Approximate Measurement range of the measurement time of Counting statistics, % α- particles flux density, the α-particles flux no more than ⋅cm... -
Page 88: Appendix C: Typical Energy Dependence Of The Pm1401K-3 Sensitivity To Β- Radiation Energy
APPENDIX C: TYPICAL ENERGY DEPENDENCE OF THE PM1401K-3 SENSITIVITY TO β- RADIATION ENERGY ε Emax 1000 10000 Fig. 28 - Typical energy dependence of the PM1401K-3 sensitivity to β- radiation energy... -
Page 89: Appendix D: Technical Specifications
APPENDIX D: TECHNICAL SPECIFICATIONS Gamma radiation dose equivalent rate indication range from 0.01 μSv/h to 200 mSv/h Accuracy of gamma radiation dose equivalent rate measurement in the ±(15 + 0.0015 / Ḣ) %; range from 0.1 μSv/h to where Ḣ − measured dose equivalent rate 100 mSv/h value in mSv/h. - Page 90 Table 1 Detection angle Energy of γ-radiation, MeV relative to 0.059 0.662 1.25 graduation Angular response (δ , %) α direction, ° 5/-15 ±10 5/-10 -15/-60 0/-25 0/-20 -20/-60 -10/-40 -10/-35 -40/-99 -20/-60 -10/-50 -50/-98 -15/-50 -10/-40 -50/-95 -10/-35 -10/-30 -5/-20 ±15 5/-10...
- Page 91 Sensitivity to gamma radiation in the “Search γ ≥ 200.0 s /(μSv/h) – for (γn)” mode ≥ 200.0 s /(μSv/h) – for Indication range (search mode) gamma 1 – 9999 CPS neutron 0.01 – 999 CPS Neutron count rate measurement energy range from thermal to 14MeV РМ1401К-3 sensitivity ≥...
- Page 92 Limits of complementary permissible measurement error of the α- radiation flux density: - in 200 µrem/h gamma ± 30 %; radiation field - in 3.0 ⋅ 10 β-radiation field from the Y source placed at 50 mm from the ± 15 %; mica window of the detector β- radiation flux measurement range...
- Page 93 ± �30 + 2000 А � �%, Accuracy of the Cs nuclide activity measurement in the range from 10 to 10 where А – measured activity value, Bq/kg(l) Bq/kg(l) Sensitivity to Cs in the activity measurement mode ≥ 0,003 cps·kg/s(cps·l/s)·Bq Activity measurement sample density range 0.2 –...
- Page 94 Environmental protection of In the shipping package the instrument is resistant to: PM1401K-3 in shipping - temperatures from -50 to +50 °С; package - humidity up to 100 % at 40 °С; - shocks with 98 m/s...
- Page 96 © 2013-2017 Polimaster. 17.11...
Need help?
Do you have a question about the PM1401K-3 and is the answer not in the manual?
Questions and answers