
Related Manuals for Polimaster PM1710A


Summary of Contents for Polimaster PM1710A
- Page 1 HAND-HELD RADIATION MONITORS PM1710A PM1710C PM1710GNA PM1710GNC OPERATION MANUAL...
-
Page 2: Table Of Contents
CONTENTS 1 GENERAL INFORMATION ......................3 2 DELIVERY OPTIONS ........................4 3 SPECIFICATIONS ..........................5 4 GENERAL DESCRIPTION ........................ 7 4.1 DISPLAY AND CONTROL BUTTONS ................7 4.2 BATTERY INSTALLATION ....................7 4.3 CLIP INSTALLATION/REMOVAL.................. 9 4.4 TELESCOPIC TUBE. REMOTE VIBRATION ALARM ........... 9 5 OPERATION ............................ -
Page 3: General Information
Thank you for purchasing a Polimaster Hand-held radiation monitor. Before operating this unit, please review this guide thoroughly and retain it for future reference. PRECAUTIONS 1 Monitor is not a dosimeter. It is designed for detection of radiation sources and cannot be used as a personal safety device;... -
Page 4: Delivery Options
2 Delivery options Consult the table 2.1 to find out which modes and features are enabled in your particular Gamma or Gamma-Neutron Radiation Monitor. Enabled features are marked by ”1”. Monitor serial number: ___________________ Table 2.1 Quantity per model Description, type PM1710А... -
Page 5: Specifications
3.1 Detectors: - gamma CsI(Tl) scintillator - neutron 3.2 Gamma Sensitivity: - for PM1710A, PM1710C 5 cps/(µR/h) (500 cps/(µSv/h)) – for 5 cps/(µR/h) (500 cps/(µSv/h)) – for 2 cps/(µR/h) (200 cps/(µSv/h)) – for - for PM1710GNA, PM1710GNC 3 cps/(µR/h) (300 cps/(µSv/h)) – for 3 cps/(µR/h) (300 cps/(µSv/h)) –... - Page 6 - autocalibration on background level change; - user initiated 3.14 Alarm Types: - audio tone; - remote vibration (only PM1710A and PM1710GNA); - visual 3.15 PC Communications through IR channel at an up - reading of the history from monitor memory;...
-
Page 7: General Description
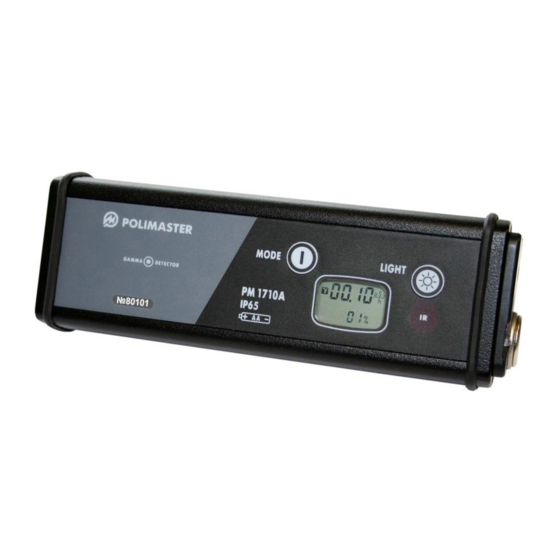
4 GENERAL DESCRIPTION PM1710 monitors belong to Polimaster’s new generation of extremely sensitive, small and power- saving, gamma and gamma-neutron radiation monitors. When ON, the monitor continuously monitors the environment for radiation and alerts the user with audio, visual, and/or vibrating alarms if a radiation source is detected. - Page 8 1 – MODE button: - Turns the monitor on; - Selects a operation mode; - Performs background recalibration; - Changes parameters in the Set mode. 2 – LIGHT button: - Switches on LCD light; - Enables the PC communication mode; - Changes parameters in the Set mode;...
-
Page 9: Clip Installation/Removal
To work with the telescopic tube (figure 4): Insert the connector (3), and then fix the monitor (PM1710A or PM1710GNA) on the telescopic tube with the help of a clip. If you want to use the remote vibration alarm (6), connect it to the connector... - Page 10 1 – PM1710A or PM1710GNA monitor; 2 – Battery cover; 3 – Telescopic tube cable with a monitor connector; 4 – Telescopic tube clutch used to attach a monitor using its clip; 5 – Telescopic tube latch; 6 – Remote vibration alarm;...
-
Page 11: Operation
5 OPERATION Attention! When using the monitor in ambient temperatures below minus 15 °С the normal operation of the monitor LCD is not guaranteed. In this case you can still use it by monitoring sound and vibration alarms. The LCD functioning will be restored after its returning to normal operation temperature. -
Page 12: Test Mode
5.2.1 Test mode The monitor enters this mode just after turned on. Before the beginning of the testing process the alarms (audio and/or vibration) are activated approximately for 1 s. All marks, segments will be indicated on the LCD. Then the LCD shows the firmware version (P-X.X) for several seconds. In the Test mode all the required tests are fulfilled. -
Page 13: Search Mode. Detection And Localization
The monitor is able to perform calibration automatically. It provides more convenient monitor usage and decreases false alarm probability when radiation background is changed. To use the autocalibration function, a user should activate this function by using Polimaster Software. 5.2.2.3 Alarms Alarm levels in the Search are derived from the ambient background. - Page 14 Overload indication: If the mean gamma channel count rate exceeds the upper limit of the indication range you will see "OL" message on the LCD If the mean neutron channel count rate exceeds the upper limit of the indication range you will see a blinking "999" message on the LCD (only for PM1710GNA and PM1710GNC) In this mode the monitor automatically compares the average count rate with the following...
-
Page 15: Der Indication Mode
When in the DER indication mode, the upper line of the LCD screen indicates the dose equivalent rate in µSv/h (µR/h), while the lower line indicates the mean square error of DER indication in percents (PM1710A, PM1710C). PM1710GNA and PM1710GNC monitors indicate an mean neutron count rate in the lower LCD line in this mode. -
Page 16: Set Mode
5.2.7.1 Setting the coefficient n of gamma channel If adjusting of this setting is allowed during the connection with the Polimaster PRD Software, you will be able to find it in the settings menu. To adjust it, make sure the monitor is in any of the operation modes, then press the MODE button and hold it for more than 5 seconds, “CAL”... - Page 17 (only for PM1710GNA and PM1710GNC) If adjusting of this setting is allowed during the connection with the Polimaster PRD Software, you will be able to find it in the settings menu. To adjust it, make sure the monitor is in any of the operation modes, then press the MODE button and hold it for more than 5 seconds, “CAL”...
-
Page 18: Pc Communication Mode. Monitor Parameters
To synchronize the time between the instrument and PC, simply connect the instrument to the PC via IrDA. Start the Polimaster software for the instrument. Read the history of the instrument and the time will automatically be synchronized after reading the history or reading the settings. -
Page 19: Maintenance
- to read following information from the monitor memory including its work history: 1) monitor serial number; 2) times of monitor turn on and off; 3) current gamma channel DER value in a user defined time period; 4) times and monitor readings in case of exceeding the gamma channel alarm threshold ; 5) times and monitor readings in case of exceeding the neutron channel alarm threshold (only for PM1710GNA and PM1710GNC) In settings of monitor/program... -
Page 20: Storage And Shipping
8 STORAGE AND SHIPPING 8.1 Storage When stored in a storage area the monitors must be in the manufacturer packing without batteries at ambient temperatures from minus15 to 50 °С and humidity up to 95 % at 35 °С. Storage duration should not exceed average monitor life time, 8 years. -
Page 21: Limited Warranty
Polimaster to return the Affected Products to Polimaster for repair or replacement. All Products so returned shall be shipped prepaid or otherwise delivered to Polimaster's facility or authorized service center. If Polimaster fails to repair or replace the Affected Products within a reasonable time after Purchaser has so returned them to Polimaster, Purchaser shall be entitled to repayment or credit of the original price of the defective or nonconforming Product as its exclusive further remedy. -
Page 22: Appendix А Monitor Operation Modes And Functions Order Chart
Appendix A (reference) Monitor operation modes and functions order chart Table A.1 Modes and functions Enabled - (V) Note Disabled - (-) ---------- Value Search mode (indication in "s ") The mode can be enabled autonomously or together with modes 2 or 3 DER indication mode (indication in µSv/h) The mode can be enabled autonomously or together with mode 1 DER indication mode (indication in µR/h)
Need help?
Do you have a question about the PM1710A and is the answer not in the manual?
Questions and answers