Table of Contents
Advertisement
Quick Links
Advertisement
Table of Contents

Subscribe to Our Youtube Channel
Related Manuals for Torque XFIB-104


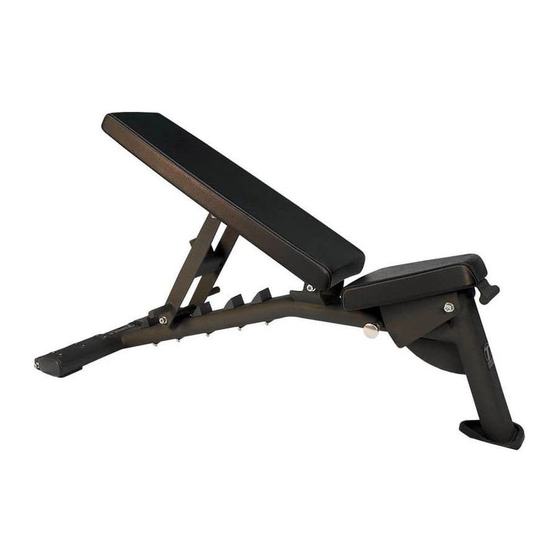
Summary of Contents for Torque XFIB-104
- Page 1 FLAT INCLINE BENCH ASSEMBLY GUIDE VERSION: XFIB-104 PART #: 5456801-B...
-
Page 2: Table Of Contents
TABLE OF CONTENTS Important safety instructions: • Important safety instructions for using equipment: Page 3 • Important safety instructions for assembling equipment: Page 3 • Obtaining service: Page 3 General Notes: • Unpacking equipment: Page 4 • Tools Required: Page 4 •... -
Page 3: Important Safety Instructions For Using Equipment
Do not disassemble, remove any parts or components or otherwise attempt to repair this product. DO NOT use product if product appears damaged. DO NOT attempt to fix a broken or jammed machine. Contact Torque Fitness Customer service at: 763-754-7533 (8:30 am - 5:00 pm CST). Failure to comply with these instructions will void any and all product warranties. -
Page 4: General Notes
If any items are missing, contact Torque Fitness • A 6" scale is provided at the bottom of Customer service at: 763-754-7533 (8:30 am - 5:00 pm •... -
Page 5: Parts List
ITEM NO. PART NO. DESCRIPTION QTY. 5456901 ASSY, BENCH 54519PA PTD ASSY, BENCH FRAME 54539PA PTD ASSY, BACK PAD SUPPORT 54541PA PTD ASSY, BACK PAD ADJUST 5454601 WLDMT, SEAT SUPPORT 5454901 PAD, TAPPERED SEAT 2001101 WASHER, FLAT 3/8 SAE ST ZN 2009404 BOLT, 3/8-16 X 1-1/4"... -
Page 6: Assembly Instructions: Pages
STEP 1 NOTE: Securely tighten all bolt connections in this step. - Page 7 STEP 2 Assembled View NOTE: Make sure spring pin is engaged in the slot of the seat support as shown. (See assembled view) NOTE Securely tighten all bolt connections in this step.
- Page 8 STEP 3 NOTE: Securely tighten all bolt connections in this step.
-
Page 9: Anchoring
STEP 4 (OPTIONAL) NOTE: Anchor hole NOTE: Remove guards to access anchor holes NOTE: If the bench is required to be anchored to the floor, use anchor holes in the bench as shown above. Consult a professional contractor for the actual anchoring of the bench. -
Page 10: Adjustment Instructions
FRAME: Wipe down with a damp rag. UPHOLSTERY: Wipe down and dry after each use. Clean and condition periodically. NOTE: For customer service contact Torque To adjust the seat pad down, TORQUE Fitness Customer service at: 763-754- pull out spring pin and allow 7533 (8:30 am - 5:00 pm CST).
Need help?
Do you have a question about the XFIB-104 and is the answer not in the manual?
Questions and answers