Table of Contents
Advertisement
Quick Links
Advertisement
Table of Contents

Subscribe to Our Youtube Channel
Related Manuals for CAME PB1100


Summary of Contents for CAME PB1100
- Page 1 SWING-DOOR 11 9 PM 7 5 E N OPERATOR Installation manual PB1100 English...
- Page 2 • Employ this product only for the use for which it was expressly made. Any of travel or suddenly stops, the photocells are working properly. This is the other use is dangerous. CAME S.p.A is not liable for any damage caused by only maintenance operation to do with the power on. Constantly clean the improper, wrongful and unreasonable use •...
- Page 3 ☞ This symbol shows which parts to tell users about. REFERENCE REGULATIONS CAME S.p.A. is certified for the: ISO 9001 quality and ISO 14001 environmental management systems. This product complies with the current regulations mentioned in the declaration of conformity.
-
Page 4: Description Of Parts
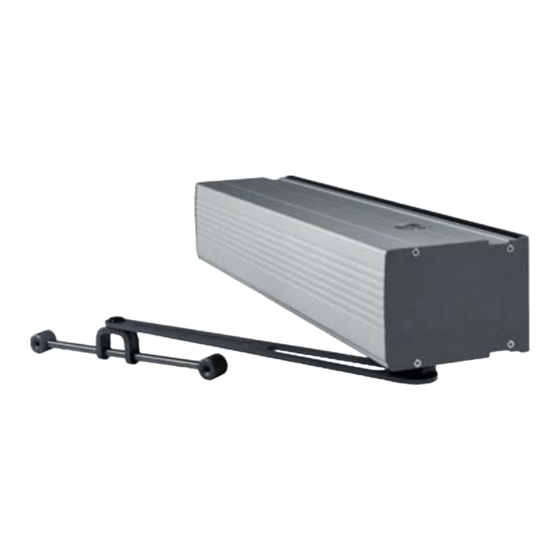
Dimensions Description of parts Gearmotor case Fastening base Front protective carter Side plates Transformer Control board Gearmotor Batteries (OPTIONAL) GENERAL INSTRUCTIONS FOR INSTALLING ⚠ Only skilled, qualified staff must install this product. Preliminary checks ⚠ Before beginning, do the following: •... -
Page 5: Tools And Materials
Cable types and minimum thicknesses Cable length Cable length Cable length Connection Cable type 1 < 10 m 10 < 20 m 20 < 30 m Control panel power supply 230 V AC 3G x 1.5 mm 3G x 2.5 mm 3G x 4 mm FROR CEI Photocell transmitters... - Page 6 Sliding arm PB1001, for pull-to-open doors For details on drilling and fastening the base, see the literature about the arm. up to 120° Articulated arm PB1002, for push-to-open doors For details on drilling and fastening the base, see the literature about the arm. up to 180°...
-
Page 7: Setting Up The Base
INSTALLATION ⚠ The following illustrations are mere examples that show the most common fitting. Consider that the space available for fitting the operator and accessories varies depending on where it is being installed. It is up to the fitter, therefore, to choose the most suitable solution. -
Page 8: Fastening The Operator
Fastening the operator After fastening the base to the wall, mount the case onto the base, while threading the cable into the corresponding holes. Mount the required arm. Refit the transformer; make the required connections and settings. -
Page 9: Main Components
ELECTRICAL CONNECTIONS AND PROGRAMMING Warning! Before working on the control panel, cut off the main current supply and, if present, remove any batteries. Control board power supply, control devices and accessories: 24 V. The features are set using the DIP switches, the adjustments using the trimmer. All connections are quick-fuse protected. -
Page 10: Power Supply
Power supply Power supply 230 V AC 50/60 Hz M - N Default gearmotor connection for the PB1001 blue arm. brown With the PB1002 invert cables M-N. Accessories 10 - 11 Accessories power-supply output 24 V AC. The connected accessories must not exceed 15 W overall. -
Page 11: Command And Control Devices
Command and control devices 1 - 2 (N.C.) connection for STOP button. This is for stopping the door while excluding automatic closing. To resume movement, use the control device. The contact is bridged. If unused, leave it bridged. 2 - R1 (N.O.) connection for outer OPENING sensor, which is excludable on the selector in EXIT mode. -
Page 12: Selecting Functions
Selecting functions FUSIBILE MOTORE FUSIBILE FUSIBILE - FORZA + ACCESSORI CENTRALINA 630 mA CHIUSURA + VEL. - + RALL. - + T.C.A. - QUADRO COMANDO APERTURA ZP10 Selector DIP-SWITCH Alarm See the PAIRED CONNECTION chapter. See the PAIRED CONNECTION chapter. Unused, keep the DIP switch on OFF Obstruction detection when gate leaves are at the end of their travel (it inhibits contacts 2-M, 2-R1 4 ON... - Page 13 Memorizing the door travel Warning: the PB1100 operator is set up for using the PB1001 slide arm; if using the PB1002 jointed arm, invert the motor cables. Power up the operator; the door will proceed at slowed- down speed until it closes ❶.
- Page 14 PAIRED CONNECTION With two PB1100 operators, fitted onto a two-leaved door. Definitions MASTER: operator on the door-leaf that opens first and closes second. SLAVE: operator on the door-leaf that opens second and closes first. The MASTER must be slower than the SLAVE because it must close second. This offsetting must be done by...
- Page 15 CAME S.p.A. employs a certified Environmental Management System at its premises, compliant with the UNI EN ISO 14001 environmental safeguard standard. Please always protect the environment. At CAME it is fundamental to our operating and market strategies. Simply follow these brief disposal guidelines:...
- Page 16 IT • Per ogni ulteriore informazione su azienda, prodotti e assistenza nella vostra lingua: EN • For any further information on company, products and assistance in your language: FR • Pour toute autre information sur la société, les produits et l’assistance dans votre langue : DE •...
Need help?
Do you have a question about the PB1100 and is the answer not in the manual?
Questions and answers