Table of Contents
Advertisement
Quick Links
Advertisement
Table of Contents

Subscribe to Our Youtube Channel
Summary of Contents for PerkinElmer 200 Series
- Page 1 Series 200 Oven Family User’s Manual...
- Page 2 The information contained in this document is subject to change without notice. Except as specifically set forth in its terms and conditions of sale, PerkinElmer makes no warranty of any kind with regard to this document, including, but not limited to, the implied warranties of merchantability and fitness for a particular purpose.
-
Page 3: Table Of Contents
Contents Safety and Regulatory Information Electromagnetic Compatibility (EMC).......... S-1 United States ................S-1 Addresses ..................S-1 Conventions used in this Manual..........S-2 Instrument Symbols and Warnings ..........S-2 Symbols ................... S-2 Warnings on the Oven ............S-4 Electrical Warnings ............... S-6 Quality Control/Good Laboratory Practices........ - Page 4 Contents Installing the Oven Prepare Your Laboratory............... 2-1 Required Air Quality .............. 2-1 Sufficient Electrical Power ............. 2-2 Space Requirements ............... 2-2 Solvents/Mobile Phase ............2-2 Unpack Your Series 200 Peltier Column Oven ......2-3 Electrical Requirements and Settings .......... 2-3 Oven Power Cord and Fuses ..........
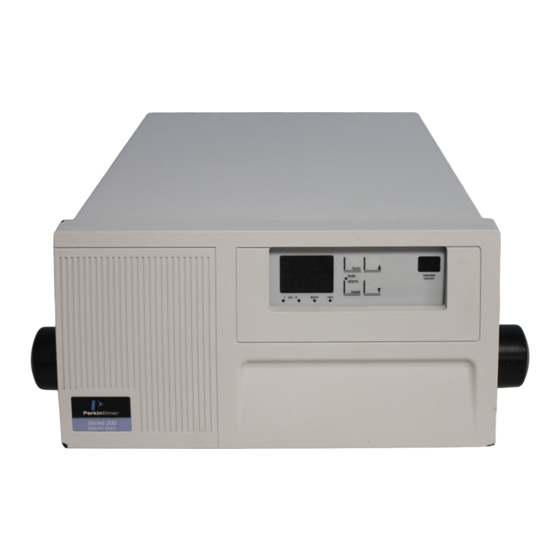
- Page 5 Illustrations Safety and Regulatory Information Figure S-1. Location of side panel warning labels on the Peltier column oven ..............S-4 Figure S-2. Location of rear panel warning labels on the Peltier column oven ..............S-5 Introduction Figure 1-1. Front View of the Series 200 Peltier column oven..1-3 Figure 1-2.
- Page 6 Illustrations Installing the Oven Figure 2-1. Rear panel of the oven ..........2-4 Figure 2-2. Removing and installing fuses ........2-5 Figure 2-3. AC outlet configurations..........2-6 Figure 2-4. Peltier Column Oven in a typical LC ssystem ....2-7 Using the Column Oven Figure 3-1.
-
Page 7: Safety And Regulatory Information
Shelton, Connecticut 06484-4794 Tel: (800) 762-4000 Fax: (203) 762-6000 Supplies, accessories, and replacement parts can be ordered directly from PerkinElmer using the eight-digit part numbers provided in the manual. To place an order or ask for information, call your local PerkinElmer representative. -
Page 8: Conventions Used In This Manual
Safety and Regulatory Information Conventions used in this Manual Conventions used in this Manual The following graphic symbols and special text formats are used in this manual to identify important safety information: A warning indicates an operation that could cause personal injury if precautions are not followed. - Page 9 Safety and Regulatory Information Instrument Symbols and Warnings This symbol indicates the danger of burns if precautions are not followed due to the presence of heat in this instrument area. This may also indicate a hot surface that can be easily touched. AVERTISSEMENT.
-
Page 10: Warnings On The Oven
Safety and Regulatory Information Instrument Symbols and Warnings Warnings on the Oven The following warning labels are affixed to the side and rear panels of the column oven: See Figures S-1 and S-2. Figure S-1. Location of side panel warning labels on the Series 200 Peltier Column Oven. - Page 11 Safety and Regulatory Information Instrument Symbols and Warnings Figure S-2. Location of the rear panel warning labels on the Series 200 Peltier Column Oven.
-
Page 12: Electrical Warnings
Electrical Hazard: Do not make adjustments, replacements or repairs to this instrument except as described in the User Documentation. Only a PerkinElmer service representative or similarly trained and authorized person should service the instrument. Electrical Hazard: Use only fuses of the specified type... -
Page 13: Quality Control/Good Laboratory Practices
To maintain functional performance, PerkinElmer recommends a yearly Instrument Performance Verification (IPV) of the Series 200 Peltier Column Oven by a PerkinElmer Service Engineer to ensure its operation within published specifications. These tests consist of measuring the most important Peltier Column Oven characteristics, such as retention time repeatability. -
Page 14: Hazardous Chemicals
Safety and Regulatory Information Hazardous Chemicals Hazardous Chemicals Before using mobile phase solvents, you should be thoroughly familiar with all hazards and safe handling practices. Observe the solvent manufacturer’s recommendations for use, storage, and disposal. These recommendations are normally provided in the material safety data sheets (MSDS) supplied with the solvents. -
Page 15: Temperature, Humidity And Environment
Safety and Regulatory Information Temperature, Humidity and Environment Temperature, Humidity and Environment This instrument is designed for indoor use only. This instrument is not designed for operation in an explosive environment. Safe Operation This instrument will operate safely between +5°C and +40°C (40°F and 104°F) with an ambient relative humidity of between 20 and 80% noncondensing Installation Category... -
Page 17: Introduction
Introduction About the Manual................... 1-1 Chapter Content ..................1-1 Introducing the Series 200 Peltier Column Oven ......... 1-2 About the Oven Controls, Indicators, and Connections ......1-5 Warranty Exclusions and Limitations ............1-7 Maintenance ....................1-7 Warnings and Precautions................1-7 Solvents..................... -
Page 19: About The Manual
Introduction About the Manual This manual contains important information regarding potential hazards that may arise during the operation of the Peltier column oven. All references, except where indicated in this manual, that refer to the Series 200 Peltier Column Oven also apply to the Series 200 Column Oven. It is essential that the Safety and Regulatory Information preceding this chapter be read and thoroughly understood by all potential users of the oven. -
Page 20: Introducing The Series 200 Peltier Column Oven
1-2 Introduction Introducing the Series 200 Peltier Column Oven If you require an introduction to these concepts, the following book is an excellent reference: Practical Liquid Chromatography -- An Introduction by R.W. Yost, L.S. Ettre, and R.D. Conlon, published by The Perkin-Elmer Corporation (1980), P/N 0993-9656. - Page 21 Introduction Introducing the Series 200 Peltier Column Oven You can install your column by simply removing the lower part of the front panel (which is held onto the oven assembly only by magnets), connect the fittings to the column inlet and outlet, and insert the column into the holders to secure it in place.
- Page 22 1-4 Introduction Introducing the Series 200 Peltier Column Oven The column chamber contains a drain line that directs solvent leaks away from the electronics. Connect drain tubing to the drain fitting located under the left-front panel of the Peltier Column Oven (see Figure 1-2), and directs the tubing to the system waste vessel as shown in Figure 2-4.
-
Page 23: About The Oven Controls, Indicators, And Connections
Introduction Introducing the Series 200 Peltier Column Oven • key for Service use only. • key resets solvent leak alarm. Figure 1-3. Peltier Column Oven controller. About the Oven Controls, Indicators, and Connections On the Front Panel • Oven Controller: (see Figures 1-1 and 1-3). Used to increase and decrease the oven temperature. - Page 24 1-6 Introduction Introducing the Series 200 Peltier Column Oven On the Back Panel Figure 1-4. Back panel of the Peltier Column Oven. • Power (On/Off) switch: A rocker-type switch located above the power cord connector. It supplies AC power to the Peltier Column Oven. •...
-
Page 25: Warranty Exclusions And Limitations
Introduction Warranty Exclusions and Limitations Warranty Exclusions and Limitations The Limited Warranty set forth on PerkinElmer's ORDERING INFORMATION form applies to the Series 200 Peltier Column Oven. Among those items excluded from the warranty under Part (B) "EXCLUSIONS AND LIMITATIONS" are: •... -
Page 26: Buffers
PEEK, or glass. Some of these materials are extremely sensitive to acid chlorides. If you have questions about your mobile phase, contact a PerkinElmer representative. Table 1-1. Solvents Which May Corrode the Series 200 Peltier Column Oven Aqua Regia (80% HCl, 20% HNO 3 ) -
Page 27: Pressure Buildup
Introduction Warnings and Precautions Pressure Buildup Over time, you may notice a gradual increase in the system operating pressure. If you observe pressure readings greater than 3.45 MPa (500 psi) above the normal operating pressure of your analysis, check the following items: If you are injecting “clean”... -
Page 28: Specifications
1-10 Introduction Specifications Specifications Table 1-2 – Series 200 Peltier Column Oven, Oven/Selector Specifications Specification Description Column Capacity Up to three 3/8-in. × 30-cm columns or three ¼-in × 30-cm columns Operating Range 5°C to 90°C (39°F to 194°F) Recommended Flow Range Up to 5 mL/minute ±... - Page 29 Introduction Specifications 1-11 Table 1-3 – Series 200 Column Oven Specifications Specification Description Column Capacity Up to three 3/8-in. × 30-cm columns or three ¼-in × 30-cm columns Operating Range 30°C to 90°C (87°F to 194°F) Recommended Flow Range Up to 5 mL/minute Temperature Accuracy ±...
- Page 30 1-12 Introduction Specifications...
- Page 31 Installing the Oven Prepare Your Laboratory ................2-1 Required Air Quality.................2-1 Sufficient Electrical Power................2-2 Space Requirements ..................2-2 Solvents/Mobile Phase................2-2 Unpack Your Series 200 Peltier Column Oven ..........2-3 Electrical Requirements and Settings ............2-3 Oven Power Cord and Fuses ..............2-4 AC Line Cord .....................2-5 Connect the Tubing..................2-6 Turn-On the Oven ...................2-7...
-
Page 33: Prepare Your Laboratory
Installing the Oven This chapter describes how to install your Series 200 Peltier Column Oven. The topics covered in this chapter are: Prepare your laboratory • Unpack your oven • Electrical requirements and settings • Connect the tubing • Turn on the oven •... -
Page 34: Sufficient Electrical Power
2-2 Installing the Oven Prepare Your Laboratory Make sure that your laboratory environment consists of the following temperature and humidity levels: • Ambient temperature between 10 C and 35°C (50°F and 95°F) ° • Constant relative humidity between 20% and 80% (without condensation) Use care when working with hazardous solvents, or solvents that produce hazardous by-products. -
Page 35: Unpack Your Series 200 Peltier Column Oven
Carefully unpack the Series 200 Peltier Column Oven. Then check for obvious signs of damage that may have occurred during shipment. Immediately report any damage or missing items to the shipping carrier and PerkinElmer. A Start-Up Kit is supplied with the oven. Use Table 2-1 to check the Start- Up Kit parts. -
Page 36: Oven Power Cord And Fuses
2-4 Installing the Oven Electrical Requirements and Settings Oven Power Cord and Fuses The AC input power module is located on the left side of the back panel and contains the on/off switch and system fuses. Figure 2-1. Rear panel of the oven. The unit is shipped with two 1.0 amp fuses installed for 230-Volt operation. -
Page 37: Ac Line Cord
Installing the Oven Electrical Requirements and Settings Figure 2-2. Removing and installing fuses. AC Line Cord Do not disconnect or defeat the safety ground on the power cord. Ground is necessary for safe operation of the oven and proper functioning of the electronic circuitry. -
Page 38: Connect The Tubing
2-6 Installing the Oven Connect the Tubing Figure 2-3. AC Outlet configurations. Connect the Tubing 1. Use standard 1/16-in. stainless steel or titanium tubing, and standard 1/16-in. nuts and ferrules for all tubing connections you make to the column oven inlet and to the column (see Figure 2-4). PEEK tubing (with fingertight connections) can also be Note used. -
Page 39: Turn-On The Oven
Installing the Oven Turn on the Oven Turn on the Oven After installing the Peltier Column Oven, read Chapter 3 "Using the Column Oven," before turning it on. Figure 2-4. Series 200 Peltier Column Oven in a typical LC system. - Page 40 2-8 Installing the Oven Turn on the Oven...
-
Page 41: Using The Column Oven
Using the Column Oven Operating Overview ..................3-1 Operating Summary ..................3-2 Shutting Down the System................3-3... -
Page 43: Operating Overview
Using the Column Oven In this chapter we explain how to routinely operate the Series 200 Peltier Column Oven. Before operating the oven, carefully read Chapter 2, "Installation," and make a final check of the column connections to and from the oven. We have included a simple paragraph before the operating procedure that explains how the oven works. -
Page 44: Operating Summary
3-2 Using the Column Oven Operating Summary Operating Summary Make sure that the oven AC line cord is connected to the proper line voltage. See the paragraphs "Electrical Requirements" and "Setting the Operating Voltage" in Chapter 2. After switching on the oven power, proceed as follows: 1. -
Page 45: Shutting Down The System
Using the Column Oven Shutting Down the System Shutting Down the System When shutting down the system overnight or for the weekend, observe all precautions pertaining to hazardous solvents and/or those solvents which form harmful deposits or by-products. 1. Remove harmful mobile phases from the LC system. 2. - Page 46 3-4 Using the Column Oven Shutting Down the System...
-
Page 47: Appendix
Appendix Series 200 Accessory Control Installation Guide... -
Page 49: Series 200 Accessory Control Installation Guide
PerkinElmer Turbochrom 6.1.2 or TotalChrom 6.2 Workstation (WS) or Client/Server (CS) software 1.2 Hardware Requirements • PerkinElmer Series 200 Peltier Column Oven (Part number: N260-1580) or Series 200 Accessory Controller • Rheodyne LabPRO 6-Column Selector Rheodyne Part numbers: PR501-104-01 (Stainless Steel) or PR551-104-01 (PEEK);... - Page 50 2.1 Column Oven Install the column oven, including power cable (see Installation section in the PerkinElmer Instruments Series 200 Peltier Column Oven (or Series 200 Accessory Controller) User’s Guide. If the column oven is connected via a serial port on the local computer, install the RS- 232 modem cable supplied with the oven, connecting the oven to the computer.
- Page 51 Page 3 of 6 2.3 Terminal Server Connect the Terminal Server to the network and configure the Terminal Server (see Lantronix Terminal Server Installation Guide). It is encouraged to check Terminal Server port parameters for Series 200 Accessory Control. These parameters can be accessed by Telnetting to the terminal server and typing "show ports x”, “x”...
- Page 52 BACKUP folder will be created in the appropriate destination folder. 9) On the Select Program Manager Group screen a program manager group is entered by default (PerkinElmer\Series 200 Accessory Control). If desired enter another program manager group. Note: With the selected program manager group, on NT any user has access to this program.
- Page 53 In order to have access to the Series 200 Accessory Control software from the Turbochrom / TotalChrom Navigator’s Apps menu the following changes in the System Configuration are required. For every “Job Type” using PerkinElmer Series 200 Accessory Control software the following procedures have to be completed under Turbochrom’s / TotalChrom’s SysConfig.
- Page 54 1) From the Windows, select Start > Programs > PerkinElmer > Series 200 Accessory Control > Series 200 Accessory Control Manager. (if this structure was customized during installation, please follow customized structure.
- Page 55 To place an order for supplies and many replacement parts, request a free e-ssentials catalog or ask for information, visit our websiteat www.perkinelmer.com The most up-to-date information on part numbers, product brochures, systems modules, spare parts, and application notes are in the PerkinElmer website. Telephone: •...
Need help?
Do you have a question about the 200 Series and is the answer not in the manual?
Questions and answers