Table of Contents
Advertisement
User Manual
Color Video Door Phone CDV-43Y
• Thank you for purchasing COMMAX products.
• Thank you for purchasing COMMAX products.
• Please carefully read this User's Guide (in particular, precautions for safety) before using a product and follow
• Please carefully read this User's Guide (in particular, precautions for safety) before using a product and follow
instructions to use a product exactly.
instructions to use a product exactly.
• The company is not responsible for any safety accidents caused by abnormal operation of the product.
• The company is not responsible for any safety accidents caused by abnormal operation of the product.
Advertisement
Table of Contents

Related Manuals for Commax CDV-43Y


Summary of Contents for Commax CDV-43Y
- Page 1 User Manual Color Video Door Phone CDV-43Y • Thank you for purchasing COMMAX products. • Thank you for purchasing COMMAX products. • Please carefully read this User’s Guide (in particular, precautions for safety) before using a product and follow • Please carefully read this User’s Guide (in particular, precautions for safety) before using a product and follow instructions to use a product exactly.
-
Page 2: Table Of Contents
Greetings ● Thank you for choosing COMMAX. ● Please read this manual carefully before you use the product. Table of contents Greetings······················ 2 1.·Warnings·and·caution· · ············· 2 2.·Parts·Names··················· 4 3.·How·to·use·this·product············· 5 4.·Monitoring···················· 6 5.·Settings· ···················· 6 6.·RESET····················· · 8 7.·Installation···················... - Page 3 Warning & Caution Please don’ t disassemble, If an abnormal sound, burning Please don’t insert any When cleaning the product, repair or rebuild this product smell or smoke is coming out metallic or burnable materials please rub it with a soft and arbitrarily (please contact the of the product, please plug out into the ventilation hole.
-
Page 4: Parts Names
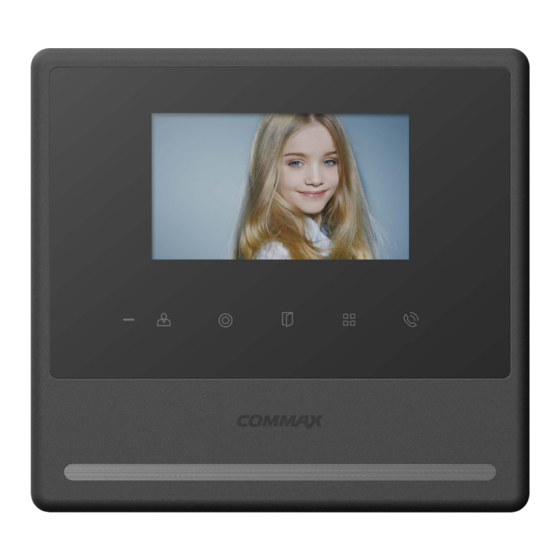
2. Parts Names PART PART PART MONITOR BUTTON / POWER SWITCH TALK BUTTON DOWN BUTTON INTERPHONE BUTTON / POWER LED SPEAKER SELECT BUTTON DOOR RELEASE TERMINAL FOR MICROPHONE BUTTON / UP BUTTON EXTERIOR MONITOR(LCD) MENU BUTTON 1. POWER SWITCH 2. POWER LED : show blue light when the monitor is turned on, no light when off 3. -
Page 5: How To Use This Product
3. How to use this product 1. Call from the visitor ① When the visitor calls from the entrance(door camera), the calling sound rings and the image of the visitor is shown on LCD screen. ② If you press the talk button, you can talk with door camera. By pressing the door release button, door will be released. -
Page 6: Monitoring
4. Monitoring : function to see the image of visitor in the entrance. (stand-by mode) Operation - By pressing the MONITOR button repeatedly, the monitor will work as following in order. → → Camera1 Camera2 OFF .... 5. Settings * Product settings need the following 4 buttons on the product. * Start Menu / Exit : MENU button * Select and in-put : SELECT button (INTERPHONE button) * Move up / Move right: UP button (DOOR RELEASE button) - Page 7 5-2. UTILITY(additional function) Press the MENU button and access to UTILITY and enter the menu by pressing the SELECT button. (1) SPEAKER-VOLUME: setting receiver sound level while you are talking to the door camera. * How to adjust ① Move to SPEAKER-VOLUME icon with UP /DOWN button in UTILITY Menu. ②...
-
Page 8: Reset
6. RESET : Initializing Keep pushing interphone and door release button for 3 seconds. (Screen setting and Call volume will be initialized). Caution : If initialization is activated, all data including screen setting and Call volume will be initialized . (Screen setting and Call volume) 7. -
Page 9: Wiring
8. Wiring The wiring of this equipment is as follows. * Camera connector polarity 1. Red : Voice 2. Blue : GND 3. Yellow : Power(+12V) 4. White : Video... - Page 10 ▣ Wiring precautions Each device should be connected by separated cables. If you use UTP CABLE[CAT.5] for Door and Interphone, 2 lines of UTP cable are required. ▣ DOOR Camera Wiring If you use UTP CABLE[CAT.5], Connect the rest 4 lines to GND after connecting 4 lines between monitor and camera.
-
Page 11: Package Contents
9. Package Contents 10. Specification SPEC CDV- 43Y Door camera 4wires (Polarity), Wiring interphone 4wires (polarity) Rating Voltage 100V-240V~, 50/60Hz (FREE VOLTAGE) Stand-by : 3W Power consumption Maximum: 12 W Transmission way HANDS FREE (Voice switch circuit) Screen size 4.3" TFT-DIGITAL LCD Door : Electronic chime (Sol Mi Do), Ringtone Interphone : Beep... - Page 12 513-11, Sangdaewon-dong, Jungwon-gu, Seongnam-si, Gyeonggi-do, Korea Int’l Business Dept. Tel. : +82-31-7393-540~550 Fax. : +82-31-745-21 33 Web site : www.commax.com Edited.2021.03.22 Printed In Korea / 2021. 03.105...
Need help?
Do you have a question about the CDV-43Y and is the answer not in the manual?
Questions and answers
Please send me the door rlease wiring with power suply