
Subscribe to Our Youtube Channel
Related Manuals for Jaypro Sports A12-568


Summary of Contents for Jaypro Sports A12-568
- Page 1 -- FBSC-120 -- (ECONOMY FOOTBALL / SOCCER GOAL) Installation Instructions Call Jaypro Sports Equipment at 1-800-243-0533 during regular business hours for technical support. www.jaypro.com 1/17 Page 1 of 14...
- Page 2 JAYPRO SPORTS ECONOMY FOOTBALL / SOCCER GOAL ITEM IMAGE DESCRIPTION UPRIGHT UPRIGHT BACKING PLATE 2” x 2” BLACK SQUARE TUBE CAP 2” x 4” BLACK SQUARE TUBE CAP FOOTBALL UPRIGHT LADDER FRAME 1/2”-13 HEX NUT ECONOMY FOOTBALL / SOCCER GOAL PARTS LIST CONTINUE NEXT PAGE...
- Page 3 1/2” SPLIT LOCK WASHER 1/2” FLAT WASHER 1/2”-13 x 6” HEX HD CAP SCREW, ZP 1/2”-13 x 5 1/2” HEX HD CAP SC, ZP 1/2"-13 x 2” HX HD CAP SC, 3/8”-16 x 3” HEX HEAD CAP SCREW ZP 3/8” SAE FLAT WASHER, 3/8”-16 THIN NYLON LOCK NUT NTE, ZP NET CLIPS w/ SELF...
- Page 4 LOCK NUT NTE, ZP 3/8" SAE FLAT WASHER, ZP 3/8"-16 x 3" HEX HEAD CAP SCREW ZP Call Jaypro Sports Equipment at 1-800-243-0533 during regular business hours for technical support. www.jaypro.com MODEL #: FBSC-EBS EUROPEAN BACKSTAYS: Removable backstays are made of 1.66" OD galvanized steel tubing.
- Page 5 3/8"-16 THIN NYLON LOCK NUT NTE, ZP 3/8" SAE FLAT WASHER, ZP GROUND STAKE Call Jaypro Sports Equipment at 1-800-243-0533 during regular business hours for technical support. www.jaypro.com MODEL #: FBSC-FBS FULL BACKSTAYS: Removable backstays are made of 1.66" OD galvanized steel tubing.
-
Page 6: Tools Required
3) USE OF THIS EQUIPMENT OTHER THAN INTENDED, MAY BE HAZARDOUS. 4) ALTERATION OR MODIFICATION OF THIS EQUIPMENT MAY BE HAZARDOUS AND RESULT IN INJURY. FOR REPAIR OR REPLACEMENT, CONTACT YOUR DEALER OR JAYPRO SPORTS. ASSEMBLY INSTRUCTIONS TOOLS REQUIRED: (1) 9/16” Socket Wrench and Box Wrench (1) 3/4”... - Page 7 Site prep: 1. Determine the proper location for the goal uprights on the playing field. The spacing between uprights is 24’-4” center to center. Dig the footing holes to the dimensions as shown on the illustration below. These are minimum suggested dimensions for average soil conditions.
- Page 8 Soccer Net Money Clip installation: (Nets sold separately) 1. Drill pilot holes for money clip if using soccer net with football/soccer goal frame. 2. Layout ladder frame and determined the orientation before drilling holes on one side only. Holes are space at 14” on center, expert for ends. Same goes for the upright. 1/17 Page 8 of 14...
- Page 9 1/17 Page 9 of 14...
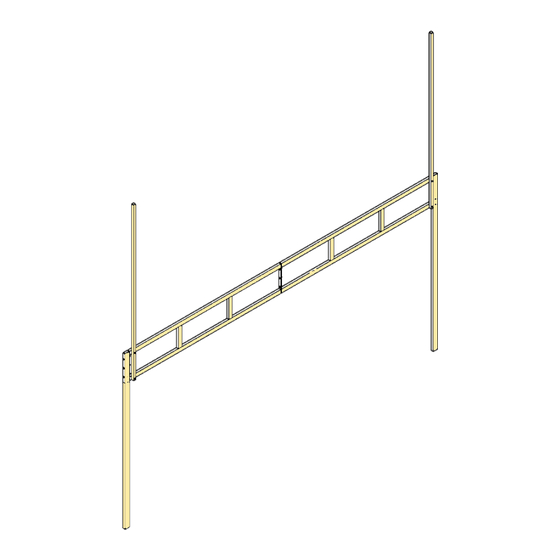
- Page 10 Corner goal frame installation: 1. Use 6” long hex head screw thru upright backing plate, upright and ladder frame. Make sure your ladder frame matches the image shown below. 1/17 Page 10 of 14...
- Page 11 Ladder frame installation: 1. Bridge the two ladder frame with 2” long hex head screw, as shown below. Football upright installation: 1. Bridge the two ladder frame with 2” long hex head screw, as shown below. FRONT OF GOAL 1/17 Page 11 of 14...
- Page 12 European backstay installation: 1. Drill two holes for hardware on each end of goal, as shown. Two Holes @ 9/16” Drill Bit 1/17 Page 12 of 14...
- Page 13 Standard backstay installation: 1. Reuse hardware, as shown. 1/17 Page 13 of 14...
- Page 14 Final Adjustments: (1) Checks to make sure the soccer goal frame is properly aligned and square. Securely tightened all button head and hex head hardware. (2) With goal fully assembled attach the net using the “Money Clip” net attachment system. Use a step ladder to attach the net to the crossbar. 1/17 Page 14 of 14...
Need help?
Do you have a question about the A12-568 and is the answer not in the manual?
Questions and answers