
Subscribe to Our Youtube Channel
Related Manuals for Jaypro Sports Series FHG-2AL


Summary of Contents for Jaypro Sports Series FHG-2AL
- Page 1 -- FHG-2AL -- (Formally: OFHG-7124) OFFICIAL FIELD HOCKEY GOAL Installation Instructions Call Jaypro Sports Equipment at 1-800-243-0533 during regular business hours for technical support. www.jaypro.com Rev-A Page 1 of 8...
- Page 2 ITEM IMAGE DESCRIPTION TOP FRONT CROSSBAR P/N: FHG-2AL-1XB RIGHT SIDE FRAME P/N: FHG-2AL-1R LEFT SIDE FRAME P/N: FHG-2AL-1L BOTTOM REAR CROSSBAR P/N: FHG-1XB-1 TOP REAR CROSSBAR REAR FOOT BOARD x 48 1/8" LONG P/N: FHG-16-1 SIDE FOOT BOARD x 45 3/4" LONG P/N: FHG-16-2 5/16"-18 x 2 1/2"...
- Page 3 HAZARDOUS. 4) ALTERATION OR MODIFICATION OF THIS EQUIPMENT MAY BE HAZARDOUS AND RESULT IN INJURY. 5) FOR REPAIR OR REPLACEMENT PARTS, CONTACT YOUR DEALER OR JAYPRO SPORTS. Tools Require: Rubber Mallet 1/2" Socket Wrench or Box Wrench 3/16" Allen Wrench o Unpack all parts and hardware, and check against the parts list to ensure that all items have been included.
- Page 4 ASSEMBLY (REQUIRES 2 PEOPLE): 1) Lay parts out on clean dry flat surface. NOTE: There is a left and right side frame, distinguished by the offset to accommodate the Foot Boards. Identify each frame and install keeping the offset to the outside of the goal. 2) Assemble both side frames onto the Top Crossbar, as shown in Figure 1.
- Page 5 NOTE: LARGE HOLE FOR WHEEL KIT 5/16” NYLON LOCK NUT 5/16” WASHER 5/16”-18 x 2 1/2” BUTTON HEAD SCREW BOTTOM CROSSBARS 5/16”-18 x 2 1/2” BUTTON HEAD SCREW 5/16” WASHER 5/16” NYLON LOCK NUT Figure 2a Rev-A Page 5 of 8...
- Page 6 3/8” FLAT WASHER 3/8” LOCK WASHER 3/8”-16x 2-1/2” HEX BOLT TOP REAR CROSSBAR Figure 2b (Flip 180°) Note: Be careful not to cross-thread the nut or bolt when installing the top rear crossbar. Lay goal on its back and place a 2” x 4” block underneath far end of the crossbar. Rev-A Page 6 of 8...
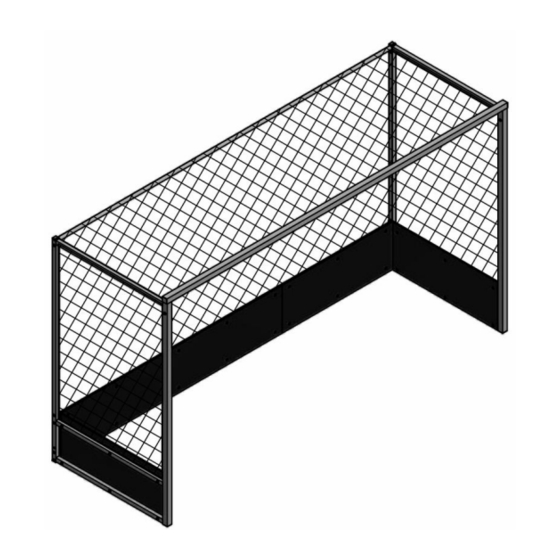
- Page 7 REAR FOOT BOARD 5/16” NYLON LOCK NUT SIDE FOOT BOARD 5/16” WASHER 5/16” WASHER SIDE FOOT BOARD 5/16”-18 x 2 1/2” BUTTON HEAD SCREW 7) Stand the goal up and install the Foot Boards. Install the Rear Boards first. 8) Drape the net over the goal and secure net to the goal using the net clips & screws. Note the top corner of net has a label.
- Page 8 Note: Tighten the screw stud snugly, but do not overtighten it. This may strip the treads in the snug plug. TOP CROSSBAR / UPRIGHT NET TIE CLIP 5/16” SNAP PLUG P/N: HM5076 P/N: RP5010 #8 x 3/4” SCREW P/N: HS5031 SNT-180 Net Clip Kit Bag Contains 82 Pieces Rev-A...
Need help?
Do you have a question about the Series FHG-2AL and is the answer not in the manual?
Questions and answers