
Related Manuals for Jaypro Sports SP4


Summary of Contents for Jaypro Sports SP4
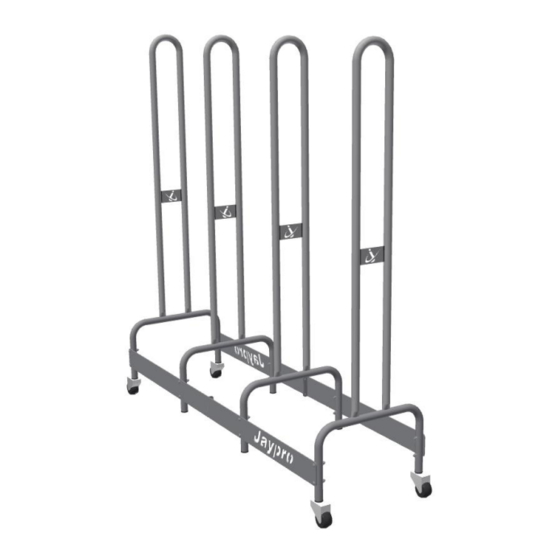
- Page 1 -- SP4 -- (SHOULDER PAD) Installation Instructions Call Jaypro Sports Equipment at 1-800-243-0533 during regular business hours for technical support. www.jaypro.com Rev-B Page 1 of 7...
- Page 2 PARTS LIST (QTY: SINGLE UNIT) ITEM IMAGE DESCRIPTION BOTTOM UPRIGHT (w/ WHEEL MOUNTS) BOTTOM UPRIGHT TOP UPRIGHT SIDE PLATE 1 SIDE PLATE 2 (PLATE w/ LOGO CUTOUT) WHEEL (IMAGE MAY DIFFER FROM WHAT’S SHOWN) #8 x 12” PAN HEAD PHILIP SCREW 5/16”-18 x 2”...
- Page 3 3) USE OF THIS EQUIPMENT OTHER THAN INTENDED, MAY BE HAZARDOUS. 4) ALTERATION OR MODIFICATION OF THIS EQUIPMENT MAY BE HAZARDOUS AND RESULT IN INJURY. FOR REPAIR OR REPLACEMENT, CONTACT YOUR DEALER OR JAYPRO SPORTS. Tools Require: Allen Wench Set 1/2" Socket or Adjustable Wench...
- Page 4 I. Assembly One Half: TOP UPRIGHT #8 x 12” PAN HEAD PHILIP SCREW OUTSIDE UPRIGHT INSIDE UPRIGHT (LOGO TO FACE OUTWARD) (LOGO TO FACE OUTWARD) SIDE PLATE 2 SIDE PLATE 1 (w/ LOGO CUTOUT) (FLANGE) BOTTOM UPRIGHT (w/ WHEEL MOUNTS) 5/16”-18 x 2”...
- Page 5 Figure 3 1) Assemble side plate 1 and side plate 2 onto two uprights in place using 5/16”-18 x 2” long button head screws (as shown in Figure 1). Ensure that both upright logo faces the same direction and both side plate flanges are on the same side. 2) Using 5/16”-18 thin nylon lock nut.
- Page 6 II. Assemble Both Halves: Figure 4 5/16”-18 THIN NYLON LOCK NUT SIDE PLATE 5/16”-18 x 1” LONG BUTTON HEAD SCREW Figure 5 1) Orientate both halves of cart back to back (Figure 4) and line up the holes in the side plate flange.
- Page 7 III. Install Wheels: WHEEL OUTSIDE UPRIGHT (w/ WHEEL MOUNTS) Figure 6 1) Carefully lay the entire frame onto its side. 2) Thread four wheels by hand onto the outside uprights. Please note only two of the uprights accept wheels. Rev-B Page 7 of 7...
Need help?
Do you have a question about the SP4 and is the answer not in the manual?
Questions and answers