Table of Contents
Advertisement
Quick Links
Advertisement
Table of Contents

Related Manuals for Intermec ColorCoder 901


Summary of Contents for Intermec ColorCoder 901
- Page 1 Installation Guide P/N 068748-004 Intermec Ethernet Adapter...
- Page 2 U.S. media supplies ordering information: 1.800.227.9947 Canadian service and technical support: 1.800.688.7043 Canadian media supplies ordering information: 1.800.268.6936 Outside U.S. and Canada: Contact your local Intermec service supplier. The information contained herein is proprietary and is provided solely for the purpose of allowing customers to operate and/or service...
-
Page 3: Table Of Contents
Contents Overview of the Ethernet Adapter 5 Connecting the External Ethernet Adapter to Your Printer 7 Downloading the IP Address 9 Installing for a Macintosh Network 11 Installing for a NetWare Network 12 Using NDPS or AXIS NetPilot to Install the... -
Page 5: Overview Of The Ethernet Adapter
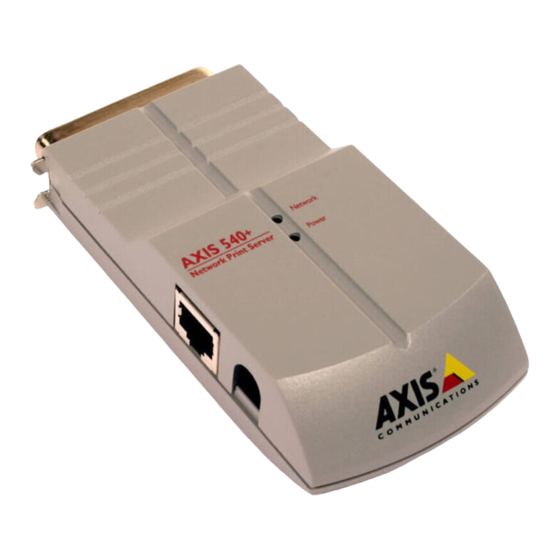
Overview of the Ethernet Adapter You can use three options to connect your Intermec printer to an Ethernet network: The external Ethernet adapter, Part No. 068788, which is a plug-in network adapter. The internal Ethernet adapters, Part Nos. 068789 and 069227, which are installed in your printer. - Page 6 Use the following illustrations to familiarize yourself with the external or internal Ethernet adapter. External Ethernet Adapter Parallel port connector 10BaseT connector External power supply connector Internal Ethernet Adapter AXISI.002 Test button Network Power AXISI.001 Network Power Test button 10BaseT connector...
-
Page 7: Connecting The External Ethernet Adapter To Your Printer
Connecting the External Ethernet Adapter to Your Printer Although you can connect the external Ethernet adapter to several different Intermec printers, the illustrations in the following procedure use the 7421. To connect the Ethernet adapter 1. Note the serial number found on the underside of the Ethernet adapter. - Page 8 6. Switch on the printer. The network LED flashes. Now you can install the printer and adapter into your network. To test the connection with firmware version 5.59 or higher Press the Test button. The printer prints a test label.
-
Page 9: Downloading The Ip Address
This section explains how to use ARP (address resolution protocol) to download the IP address to the Ethernet adapter. For other methods of downloading the IP address, see the Intermec Ethernet Adapter User’s Manual (Part No. 068749). Note: Do not use the example IP address when installing your Ethernet adapter. - Page 10 Example: arp -s 192.168.3.191 00-40-8c-10-00-86 ping 192.168.3.191 arp -d 192.168.3.191 The host will return 192.168.3.191 ... or a Reply from similar message. This reply indicates that the address has been set and communications established. To download the IP address in a UNIX environment Type the following command: arp -s host_name nn:nn:nn:nn:nn:nn temp ping host_name...
-
Page 11: Installing For A Macintosh Network
AX540B35_LPT1 5. Click the close box. The AppleTalk Configuration is now complete. Repeat this procedure for each Macintosh that will print to the Intermec printer. To choose a printer to print 1. Select Chooser in the Apple menu. 2. Click on your printer driver icon. -
Page 12: Installing For A Netware Network
2. Connect the Ethernet adapter to the NetWare network, if it is not already connected. The HP Gateway automatically creates a public access printer. Any user can access this printer. To install an Ethernet adapter in a NetWare network using NDPS (controlled access printer) 1. -
Page 13: Setting Up Print Queues And Advanced Operating Parameters
AXIS NetPilot Note: AXIS NetPilot software requires a Windows platform that uses NetWare or NetBIOS/NetBEUI. 1. Load the AXIS NetPilot software. For help, see the Intermec Ethernet Adapter User’s Manual. 2. After loading the software, double-click on the AXIS NetPilot icon. -
Page 14: Installing For A Unix Network
Windows application, such as Microsoft Word. When you select Print from the File menu, make sure that your Intermec printer is selected as the Active Printer. Installing for a UNIX Network Note: You must have UNIX root privileges for this configuration procedure. - Page 15 To set the IP address, you can use the dynamic host configuration protocol (DHCP), reverse address resolution protocol (RARP), or bootstrap protocol (BOOTP) commands. For help, see the Intermec Ethernet Adapter User’s Manual (Part No. 068749).
-
Page 16: Installing For A Windows Network
Choose the print instruction appropriate for your type of system: System Instructions lpr -P printername filename where: printername is the name of the printer you want to use. filename is the name of the file you want to print. pr -d printername filename... -
Page 17: Windows 95, 98, And Nt
4. Follow the rest of the Add Printer Wizard’s instructions to perform the remaining steps of the installation process. If you want to install a printer to a new LPR port, refer to the Intermec Ethernet Adapter User’s Manual (Part No. 068749). - Page 18 6. In the Port menu, click Connect to display the Windows Printers dialog. 7. Select a printer driver from the list of Installed Printers, or click Add to install a new driver. Click Connect. 8. Select the Windows port name defined in Step 4 that should now be listed at the bottom of the Ports list.
-
Page 19: Windows Clients Using Lantastic
To print from a Windows network 1. Select Print from the File menu within your application. 2. If the printer you want to use is the default printer, print from your application as normal. 3. If the required printer is not selected as the default printer, click Setup in the Print Document window and then select the name of the required printer. - Page 20 1. Double-click the Print Manager icon, click Setup, then select Printers. 2. Click Add to make a new printer definition, then type a name of your choice in the Name field. 3. Select \PIPE\name.LP1 from the Device list, then select a printer driver suitable for your printer.
-
Page 21: Configuring The Centronics Interface Timing
3. Print the file as you normally would. Configuring the Centronics Interface Timing Before you can print to an Intermec printer, you must set the Centronics interface timing to standard. To set the Centronics interface timing 1. Download the IP address. For help, see “Downloading the IP Address”... -
Page 22: Web Management
Web Management After assigning an IP address and an optional host name to the Ethernet adapter, you can access your Ethernet adapter from any standard Web browser. To do this, simply enter the IP address or the host name of the Ethernet adapter as a URL in your browser, as follows: http://192.36.253.96 http://salesdept...
Need help?
Do you have a question about the ColorCoder 901 and is the answer not in the manual?
Questions and answers