
Subscribe to Our Youtube Channel
Related Manuals for HOMCOM A91-181


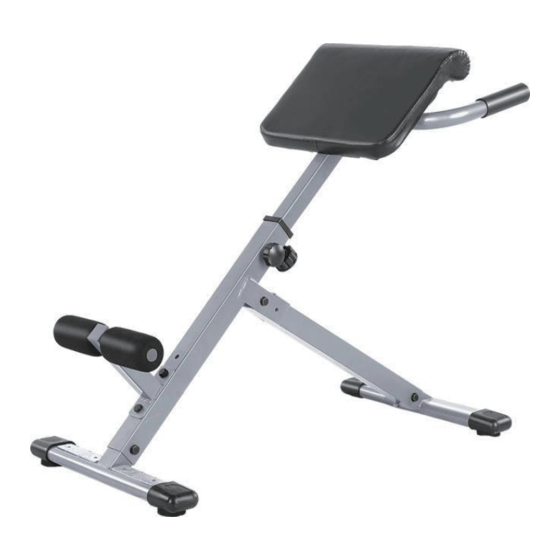
Summary of Contents for HOMCOM A91-181
- Page 1 INalb010_FR_EN A91-181 MANUEL D’INSTRUCTIONS ENTRAÎNEUR DE DOS IMPORTANT, RETAIN FOR FUTURE REFERENCE: READ CAREFULLY ASSEMBLY & INSTRUCTION MANUAL...
-
Page 2: Vue Éclatée
VUE ÉCLATÉE Description Qté. Description Qté. Tube de support arrière Vis M10*20 Tube de support avant Vis M10*70 Tube de support réglable Vis M10*65 Porte-jambes pour fixation Rondelle Tube de poignée (Gauche) Vis M6 *15 Tube de poignée (Droite) Rondelle Tube (fixation des jambes) Goupille de verrouillage Support avant... - Page 3 RONDELLE #22 4PCS VIS #21 M6*15 4PCS RONDELLE #20 16PCS VIS #17 M10*20 2PCS VIS #18 M10*70 3PCS ECROU #24 M10 7PCS VIS #19 M10*65 2PCS VIS #30 M10*60 2PCS OUTIL #29 2PCS...
- Page 4 ASSEMBLAGE 1.Montez le support avant (8) avec la vis (19), deux rondelles (20) et l’écrou (24) sur le tube de support avant (2). Une rondelle est toujours installée sous la tête du boulon et l’écrou. A l’arrière du tube de support avant, fixez la vis (17) avec une rondelle (20). 2.Fixez le support arrière (9) avec la vis (19) et deux rondelles (20) et l’écrou (24) au niveau du tube de support arrière (1).
- Page 5 3.Connectez maintenant le tube de support arrière (1) avec la vis (18), deux rondelles (20) et l’écrou à vis (24) sur le tube de support avant. Enfin, vous poussez toujours la goupille de verrouillage (23) par les trous sous-jacents des deux parties. 4.
- Page 6 7.Assemblez le coussin (11) sur le tube de support réglable (3) avec les vis (21) et les rondelles (22). 8. Montez maintenant la poignée gauche et droite (5 et 6) sur le support réglable (3) à l’aide des vis (30) et des rondelles (22). 9.Insérez les caches-vis (26) avec les boulons et les écrous...
- Page 7 SÉANCE D’EXERCICE 1.Soulèvement du haut du corps...
- Page 8 2. Soulèvement du dos avec rotation 3. Soulèvement latéral du dos...
- Page 9 MANUAL INSTRUCTION BACK TRAINER IMPORTANT, RETAIN FOR FUTURE REFERENCE: READ CAREFULLY...
-
Page 10: Explosion View
EXPLOSION VIEW Description Qty. Description Qty. Rear support tube Screw M10*20 Front support tube Screw M10*70 Adjustable support tube Screw M10*65 Leg holder for fixing Washer Handle tube (Left) Screw M6 *15 Handle tube (Right) Washer Pipe (Leg fixation) Safety pin Front stand Nut M10 Rear stand... - Page 12 ASSEMBLY 1.Mounting the front stand (8) with the screw (19), two washers (20) and the nut (24) on the front support tube (2). A washer is always installed under the bolt head and the nut. On the back of the front support tube, attach the screw (17) with washer (20). 2.Mounting the rear pedestal (9) with the screw (19) comprises two washers (20) and the nut (24) at the back support (1).
- Page 13 3.Now connect the rear support tube (1) with the screw (18), two washers (20) and the Screw nut (24) on the front support tube. Finally, you still push the locking pin (23) by the underlying holes of the two parts. 4.
- Page 14 7.Assemble the cushion (11) on the adjustable support (3) with the screws (21) and the Washers (22). 8. Now mount the left and right handle (5 and 6) on the adjustable support (3) using the screws (30) and washers (22). 9.Insert the screw covers (26) with the bolts and nuts...
-
Page 15: Exercise Session
EXERCISE SESSION 1.Back lift upper body... - Page 16 2. back lift with rotation 3. Lateral back lift...
Need help?
Do you have a question about the A91-181 and is the answer not in the manual?
Questions and answers