Table of Contents
Advertisement
Available languages
Available languages
Quick Links
BEDIENUNGSANLEITUNG
Bad-Heizlüfter 2000 Watt
ART.NR. SCHWARZ: 10530795, 10530804
ART.NR. WEISS.: 10530796, 10530805
HERZLICHEN GLÜCKWUNSCH!
VIELEN DANK, DASS SIE SICH FÜR DIESES PRODUKT VON
HORNBACH ENTSCHIEDEN HABEN.
Dieses Produkt ist nur für gut isolierte Räume oder für den
gelegentlichen Gebrauch geeignet.
DE
FR
IT
NL
SE
CZ
SK
RO
EN
20
39
58
77
96
114
132
151
Advertisement
Chapters
Table of Contents

Related Manuals for Hornbach 10530795


Summary of Contents for Hornbach 10530795
- Page 1 BEDIENUNGSANLEITUNG Bad-Heizlüfter 2000 Watt ART.NR. SCHWARZ: 10530795, 10530804 ART.NR. WEISS.: 10530796, 10530805 HERZLICHEN GLÜCKWUNSCH! VIELEN DANK, DASS SIE SICH FÜR DIESES PRODUKT VON HORNBACH ENTSCHIEDEN HABEN. Dieses Produkt ist nur für gut isolierte Räume oder für den gelegentlichen Gebrauch geeignet.
-
Page 2: Table Of Contents
INHALTSVERZEICHNIS Wichtige Informationen zur Sicherheit, Standort und zum elektrischen Anschluss Recycling, Entsorgung, Konformitätserklärung Lieferumfang Beschreibung des Gerätes Standort und Anschluss Wandmontage, Standmontage Inbetriebnahme und Funktion Sicherheitseinrichtungen Reinigung und Wartung Technische Informationen Erforderliche Angaben zu elektrischen Einzelraumheizgeräten LESEN SIE BITTE DIE BEDIENUNGSANLEITUNG SORGFÄLTIG DURCH, BEVOR SIE MIT MONTAGE, INSTALLATION, BEDIENUNG ODER WARTUNG BEGINNEN. -
Page 3: Wichtige Informationen Zur Sicherheit, Standort Und Zum Elektrischen Anschluss
SACHSCHÄDEN UND/ODER ZUM VERLUST DES GEWÄHRLEISTUNGSANSPRUCHS FÜHREN! Bestimmungsgemäße Verwendung Dieses Gerät ist ausschließlich zum Heizen von Wohnräumen in Haushalten vorgesehen und darf für keine anderen Zwecke eingesetzt werden. Dieses Gerät ist ausschließlich zur Wandmontage geeignet. Der tiefste Punkt des Geräts muss bei der Montage 180cm über dem Boden sein. - Page 4 4. Vor Anschluss an das Netz müssen Sie überprüfen, ob Stromart und Netzspannung mit den Angaben des Gerätetypenschildes übereinstimmen. 5. Die elektrische Steckdose, an der Sie das Gerät anschließen, darf nicht defekt oder lose sein und muss für die erforderliche Strombelastung geeignet und vor allem zuverlässig geerdet sein.
- Page 5 11. Wenden Sie sich für eventuelle Reparaturen des Geräts, des Netzsteckers oder des Kabels stets und ausschließlich an vom Hersteller autorisierten Kundendienststellen. 12. Dieses Gerät darf ausschließlich von Erwachsenen benutzt werden. 13. Kindern ab 3 Jahren und jünger als 8 Jahre dürfen das Gerät nur ein- und ausschalten, wenn sie beaufsichtigt werden oder bezüglich des sicheren Gebrauchs des Gerätes unterwiesen wurden und die daraus resultierenden...
- Page 6 Bei Verschlucken besteht Erstickungsgefahr! 18. Dieses Gerät ist nicht mit einer Einrichtung zur Regelung der Raumtemperatur ausgestattet. 19. Das Gerät ist nicht für Dauer- und Präzisionsbetrieb geeignet. 20. Dieses Heizgerät nicht benutzen, wenn es zuvor fallen gelassen wurde. 21. Dieses Gerät dient nur zum Betrieb in trockenen Innenräumen.
- Page 7 25. Dieses Heizgerät auf einer waagerechten und stabilen Fläche oder gegebenenfalls an einer Wand befestigt benutzen. 26. Decken Sie das Gerät während des Betriebes und der Auskühlphase niemals ab. 27. Achten Sie darauf, dass keine Gegenstände zwischen Gerät und Montagewand gelangen, welche die Heizfläche berühren.
- Page 8 VERLETZUNGSGEFAHR ACHTUNG Das Gerät wird während des Betriebs heiß! Berühren Sie niemals das Gerät während des Betriebs → dies könnte zu ernsthaften VERBRENNUNGEN führen. ACHTUNG BRANDGEFAHR Das Gerät darf während des Betriebs nicht abgedeckt werden! SICHERHEITSABSTAND Halten Sie mind. einen Meter Sicherheitsabstand zu leicht entzündlichen Gegenständen wie Möbeln, Vorhängen, Papier, etc.
-
Page 9: Recycling, Entsorgung, Konformitätserklärung
davor aufzuhängen. Das Heizgerät darf nicht abgedeckt werden, um Überhitzung und Brandgefahr zu vermeiden! Symbol: Bedeutung: Schutzklasse 2 Das Symbol weist darauf hin, dass das Gerät, der Schutzklasse 2 zuzuordnen ist. Geräte der Schutzklasse 2 sind nicht an den Schutzleiter angeschlossen. Stattdessen haben sie eine verstärkte oder doppelte Isolierung in Höhe der Bemessungsisolationsspannung zwischen aktiven und berührbaren Teilen. -
Page 10: Lieferumfang
CR 2025 (Li); AA (Al, Mn); AAA (Al, Mn) KONFORMITÄTSERKLÄRUNG Hiermit bestätigen wir, dass dieser Artikel den grundlegenden Anforderungen, Vorschriften und Richtlinien der EU entspricht. Die ausführliche Konformitätserklärung können Sie jederzeit unter folgendem Link einsehen: https://www.hornbach.com/productcompliance/ Irrtümer und technische Änderungen vorbehalten. Lieferumfang ▪ Heizlüfter ▪... -
Page 11: Beschreibung Des Gerätes
Beschreibung des Gerätes Hauptschalter mit Kontrollleuchte Display Timer-Taste Funktionstaste (F) Luftansauggitter (Rückseite) Luftauslassgitter (Vorderseite) Standort und Anschluss 1. Entfernen Sie sämtliches Verpackungsmaterial und halten Sie es außerhalb der Reichweite von Kindern. Kontrollieren Sie nach Entfernung der Verpackung, ob das Gerät Beschädigungen oder Anzeichen von Beschädigungen aufweist. - Page 12 Zum Auswechseln der Batterie befolgen Sie bitte die folgenden Schritte: 1. Öffnen Sie die Batterieabdeckung an der Unterseite der Fernbedienung, drücken Sie die Schnalle an der Batterieabdeckung nach innen und ziehen Sie sie heraus, nehmen Sie die alte Batterie heraus. 2.
-
Page 13: Inbetriebnahme Und Funktion
1. Montieren Sie den Befestigungsbügel oben auf dem Bad-Heizlüfter mit der kurzen Seite zur Wand. Zeichnen Sie das Bohrloch an der Wand an und entfernen Sie den Bad-Heizlüfter wieder. 2. Bohren Sie an der ausgewählten und markierten Stelle zwei Löcher (8 mm) in die Wand - waagerecht und mit einem Abstand von 18,7 cm. - Page 14 Bedienung mit der Fernbedienung: HINWEIS Die Fernbedienung funktioniert nur, wenn der Sensor der Fernbedienung direkt auf den Bad- Heizlüfter gerichtet ist. Das Gerät muss sich im Bereitschaftsmodus befinden (Anzeige auf dem Display!) • Drücken der EIN/AUS-Taste schaltet das Gerät ein. Im Display erscheint die Anzeige wie in Abb.
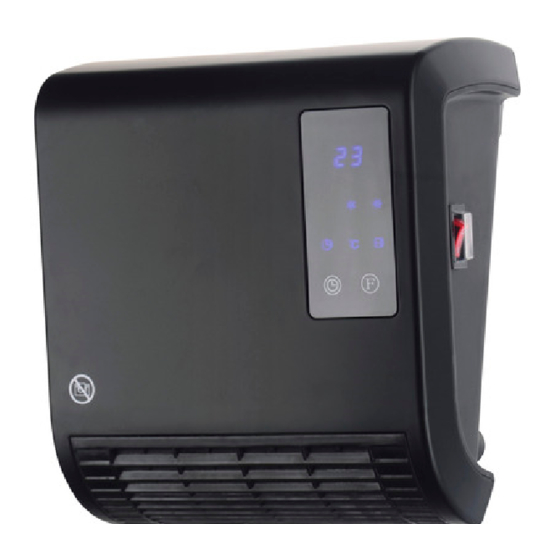
- Page 15 Temperatur einstellen: • Drücken Sie, während das Gerät in Betrieb ist, auf die Plus- oder Minus-Taste. Auf der Anzeige erscheint als Standard „23“. Drücken Sie daraufhin auf die Plus- oder Minus-Taste, bis die gewünschte Temperatur erreicht ist (10-35°C). Drücken Sie auf OK, um die Einstellung zu bestätigen. Auf der Anzeige erscheinen die eingestellte Temperatur und die Leistung.
- Page 16 . Im Display erscheint standardmäßig ‚00‘. Drücken Sie mehrmals auf 5. Drücken Sie jetzt auf TIME/ON, um die Anfangszeit einzustellen (0-24 Uhr), z.B. auf 7 Uhr; siehe Abb. G. 6. Drücken Sie jetzt auf . Im Display erscheint standardmäßig die Anfangszeit. Drücken Sie mehrmals auf TIME/OFF, um die Endzeit einzustellen (0-24 Uhr), z.B.
-
Page 17: Sicherheitseinrichtungen
Anmerkungen: • Um die Einstellungen zu prüfen, drücken Sie nacheinander auf DAY, EDIT, TIME/ON und TIME/OFF. Auf dem Display erscheinen die Einstellungen. • Der Timer kann nur auf volle Stunden, nicht auf Minuten eingestellt werden. • TIME/OFF muss immer nach TIME/ON sein. •... -
Page 18: Reinigung Und Wartung
Wachs, Glanzmittel oder sonstige chemische Lösungen. Die Rückseite des Gerätes können Sie mit einem Staubwedel entstauben. Zur gründlichen Reinigung der Rückseite schrauben Sie den Bad-Heizlüfter von der Wand ab. TECHNISCHE INFORMATIONEN Artikelnummer: schwarz: 10530795, 10530804 weiß: 10530796, 10530805 Eingangsspannung: 220-240 V~ Frequenz: 50Hz 1800 –... -
Page 19: Erforderliche Angaben Zu Elektrischen Einzelraumheizgeräten
Erforderliche Angaben zu elektrischen Einzelraumheizgeräten Artikelnummer 10530795, 10530804, 10530796, 10530805 Angabe Symbol Wert Einheit Angabe Einheit Nur bei elektrischen Speicher-Einzelraumheizgeräten: Wärmeleistung Art der Regelung der Wärmezufuhr Manuelle Regelung der Wärmezufuhr mit Nennwärmeleistung Nein integriertem Thermostat Manuelle Regelung der Wärmezufuhr mit Mindestwärmeleistung... - Page 20 MODE D'EMPLOI Chauffage à air chaud pour salle de bain 2000 watts RÉF. NOIR : 10530795, 10530804 RÉF. BLANC : 10530796, 10530805 FÉLICITATIONS ! MERCI D'AVOIR OPTÉ EN FAVEUR DE CE PRODUIT DE HORNBACH. Ce produit ne convient que pour les pièces bien isolées ou pour...
- Page 21 SOMMAIRE Informations importantes sur la sécurité, le lieu et le branchement électrique Recyclage, élimination, déclaration de conformité Contenu de la livraison Description de l'appareil Emplacement et raccordement Montage mural, montage sur pied Mise en service et fonction Dispositifs de sécurité Nettoyage et maintenance Informations techniques Informations requises pour les appareils de chauffage électrique individuels...
- Page 22 Utilisation conforme Cet appareil est conçu exclusivement pour chauffer des pièces d'habitation à des fins domestiques et ne doit pas être utilisé à d'autres fins. Cet appareil est exclusivement conçu pour un montage mural. Le point le plus bas de l'appareil doit être à...
- Page 23 5. La prise électrique à laquelle vous branchez l'appareil ne doit pas être défectueuse ni lâche ; elle doit convenir pour la charge de courant requise et être, avant tout, correctement mise à la terre. 6. Évitez d'utiliser une rallonge électrique car celle-ci pourrait surchauffer et provoquer un incendie.
- Page 24 13. Les enfants âgés de 3 ans ou moins et de moins de 8 ans ne doivent pas mettre l'appareil en marche ou l'arrêter, à moins qu'ils ne soient surveillés ou qu'ils aient reçu des instructions concernant l'utilisation sûre de l'appareil et qu'ils comprennent les risques qui en découlent, à...
- Page 25 19. L'appareil ne convient pas pour un fonctionnement continu et précis. 20. Ne pas utiliser cet appareil de chauffage si vous l'avez fait tomber auparavant. 21. Cet appareil est destiné à être utilisé uniquement en intérieur, dans un environnement sec. 22.
- Page 26 26. Ne couvrez jamais l'appareil pendant son fonctionnement et sa phase de refroidissement. 27. Veillez à ce qu'aucun objet ne se trouve entre l'appareil et la paroi de montage et ne touche la surface chauffante. 28. Éteignez toujours l'appareil avant de débrancher la fiche réseau.
- Page 27 RISQUE DE BLESSURE ATTENTION L'appareil devient chaud pendant son fonctionnement ! Ne touchez jamais l'appareil pendant son fonctionnement →, cela pourrait entraîner de graves BRÛLURES. ATTENTION RISQUE D'INCENDIE L'appareil ne doit pas être recouvert pendant son fonctionnement ! DISTANCE DE SÉCURITÉ Maintenez une distance de sécurité...
-
Page 28: Recyclage, Élimination, Déclaration De Conformité
l'appareil. L'appareil de chauffage ne doit pas être recouvert afin d'éviter toute surchauffe et tout risque d'incendie ! Symbole : Signification : Classe de protection 2 Le symbole indique que l'appareil appartient à la classe de protection 2. Les appareils de la classe de protection 2 ne sont pas raccordés au conducteur de protection. -
Page 29: Contenu De La Livraison
Nous certifions, par la présente, que cet article satisfait aux exigences, dispositions et directives fondamentales de l'Union européenne. Vous pouvez consulter, à tout moment, la déclaration de conformité détaillée à l'adresse suivante : https://www.hornbach.com/productcompliance/ Sous réserve d'erreurs et de modifications techniques. Contenu de la livraison ▪... -
Page 30: Description De L'appareil
Description de l'appareil Interrupteur principal avec témoin lumineux Écran Touche Minuterie Touche de fonction (F) Grille d'aspiration d'air (arrière) Grille de sortie d'air (avant) Emplacement et raccordement 1. Retirez tous les matériaux d'emballage et tenez-les hors de portée des enfants. Après avoir retiré... - Page 31 Pour remplacer la pile, veuillez suivre les étapes suivantes : 1. Ouvrez le couvercle de la pile au bas de la télécommande, poussez la boucle du couvercle de la pile vers l'intérieur et tirez-la, retirez la pile usagée. 2. Veillez à respecter la polarité (+z à respecter la polarité (+/-) Utilisez uniquement des piles de type CR2025 et éliminez les piles usagées en respectant l'environnement et les réglementations en vigueur dans votre pays.
-
Page 32: Mise En Service Et Fonction
1. Installez l'étrier de fixation en haut du chauffage à air chaud de salle de bain, le côté court vers le mur. Tracez le trou de perçage sur le mur et retirez le chauffage à air chaud de salle de bain. 2. - Page 33 Utilisation avec la télécommande : REMARQUE La télécommande ne fonctionne que si le capteur de la télécommande est dirigé directement vers le chauffage à air chaud de salle de bain. L'appareil doit être en mode veille (indication sur l'écran !) •...
- Page 34 Régler la température : • Lorsque l'appareil est en fonctionnement, appuyez sur la touche plus ou moins. L'écran indique par défaut « 23 ». Appuyez ensuite sur la touche plus ou moins jusqu'à ce que la température souhaitée soit atteinte (10-35°C). Appuyez sur OK pour confirmer le réglage.
- Page 35 . ‚00‘ apparaît à l'écran par défaut. Appuyez plusieurs fois sur 5. Appuyez maintenant sur TIME/ON pour régler l'heure de début (0-24 heures), par exemple sur 7 heures ; voir figure G. 6. Appuyez maintenant sur . L'écran affiche par défaut l'heure de début. Appuyez plusieurs fois sur TIME/ON pour régler l'heure de fin (0-24 heures), par exemple sur 13 heures ;...
-
Page 36: Dispositifs De Sécurité
Remarques : • Pour vérifier les paramètres, appuyez successivement sur DAY, EDIT, TIME/ON et TIME/OFF. Les paramètres s'affichent à l'écran. • La minuterie ne peut être réglée que sur des heures complètes, pas sur des minutes. • TIME/OFF doit toujours être placé après TIME/ON. •... -
Page 37: Nettoyage Et Maintenance
Vous pouvez dépoussiérer l'arrière de l'appareil avec un plumeau. Pour nettoyer soigneusement la face arrière, dévissez l'aérotherme de salle de bain du mur. INFORMATIONS TECHNIQUES Référence : noir : 10530795, 10530804 blanc : 10530796, 10530805 Tension d'entrée : 220-240 V~ Fréquence : 50 Hz 1800 –... -
Page 38: Informations Requises Pour Les Appareils De Chauffage Électrique Individuels
Informations requises pour les appareils de chauffage électrique individuels Référence 10530795, 10530804, 10530796, 10530805 Indication Symbole Valeur Unité Indication Unité Uniquement pour les appareils de chauffage Puissance thermique électrique individuel à accumulation : Type de régulation de l'apport de chaleur... - Page 39 ISTRUZIONI PER L’USO Termoventilatore da bagno 2000 watt N° ART. NERO: 10530795, 10530804 N° ART. BIANCO: 10530796, 10530805 CONGRATULAZIONI! GRAZIE PER AVER DECISO DI ACQUISTARE QUESTO PRODOTTO DI HORNBACH. Questo prodotto è adatto soltanto per ambienti ben isolati o per...
- Page 40 INDICE Informazioni importanti su sicurezza, luogo di installazione e collegamento elettrico Riciclaggio, smaltimento, dichiarazione di conformità Contenuto della fornitura Descrizione del dispositivo Luogo di installazione e collegamento Montaggio a parete, montaggio su supporto Messa in funzione e funzionamento Dispositivi di sicurezza Manutenzione e pulizia Informazioni tecniche Informazioni necessarie relative agli apparecchi elettrici per il riscaldamento...
- Page 41 E/O DANNI MATERIALI E/O LA PERDITA DEL DIRITTO DI GARANZIA! Uso previsto Questo dispositivo è concepito esclusivamente per il riscaldamento di ambienti abitativi in abitazioni private. L’uso per altri scopi non è consentito. Questo dispositivo è adatto esclusivamente al montaggio a parete. Il punto più basso del dispositivo deve trovarsi a 180 cm da terra al momento del montaggio.
- Page 42 corrispondono ai dati riportati sulla targhetta del dispositivo. 5. La presa di corrente a cui si collega il dispositivo non deve essere difettosa, deve essere ben fissata, idonea alla corrente necessaria per il funzionamento e soprattutto provvista di un’efficace messa a terra. 6.
- Page 43 13. I bambini a partire dai 3 anni o con un’età inferiore agli 8 anni possono accendere e spegnere il dispositivo soltanto se sono sorvegliati o sono stati istruiti sull’uso sicuro del dispositivo e abbiano compreso i pericoli da esso derivanti, a condizione che il dispositivo sia posizionato o installato nella sua normale posizione di utilizzo.
- Page 44 18. Questo dispositivo non è dotato di uno strumento per la regolazione della temperatura ambiente. 19. Il dispositivo non è indicato per l’uso permanente o di precisione. 20. Non utilizzare questo dispositivo se è caduto. 21. Questo dispositivo è adatto esclusivamente al funzionamento in ambienti interni asciutti.
- Page 45 26. Non coprire mai il dispositivo mentre è in funzione e durante la fase di raffreddamento. 27. Assicurarsi che nessun oggetto finisca tra il dispositivo e la parete di montaggio a contatto con la superficie riscaldante. 28. Spegnere sempre il dispositivo prima di staccare la spina dalla presa di corrente.
- Page 46 PERICOLO DI LESIONI ATTENZIONE Il dispositivo si surriscalda durante il funzionamento! Non toccare mai il dispositivo durante il funzionamento → ciò potrebbe causare USTIONI gravi. ATTENZIONE PERICOLO DI INCENDIO Non coprire il dispositivo durante il funzionamento! DISTANZA DI SICUREZZA Garantire una distanza di sicurezza minima di un metro dagli oggetti facilmente infiammabili come mobili, tende, carta, ecc.! LUOGO DI INSTALLAZIONE...
- Page 47 coprire il dispositivo al fine di evitare il surriscaldamento e il pericolo di incendio! Simbolo: Significato: Classe di isolamento 2 Il simbolo indica che il dispositivo è assegnato alla classe di isolamento 2. I dispositivi della classe di isolamento 2 non sono collegati al conduttore di terra.
- Page 48 Con la presente dichiariamo che questo articolo è conforme ai requisiti, alle disposizioni e alle direttive UE. La dichiarazione di conformità completa può essere consultata in qualsiasi momento al seguente link: https://www.hornbach.com/productcompliance/ Con riserva di errori e modifiche tecniche. Contenuto della fornitura ▪...
- Page 49 In caso di dubbio non utilizzare il dispositivo e contattare il proprio rivenditore. 2. Scegliere un luogo adatto per il dispositivo e osservare tutte le avvertenze elencate nelle presenti istruzioni per l’uso. IMPORTANTE Si consigli di installare il termoventilatore da bagno a un collegamento elettrico in maniera permanente, soprattutto in caso di utilizzo in ambienti umidi.
- Page 50 AVVISO Se non si utilizza il telecomando per un periodo di tempo prolungato (4 settimane o più), rimuovere le batterie dal telecomando. Montaggio a parete! Attenzione! Il punto più basso del dispositivo deve trovarsi a 180 cm da terra al momento del montaggio! 1.
- Page 51 4. Agganciare il termoventilatore alle viti per mezzo delle staffe di fissaggio, farlo scorrere completamente verso sinistra e spingerlo verso il basso. Messa in funzione e funzionamento • L’interruttore principale deve essere spento (O). • Srotolare completamente il cavo di alimentazione e inserire la spina in una presa adatta da 220-240 V~.
- Page 52 • Premere il tasto ON/OFF per accendere il dispositivo. Il display appare come mostrato nella Figura A. • Premere una volta il tasto funzione del telecomando affinché il dispositivo riscaldi a metà potenza. Il display appare come mostrato nella Figura B. •...
- Page 53 Di conseguenza, il dispositivo mantiene in movimento l’aria presente nella stanza e può quindi determinare in modo ottimale se la stanza si sta raffreddando. Il dispositivo ritorna nella modalità standby dopo 3 minuti. Se la stanza si raffredda fino a trovarsi 2 °C al di sotto della temperatura impostata, il dispositivo ricomincia a riscaldare.
- Page 54 7. Premere i tasti Più e Meno per impostare la temperatura desiderata. 8. Finché un valore lampeggia, è possibile modificarlo o passare all’impostazione successiva. Se si attende troppo a lungo, la modalità di impostazione verrà interrotta. 9. Infine premere OK per confermare l’impostazione. 10.
- Page 55 Note: • Per controllare le impostazioni, premere uno dopo l’altro DAY, EDIT, TIME/ON e TIME/OFF. Sul display appariranno le impostazioni. • Il timer può essere impostato solo su ore intere, non minuti. • TIME/OFF deve essere sempre posteriore a TIME/ON. •...
- Page 56 È possibile spolverare il retro del dispositivo con un piumino. Per pulire a fondo il retro del dispositivo, svitare il termoventilatore da bagno dalla parete. INFORMAZIONI TECNICHE Numero articolo: nero: 10530795, 10530804 bianco: 10530796, 10530805 Tensione in ingresso: 220-240 V~...
- Page 57 Informazioni necessarie relative agli apparecchi elettrici per il riscaldamento d’ambiente locale Numero articolo 10530795, 10530804, 10530796, 10530805 Indicazione Simbolo Valore Unità Indicazione Unità Solo per apparecchi elettrici per il riscaldamento d’ambiente locale ad accumulo: Potenza termica Tipo di controllo della fornitura di calore...
- Page 58 GEBRUIKSAANWIJZING Heteluchtkachel voor badkamer 2000 watt ART.NR. ZWART: 10530795, 10530804 ART.NR. WIT: 10530796, 10530805 HARTELIJK GEFELICITEERD! HARTELIJK BEDANKT DAT U VOOR DIT PRODUCT VAN HORNBACH HEBT GEKOZEN. Dit product is alleen geschikt voor goed geïsoleerde ruimtes of voor incidenteel gebruik.
- Page 59 INHOUDSOPGAVE Belangrijke informatie over veiligheid, locatie en elektrische aansluiting Recycling, verwijdering, conformiteitsverklaring Leveringsomvang Beschrijving van het apparaat Locatie en aansluiting Wandmontage, staande montage Ingebruikname en werking Veiligheidsvoorzieningen Reiniging en onderhoud Technische informatie Vereiste informatie over elektrische kachels voor enkele kamers LEES DE GEBRUIKSAANWIJZING ZORGVULDIG DOOR VOORDAT U MET MONTAGE, INSTALLATIE, BEDIENING OF ONDERHOUD BEGINT.
- Page 60 Beoogd gebruik Dit apparaat is uitsluitend bedoeld voor het verwarmen van woonruimtes in huishoudens en mag niet voor andere doeleinden worden gebruikt. Dit apparaat is uitsluitend geschikt voor wandmontage. Het diepste punt van het apparaat moet bij de montage 180 cm boven de vloer liggen.
- Page 61 5. Het stopcontact waarop u het apparaat aansluit, mag niet defect zijn of loszitten, moet geschikt zijn voor de vereiste stroombelasting en absoluut goed geaard zijn. 6. Vermijd het gebruik van een verlengsnoer, omdat dit kan oververhitten en brand veroorzaken. 7.
- Page 62 normale plek is geplaatst of geïnstalleerd en wanneer ze onder toezicht staan of instructies hebben ontvangen over hoe het apparaat op veilige wijze gebruikt kan worden en begrijpen welke gevaren eraan verbonden zijn. Kinderen tussen de 3 en 8 jaar mogen niet de stekker in het stopcontact steken, het apparaat instellen, reinigen of gebruikersonderhoud uitvoeren.
- Page 63 21. Dit apparaat is alleen bedoeld voor gebruik in droge binnenruimtes. 22. Gebruik het apparaat niet in de buurt van water of veel vocht, bijv. in natte kelders, naast zwembaden, badkuipen of douches. Let op dat er geen water in het apparaat kan binnendringen.
- Page 64 29. Voorzichtig - sommige onderdelen van het product kunnen zeer heet worden en verbranding veroorzaken. Bijzondere voorzichtigheid is geboden wanneer er kinderen en kwetsbare personen aanwezig zijn. Laat het apparaat altijd afkoelen voordat u het reinigt of wilt demonteren. 30. Trek als u het apparaat niet gebruikt de stekker eruit voordat u het reinigt of als het bijv.
- Page 65 GEVAAR VOOR LETSEL LET OP Het apparaat wordt heet tijdens het gebruik! Raak het apparaat nooit tijdens het gebruik aan → dit kan tot ernstige VERBRANDINGEN leiden. LET OP BRANDGEVAAR Het apparaat mag tijdens het gebruik niet afgedekt worden! VEILIGHEIDSAFSTAND Houd minstens een meter veiligheidsafstand van licht ontvlambare objecten zoals meubels, gordijnen, papier, enz.! LOCATIE...
- Page 66 hangen. De kachel mag niet afgedekt worden om oververhitting en brandgevaar te vermijden! Symbool: Betekenis: Beschermingsklasse 2 Dit symbool geeft aan dat het toestel ingedeeld is in beschermingsklasse 2. Apparaten uit beschermingsklasse 2 zijn niet met de randaarde verbonden. Daarom hebben ze een verbeterde of dubbele isolatie die overeenkomt met de nominale isolatiespanning tussen actieve en aanraakbare delen.
- Page 67 Hierbij verklaren we dat dit artikel voldoet aan de essentiële eisen, verordeningen en richtlijnen van de EU. Die uitgebreide conformiteitsverklaring kunt u op elk gewenst moment inzien via de volgende link: https://www.hornbach.com/productcompliance/ Fouten en technische wijzigingen voorbehouden. Leveringsomvang ▪ Kachel ▪...
- Page 68 1. Verwijder al het verpakkingsmateriaal en houd dit buiten het bereik van kinderen. Controleer na het verwijderen van de verpakking of het apparaat schade of tekenen van beschadiging vertoont. Gebruik het apparaat in geval van twijfel niet, maar neem in dat geval contact met uw verkoper 2.
- Page 69 Let op dat u de contacten niet verbuigt. Plaats de nieuwe batterij en sluit het batterijdeksel. Als u de afstandsbediening voor langere tijd niet gebruikt (4 weken of langer), haal dan de batterijen uit de afstandsbediening. Wandmontage! Let op! Het diepste punt van het apparaat moet bij de montage 180 cm boven de vloer liggen! 1.
- Page 70 4. Haak de kachel met de bevestigingsbeugel aan de schroeven, schuif hem helemaal naar link en trek hem naar beneden. Ingebruikname en werking • De hoofdschakelaar moet op uit staan (O). • Rol de stroomkabel volledig af en steek de stekker in een passend stopcontact met 220V-240V~.
- Page 71 • Druk op de AAN-UITknop om het apparaat in te schakelen. Op het display verschijnt de weergave zoals in afb. A. • Door één keer op de functieknop op de afstandsbediening te drukken, gaat het apparaat verwarmen op half vermogen. Op het display verschijnt de weergave zoals in afb.
- Page 72 Daardoor houdt het apparaat de lucht in de kamer in beweging en kan daardoor optimaal vaststellen of de kamer aan het afkoelen is. Na 3 minuten keer het apparaat terug naar de stand- by-modus. Als de kamer is afgekoeld tot 2°C onder de ingestelde temperatuur, gaat het apparaat weer verwarmen.
- Page 73 7. Druk op de plus- en minknoppen om de gewenste temperatuur in te stellen. 8. Zolang een waarde knippert, kunt u deze wijzigen of naar de volgende instellingen gaan. Als u te lang wacht, wordt de instellingsmodus afgebroken. 9. Druk aan het einde op OK om de instelling te bevestigen. 10.
- Page 74 Opmerkingen: • Druk om de instellingen te controleren achtereenvolgens op DAY, EDIT, TIME/ON en TIME/OFF. Op het display verschijnen de instellingen. • De timer kan alleen op hele uren worden ingesteld, niet op minuten. • TIME/OFF moet altijd later dan TIME/ON zijn. •...
- Page 75 U kunt de achterkant van het apparaat afstoffen met een stofdoek. Verwijder de badkamerkachel van de muur om de achterkant grondig te reinigen. TECHNISCHE INFORMATIE Artikelnummer: zwart: 10530795, 10530804 wit: 10530796, 10530805 Ingangsspanning: 220-240 V~ Frequentie: 50 Hz 1800 –...
- Page 76 Vereiste informatie over elektrische kachels voor enkele kamers Artikelnummer 10530795, 10530804, 10530796, 10530805 Aanduiding Symbool Waarde Eenheid Aanduiding Eenheid Alleen bij elektrische kachels met warmteopslag voor Warmteafgifte enkele kamers: Type regeling van de warmtetoevoer Handmatige regeling van de warmtetoevoer met Nominale warmteafgifte geïntegreerde thermostaat...
- Page 77 BRUKSANVISNING Värmefläkt för badrum 2000 watt ART.NR. SVART: 10530795, 10530804 ART.NR. VIT: 10530796, 10530805 GRATTIS! TACK FÖR ATT DU HAR BESTÄMT DIG FÖR DEN HÄR PRODUKTEN FRÅN HORNBACH. Den här produkten är lämplig endast för användning i välisolerade utrymmen eller för sporadisk användning.
- Page 78 INNEHÅLLSFÖRTECKNING Viktig information om säkerhet, placering och elektrisk anslutning Återvinning, avfallshantering, försäkran om överensstämmelse Leveransomfång Beskrivning av apparaten Placering och anslutning Väggmontering, fristående montering Idrifttagning och funktion Säkerhetsanordningar Rengöring och underhåll Teknisk information Uppgifter som krävs för elektriska rumsvärmare LÄS IGENOM BRUKSANVISNINGEN NOGA INNAN DU BÖRJAR MONTERA, INSTALLERA, ANVÄNDA ELLER UNDERHÅLLA PRODUKTEN.
- Page 79 Avsedd användning Den här apparaten är endast avsedd för uppvärmning av boningsrum i hushåll och får inte användas för några andra ändamål. Den här apparaten är lämplig endast för väggmontering. Vid monteringen måste apparatens lägsta punkt befinna sig 180 cm ovanför golvet. VIKTIG INFORMATION OM SÄKERHET, STANDARD OCH ELEKTRISK ANSLUTNING 1.
- Page 80 strömbelastning som krävs och framför allt vara jordat på ett tillförlitligt sätt. 6. Undvik att använda en förlängningssladd. En sådan kan överhettas och orsaka brand. 7. Om elkabeln är skadad, måste den bytas ut av tillverkaren eller en auktoriserad serviceverkstad för att undvika alla potentiella risker.
- Page 81 apparaten är placerad eller installerad i sitt normala användningsläge. Barn från 3 år och yngre än 8 år får inte sätta i kontakten i eluttaget, inte reglera apparaten, inte rengöra apparaten och inte heller utföra det underhåll som ska utföras av användaren. 14.
- Page 82 badkar eller en dusch. Var noga med att inget vatten kan tränga in i apparaten. 23. Använd inte apparaten i direkt närhet till bensin, gas, olja, alkohol eller andra explosionsfarliga och lättantändliga vätskor eller gaser. 24. För att minska brandrisken ska du se till att det alltid finns ett avstånd på...
- Page 83 är närvarande. Låt apparaten alltid svalna innan du rengör eller monterar ner den. 30. Dra ut kontakten ur eluttaget när du inte använder apparaten, innan du rengör den resp. när den måste underhållas. Rengöring och underhåll som ska utföras av användaren får inte utföras av barn utan tillsyn av en vuxen.
- Page 84 RISK FÖR PERSONSKADOR VARNING Apparaten blir mycket het under drift! Vidrör aldrig apparaten när den är i drift → det kan leda till allvarliga BRÄNNSKADOR. VARNING BRANDRISK Apparaten får inte täckas över när den är i drift! SÄKERHETSAVSTÅND Håll ett säkerhetsavstånd på minst en meter till lättantändliga föremål som möbler, draperier, papper osv.! PLACERING Placera apparaten alltid på...
- Page 85 Symbol: Betydelse: Skyddsklass 2 Symbolen betyder att apparaten tillhör skyddsklass 2. Apparater i skyddsklass 2 är inte anslutna till jordtagsledaren. Istället har de en förstärkt eller dubbel isolering motsvarande den dimensionerande isoleringsspänningen mellan aktiva och vidrörbara delar. Elektriskt ledande ytor eller konduktiva vidrörbara delar är på så sätt åtskilda från spänningsförande delar genom en förstärkt eller dubbel isolering.
- Page 86 CR 2025 (Li); AA (Al, Mn); AAA (Al, Mn) FÖRSÄKRAN OM ÖVERENSSTÄMMELSE Härmed bekräftar vi att den här produkten motsvarar EU:s grundläggande krav, föreskrifter och direktiv. Den utförliga försäkran om överensstämmelse finns tillgänglig på följande länk: https://www.hornbach.com/productcompliance/ Med reservation för fel och tekniska ändringar. Leveransomfång ▪ Värmefläkt ▪...
- Page 87 VIKTIGT Värmefläkten för badrum ska helst – framför allt vid användning i våtrum – anslutas fast till en elektrisk anslutning. Denna anslutning får utföras endast av en behörig elektriker. Därför beskrivs den inte närmare i detalj här. Således utgår man av säkerhetsskäl från en användning med kontakt i den här bruksanvisningen.
- Page 88 Väggmontering! Varning! Vid monteringen måste apparatens lägsta punkt befinna sig 180 cm ovanför golvet! 1. Montera fästbygeln som sitter upptill på värmefläkten för badrum med den korta sidan mot väggen. Markera borrhålet på väggen och ta bort värmefläkten för badrum igen. 2.
- Page 89 • Tryck en gång på funktionsknappen (F). Apparaten ventilerar. På displayen syns den indikering som visas i bild A. • När du trycker en andra gång på knappen, värmer apparaten upp med halv effekt. På displayen syns den indikering som visas i bild B.
- Page 90 • Timerknappen på fjärrkontrollen fungerar exakt på samma sätt som den på apparaten. Ställa in dag och tid: • Tryck en gång på knappen SET : Displayen visar ”12”. Använd nu plus- och minusknapparna för att ställa in den aktuella timmen (kl.
- Page 91 För att ställa in veckotimern måste datum och tid ha matats in. Se avsnittet ”Ställa in dag och tid”. 1. Slå på apparaten med PÅ/AV-knappen . Displayen visar ”P” uppe till höger och växlar till inställningen av 2. Tryck nu på veckotimern.
- Page 92 10. Upprepa stegen 2 till 7 för att ställa in ett helt veckoprogram med start- och sluttider för sju dagar med upp till sex driftsperioder per dag. 11. För att ändra en inställning ska du gå igenom den ovannämnda processen och skriva över de inställda värdena.
- Page 93 Kommentarer: • För att kontrollera inställningarna ska du trycka på DAY, EDIT, TIME/ON och TIME/OFF efter varandra. Displayen visar inställningarna. • Timern kan bara ställas in på hela timmar och inte på minuter. • TIME/OFF måste alltid vara efter TIME/ON. •...
- Page 94 Du kan damma av apparatens baksida med en dammvippa. För grundlig rengöring av baksidan ska du skruva ned värmefläkten för badrum från väggen. TEKNISK INFORMATION Artikelnummer: Svart: 10530795, 10530804 Vit: 10530796, 10530805 Ingångsspänning: 220–240 V~ Frekvens: 50 Hz Effektområde:...
- Page 95 Uppgifter som krävs för elektriska rumsvärmare Artikelnummer 10530795, 10530804, 10530796, 10530805 Uppgift Symbol Värde Enhet Uppgift Enhet Endast för elektriska värmelagrande rumsvärmare: Värmeeffekt Typ av tillförd värme Nominell avgiven Manuell reglering av värmetillförseln med värmeeffekt inbyggd termostat Manuell reglering av värmetillförseln med Lägsta värmeeffekt...
- Page 96 NÁVOD K OBSLUZE Topný ventilátor do koupelny 2000W Č. ZBOŽÍ ČERNÝ: 10530795, 10530804 Č. ZBOŽÍ BÍLÝ: 10530796, 10530805 SRDEČNĚ BLAHOPŘEJEME! DĚKUJEME, ŽE JSTE SE ROZHODLI PRO TENTO PRODUKT SPOLEČNOSTI HORNBACH. Tento výrobek je vhodný jenom pro dobře izolované místnosti nebo pro příležitostné použití.
- Page 97 OBSAH Důležité informace o bezpečnosti, místu instalace a elektrickém připojení Recyklace, likvidace, prohlášení o shodě Rozsah dodávky Popis zařízení Umístění a připojení Montáž na zdi, montáž nastojato Uvedení do provozu a funkce Bezpečnostní přípravky Čištění a údržba Technické informace Požadované údaje týkající se ohřívačů pro jednotlivé místnosti PŘEDTÍM NEŽ...
- Page 98 Použití ve shodě s určením Toto zařízení je určeno výlučně k vytápění obytných prostor v domácnostech a nesmí se použít pro žádný jiný účel. Toto zařízení je vhodné výhradně k montáži na zeď. Nejnižší bod zařízení musí při montáži ležet 180 cm nad podlahou.
- Page 99 6. Zamezte použití prodlužovacího kabelu, protože by se mohl přehřát a zapříčinit požár. 7. Pokud je poškozen napájecí kabel, musí jej pro vyloučení všech možných rizik vyměnit výrobce nebo autorizovaný servis. Síťový kabel nepřekruťte ani nezalomte. 8. Zařízení nesmíte postavit přímo pod zásuvku ve zdi. V případě...
- Page 100 14. Zařízení neprovozujte bez dozoru. Pokud chcete místnost opustit, zařízení vždy vypněte. 15. Zařízení nepoužívejte v malých místnostech, v nichž se zdržují osoby, které nejsou schopny, danou místnost samostatně opustit. Výjimkou je situace, kdy jsou pod neustálým dozorem. 16. Děti si se zařízením nesmí hrát. Děti mladší...
- Page 101 24. Abyste snížili nebezpečí požáru, musí být výstup vzduchu ze zařízení ve vzdálenosti alespoň jednoho metru od všech lehce vznětlivých látek, jako jsou např.: a. nádoby pod tlakem (např. spreje) b. nábytek c. textilie jakéhokoli druhu 25. Tento ohřívač používejte na vodorovné a stabilní ploše nebo případně...
- Page 102 31. Zástrčky se nikdy nedotýkejte mokrýma rukama, abyste zabránili úderům elektrického proudu. NEBEZPEČÍ PORANĚNÍ POZOR Zařízení je během provozu horké! Nikdy se nedotýkejte zařízení v provozu → Mohlo by to vést ke vzniku závažných POPÁLENIN. POZOR NEBEZPEČÍ POŽÁRU Zařízení nesmí být během provozu zakryto! BEZPEČNOSTNÍ...
- Page 103 Symboly na zařízení Symbol: Význam: Pozor! Nezakrývat! Symbol na zařízení poukazuje na to, že je nepřípustné věšet nad zařízení nebo přímo před něj předměty (ručníky, oblečení atd.). Ohřívač nesmíte zakrývat, abyste zamezili jeho přehřátí a nebezpečí požáru! Symbol: Význam: Třída ochrany 2 Tento symbol poukazuje na to, že zařízení...
- Page 104 CR 2025 (Li); AA (Al, Mn); AAA (Al, Mn) PROHLÁŠENÍ O SHODĚ Tímto potvrzujeme, že tento výrobek odpovídá základním požadavkům, předpisům a směrnicím EU. Podrobné prohlášení o shodě je kdykoliv k nahlédnutí na následujícím odkazu: https://www.hornbach.com/productcompliance/ Omyly a technické změny vyhrazeny. Rozsah dodávky ▪ Topný ventilátor ▪...
- Page 105 Popis zařízení Hlavní spínač s kontrolním světlem Displej Tlačítko časovače Funkční tlačítko (F) Mřížka nasávání vzduchu (zadní strana) Mřížka výstupu vzduchu (přední strana) Umístění a připojení 1. Odstraňte veškerý obalový materiál a odložte jej mimo dosah dětí. Po odstranění obalu zkontrolujte, zda zařízení...
- Page 106 Chcete-li vyměnit baterii, postupujte prosím tímto způsobem: 1. Otevřete kryt přihrádky na baterie na spodní straně dálkového ovládání, stiskněte přezku na krytu přihrádky na baterie dovnitř a vytáhněte jej ven, poté vyjměte pásek jisticí baterie. 2. Dbejte na správný směr pólů (+/-). Používejte výhradně typ CR2025 a použité baterie zlikvidujte ekologickým způsobem a v souladu s ustanoveními platnými ve vaší...
- Page 107 1. Připevňovací konzolu nahoře na topném ventilátoru do koupelny montujte krátkou stranou ke zdi. Nakreslete na stěnu otvor pro vrtání a topný ventilátor do koupelny opět odstraňte. 2. Na zvoleném a označeném místě vyvrtejte do zdi dva otvory (8 mm) – vodorovně a ve vzdálenosti 18,7 cm.
- Page 108 Dálkové ovládání funguje jenom za předpokladu, že senzor dálkového ovládání je nasměrován přímo k topnému ventilátoru do koupelny. Zařízení se musí nacházet v pohotovostním režimu (Ukazatel na displeji!) • Stiskněte tlačítko ZAP/VYP Zařízení se zapne. Na displeji se objeví ukazatel jako na obr. A. •...
- Page 109 Nastavení teploty: • Když je zařízení v provozu, stiskněte tlačítko plus nebo mínus. Na ukazateli se standardně zobrazí „23“. Následně mačkejte tlačítko plus nebo mínus, a to až do dosažení požadované teploty (10-35 °C). Pro potvrzení nastavení stiskněte OK. Na ukazateli se zobrazí nastavená teplota a výkon. •...
- Page 110 6. Stiskněte teď . Na displeji se standardně objeví čas začátku. Stiskněte opakovaně TIME/OFF, abyste nastavili koncovou dobu (0-24 hod.), např. na 13 hod., viz obr. H. Koncová doba musí následovat vždy po začáteční době! Jsou-li oba časy identické, přepne se zařízení...
- Page 111 Poznámky: • Chcete-li zkontrolovat nastavení, stiskněte po sobě DAY, EDIT, TIME/ON a TIME/OFF. Na displeji se objeví nastavení. • Časovač lze nastavit jenom na celé hodiny, nikoli na minuty. • TIME/OFF musí vždy následovat teprve po TIME/ON. • Když je zařízení vypnuto hlavním spínačem, když došlo k výpadku el. proudu nebo když byla vytažena zástrčka, tak se nastavení...
- Page 112 Nepoužívejte agresivní mýdla, spreje, čistící ani abrazivní prostředky, vosk, leštidla ani jiné chemické roztoky. Zadní stranu zařízení můžete oprášit oprašovačem. Pokud chcete zadní stranu vyčistit důkladně, topný ventilátor vyšroubujte ze zdi. TECHNICKÉ INFORMACE Číslo zboží: černý: 10530795, 10530804 bílý: 10530796, 10530805 Vstupní napětí: 220-240 V~ Frekvence: 50 Hz 1800 –...
- Page 113 Požadované údaje týkající se ohřívačů pro jednotlivé místnosti Číslo zboží 10530795, 10530804, 10530796, 10530805 Údaj Symbol Hodnota Jednotka Údaj Jednotka Jen u elektrických ohřívačů jednotlivých místností se Tepelný výkon zásobníkem: Druh regulace přívodu tepla Manuální regulace přívodu tepla s integrovaným Jmenovitý...
- Page 114 NÁVOD NA OBSLUHU Teplovzdušný ventilátor do kúpeľne 2000 W Č. TOVARU ČIERNY: 10530795, 10530804 Č. TOVARU BIELY: 10530796, 10530805 SRDEČNE BLAHOŽELÁME! ĎAKUJEME, ŽE STE SA ROZHODLI PRE TENTO VÝROBOK OD FIRMY HORNBACH. Tento výrobok je vhodný len pre dobre izolované miestnosti...
- Page 115 OBSAH Dôležité informácie o bezpečnosti, umiestnení a elektrickom pripojení Recyklácia, likvidácia, vyhlásenie o zhode Obsah dodávky Opis zariadenia Umiestnenie a pripojenie Montáž na stene, montáž nastojato Sprevádzkovanie a funkcia Bezpečnostné prípravky Čistenie a údržba Technické informácie Požadované údaje pre elektrické ohrievače jednotlivých miestností PRED MONTÁŽOU, INŠTALÁCIOU, OBSLUHOU ALEBO ÚDRŽBOU SI STAROSTLIVO PREČÍTAJTE NÁVOD NA OBSLUHU.
- Page 116 Použitie v súlade s určením Toto zariadenie je určené výhradne na ohrievanie obytných miestností v domácnostiach a nesmie sa používať na iné účely. Toto zariadenie je vhodné výhradne pre montáž na stene. Najnižší bod zariadenia musí byť pri montáži 180 cm nad podlahou. DÔLEŽITÉ...
- Page 117 6. Vyhnite sa používaniu predlžovacích káblov, keďže by sa mohli prehriať a spôsobiť požiar. 7. Ak je napájací kábel poškodený, musíte ho nechať dať vymeniť výrobcom alebo autorizovanému servisu, aby ste predišli všetkým možným rizikám. Nepretáčajte sieťový kábel ani ho nezalamujte. 8.
- Page 118 zástrčku do zásuvky, zariadenie regulovať, čistiť a/ani vykonávať údržbu používateľom. 14. Zariadenie neprevádzkujte bez dozoru. Ak chcete miestnosť opustiť, zariadenie vždy vypnite. 15. Zariadenie nepoužívajte v malých miestnostiach, v ktorých sa zdržiavajú osoby, ktoré nie sú schopné miestnosť samostatne opustiť, výnimkou je len situácia, keď sú neustále pod dozorom.
- Page 119 23. Zariadenie nepoužívajte v priamom susedstve benzínu, plynu, oleja, alkoholu alebo iných potenciálne výbušných či ľahko horľavých kvapalín alebo plynov. 24. Aby ste minimalizovali nebezpečenstvo požiaru, udržiavajte vývod vzduchu zariadenia vo vzdialenosti min. jedného metra od všetkých ľahko zápalných látok, ako sú...
- Page 120 30. Pred čistením, resp. pred nutnou údržbou a keď zariadenie nebudete používať, vytiahnite zástrčku zo zásuvky. Čistenie ani používateľskú údržbu nesmú vykonávať deti bez dozoru. 31. Zástrčky sa nedotýkajte mokrými rukami, inak vám hrozí úder elektrickým prúdom. NEBEZPEČENSTVO PORANENIA POZOR Zariadenie sa počas prevádzky rozhorúči! Nikdy sa počas prevádzky zariadenia nedotýkajte.
- Page 121 Symboly na zariadení Symbol: Význam: Pozor! Nezakrývať! Symbol na zariadení poukazuje na to, že je zakázané nad alebo priamo pred zariadenie vešať predmety (napr. uteráky, odevy atď.). Ohrievač nesmiete zakývať, aby ste predišli jeho prehriatiu a nebezpečenstvu požiaru! Symbol: Význam: Trieda ochrany 2 Symbol poukazuje na to, že zariadenie je zaradené...
- Page 122 VYHLÁSENIE O ZHODE Týmto potvrdzujeme, že tento výrobok spĺňa základné požiadavky, predpisy a smernice EÚ. Na podrobné znenie Vyhlásenia o zhode sa môžete kedykoľvek pozrieť kliknutím na tento link: https://www.hornbach.com/productcompliance/ Chyby a technické zmeny vyhradené. Obsah dodávky ▪ Teplovzdušný ventilátor ▪...
- Page 123 Opis zariadenia (1) Hlavný vypínač s kontrolným svetlom (2) Displej (3) Tlačidlo časovača (4) Funkčné tlačidlo (F) (5) Mriežka nasávania vzduchu (na zadnej strane) (6) Mriežka vypúšťania vzduchu (na prednej strane) Umiestnenie a pripojenie 1. Odstráňte všetok obalový materiál a odložte ho tak, aby bol mimo dosahu detí. Po odstránení obalu skontrolujte, či zariadenie nevykazuje poškodenie alebo známky poškodenia.
- Page 124 Pri výmene batérií postupujte podľa nasledujúcich krokov: 1. Otvorte kryt priehradky na batérie na spodnej strane diaľkového ovládania, zatlačte sponu na kryte priehradky na batérie dovnútra a vyberte kryt von, potom vyberte von i starú batériu. 2. Dbajte na správne smerovanie pólov (+/-). Používajte výhradne typ CR2025 a staré batérie zlikvidujte ekologickým spôsobom a v súlade s ustanoveniami platnými vo vašej krajine.
- Page 125 2. Na zvolenom a označenom mieste vyvŕtajte do steny dva otvory (8 mm) – vodorovne a vo vzdialenosti 18,7 cm. 3. Do otvorov vložte hmoždinky a otáčaním do nich zasuňte skrutky (sú súčasťou dodávky). Skrutky by mali cca 5 mm vytŕčať zo steny. 4.
- Page 126 Diaľkové ovládanie funguje len vtedy, keď je senzor diaľkového ovládania nasmerovaný priamo na teplovzdušný ventilátor. Zariadenie sa musí nachádzať v pohotovostnom režime (Ukazovateľ na displeji!) • Stlačením tlačidla ZAP/VYP zariadenie zapnete. Na displeji sa zobrazí ukazovateľ ako na obr. A. •...
- Page 127 Nastavenie teploty: • Počas prevádzky zariadenia stlačte tlačidlo plus alebo tlačidlo mínus. Na ukazovateli sa ako štandard objaví „23“. Následne stláčajte tlačidlo plus alebo mínus, až kým nedosiahnete želanú teplotu (10 až 35 °C). Stlačte OK, aby ste potvrdili nastavenie. Na ukazovateli sa objaví nastavená teplota a výkon. •...
- Page 128 5. Teraz stlačte . Na displeji sa štandardne zobrazí ‚00‘. Stlačte opakovane TIME/ON, aby ste nastavil čas začiatku (0-24 hod.), napr. na 7 hod., pozri obr. G. 6. Teraz stlačte . Na displeji sa štandardne zobrazí čas začiatku. Stlačte opakovane TIME/OFF, aby ste nastavil čas konca (0-24 hod.), napr.
- Page 129 Poznámky: • Ak chcete prekontrolovať nastavenia, stlačte po sebe DAY, EDIT, TIME/ON a TIME/OFF. Na displeji sa objavia nastavenia. • Časovač možno nastaviť len na celé hodiny, nie na minúty. • TIME/OFF musí byť vždy neskôr ako TIME/ON. • Keď je zariadenie vypnuté hlavným vypínačom, keď došlo k výpadku el. prúdu alebo keď bola vytiahnutá...
- Page 130 Nepoužívajte agresívne mydlá, spreje, čistiace ani abrazívne prostriedky, vosk, leštidlá ani iné chemické roztoky. Zadnú stranu zariadenia môžete oprášiť metličkou. Ak chcete zadnú stranu vyčistiť dôkladne, teplovzdušný ventilátor vyskrutkujte zo steny. TECHNICKÉ INFORMÁCIE Číslo tovaru: čierny: 10530795, 10530804 biely: 10530796, 10530805 Vstupné napätie: 220-240 V~ Frekvencia: 50 Hz 1800 –...
- Page 131 Požadované údaje pre elektrické ohrievače jednotlivých miestností Číslo tovaru 10530795, 10530804, 10530796, 10530805 Údaj Symbol Hodnota Jednotka Údaj Jednotka Len pri elektrických ohrievačov jednotlivých miestností Tepelný výkon so zásobníkom: Druh regulácie prívodu tepla Manuálne čistenie prívodu tepla s integrovaným Menovitý tepelný výkon termostatom Minimálny tepelný...
- Page 132 INSTRUCȚIUNI DE UTILIZARE Aerotermă pentru baie 2000 Watt NR. ART. NEGRU: 10530795, 10530804 NR. ART. ALB: 10530796, 10530805 FELICITĂRI! VĂ MULȚUMIM CĂ AȚI DECIS SĂ ACHIZIȚIONAȚI ACEST PRODUSUL DE LA HORNBACH. Acest produs este adecvat doar pentru încăperi bine izolate sau...
- Page 133 CUPRINS Informații importante privind siguranța, locația și racordarea electrică Reciclare, eliminarea ca deșeu, declarația de conformitate Conținutul livrării Descrierea dispozitivului Locația și racordarea Montaj pe perete, montaj pe suport Punerea în funcțiune și operarea Dispozitive de siguranță Curățarea și întreținerea Informații tehnice Informații necesare despre încălzitoarele electrice pentru spații individuale ÎNAINTE DE A ÎNCEPE MONTAREA, INSTALAREA,...
- Page 134 Utilizarea prevăzută Acest dispozitiv este destinat numai încălzirii spațiilor de locuit din gospodării și nu trebuie utilizat în alte scopuri. Acest dispozitiv este adecvat doar pentru montarea pe perete. La montare, punctul cel mai de jos al dispozitivului trebuie să fie la 180 cm deasupra solului. INFORMAȚII IMPORTANTE PRIVIND SIGURANȚA, STANDARDUL ȘI RACORDAREA ELECTRICĂ...
- Page 135 sarcina de curent necesară și, mai presus de toate, să fie împământată fiabil. 6. Evitați utilizarea unui prelungitor, deoarece acesta se poate supraîncălzi și poate provoca un incendiu. 7. În cazul în care cablul de alimentare este deteriorat, acesta trebuie înlocuit de producător sau de un centru de service autorizat, pentru a evita orice posibil risc.
- Page 136 să fie așezat sau instalat în poziția normală de utilizare. Copiilor cu vârste cuprinse între 3 ani și 8 ani nu le este permis să introducă ștecărul în priză, să regleze dispozitivul, să curețe dispozitivul și/sau să efectueze lucrările de întreținere care îi revin utilizatorului.
- Page 137 22. Nu utilizați dispozitivul lângă apă sau în locuri cu umiditate ridicată, de ex. într-un subsol umed, lângă o piscină, o cadă sau un duș. Asigurați-vă că în dispozitiv nu poate pătrunde apă. 23. Nu utilizați dispozitivul în imediata apropiere a benzinei, gazului, uleiului, alcoolului sau a altor lichide sau gaze explozive și inflamabile.
- Page 138 29. Atenție! - Unele părți ale produsului se pot încălzi foarte puternic și pot provoca arsuri. Este necesară o atenție deosebită atunci când sunt prezenți copii și persoanele care au nevoie de protecție. Lăsați întotdeauna dispozitivul să se răcească înainte de a-l curăța sau demonta.
- Page 139 PERICOL DE RĂNIRE ATENȚIE În timpul utilizării dispozitivul devine fierbinte! Nu atingeți niciodată dispozitivul în timpul funcționării acestuia → acesta poate provoca ARSURI grave. ATENȚIE PERICOL DE INCENDIU Dispozitivul nu trebuie acoperit în timpul funcționării! DISTANȚA DE SIGURANȚĂ Păstrați o distanță de siguranță de cel puțin un metru față de obiectele ușor inflamabile de ex.
- Page 140 Simbol: Semnificație: Clasa de protecție 2 Simbolul indică faptul că dispozitivul este alocat clasei de protecție 2. Dispozitivele din clasa de protecție 2 nu sunt conectate la conductorul de protecție. În schimb, între părțile sub tensiune și accesibile acestea au o izolație întărită...
- Page 141 și directivele esențiale ale UE. Puteți vizualiza în orice moment declarația de conformitate detaliată la următorul link: https://www.hornbach.com/productcompliance/ Ne rezervăm dreptul de a nu răspunde în privința unor eventuale erori și de a face modificări de natură tehnică. Conținutul livrării ▪...
- Page 142 Dacă aveți incertitudini, nu utilizați dispozitivul, ci contactați distribuitorul. 2. Selectați un loc potrivit pentru dispozitiv și luați în considerare toate avertizările din aceste instrucțiuni de utilizare. IMPORTANT De preferință, aeroterma pentru baie trebuie instalată permanent pe un racord electric, mai ales atunci când este utilizată...
- Page 143 INDICAȚIE Dacă nu veți folosi telecomanda pentru o perioadă lungă de timp (4 săptămâni sau mai mult), scoateți bateriile din telecomandă. Montaj pe perete! Atenție! La montare, punctul cel mai de jos al dispozitivului trebuie să fie la 180 cm deasupra solului! 1.
- Page 144 4. Agățați aeroterma de șuruburile cu suporturile de montare, glisați-o până la capăt spre stânga și trageți-o în jos. Punerea în funcțiune și operarea • Întrerupătorul principal trebuie să fie oprit (O). • Desfășurați complet cablul de alimentare și introduceți ștecărul într-o priză...
- Page 145 • Apăsarea tastei de pornire/oprire pornește dispozitivul. Pe afișaj apare așa cum este prezentat în fig. A. • Prin apăsarea o dată a butonului de funcționare a telecomenzii dispozitivul încălzește la jumătate din putere. Pe afișaj apare așa cum este prezentat în fig.
- Page 146 Prin aceasta, dispozitivul menține aerul din încăpere în mișcare și, prin urmare, poate determina în mod optim dacă încăperea se răcește. După 3 minute, dispozitivul revine în modul pregătit de funcționare. Dacă încăperea s-a răcit cu 2 °C sub temperatura setată, dispozitivul se încălzește din nou. •...
- Page 147 7. Apăsați tastele plus și minus pentru a seta temperatura dorită. 8. Atât timp cât o valoare se aprinde intermitent, o puteți modifica sau puteți trece la următoarea setare. Dacă așteptați prea mult, modul de setare va fi întrerupt. 9. Apăsați până la sfârșit pe OK pentru a confirma setarea. 10.
- Page 148 Observații: • Pentru a verifica setările, apăsați succesiv DAY, EDIT, TIME/ON și TIME/OFF. Pe afișaj apar setările. • Temporizatorul poate fi setat doar în ore întregi, nu în minute. • TIME/OFF trebuie să fie întotdeauna după TIME/ON. • Dacă dispozitivul este oprit de la întrerupătorul principal, a avut loc o întrerupere a curentului sau a fost scos ștecărul, setările se pierd.
- Page 149 Puteți șterge praful de pe partea din spate a dispozitivului cu un pămătuf pentru îndepărtarea prafului. Pentru a curăța bine partea din spate, deșurubați aeroterma pentru baie de pe perete. INFORMAȚII TEHNICE Numărul articolului: negru: 10530795, 10530804 alb: 10530796, 10530805 Tensiune de intrare: 220-240 V~ Frecvență: 50 Hz 1800 –...
- Page 150 Informații necesare despre încălzitoarele electrice pentru spații individuale Numărul articolului 10530795, 10530804, 10530796, 10530805 Informații Informații Simbol Valoare Unitate Unitate Numai pentru încălzitoarele electrice pentru spații individuale cu acumulator de căldură: Putere termică Tipul sistemului de control al aportului de căldură...
- Page 151 OPERATING MANUAL Bathroom Fan Heater 2000 W ART.NO. BLACK: 10530795, 10530804 ART.NO. WHITE: 10530796, 10530805 CONGRATULATIONS! THANK YOU FOR PURCHASING THIS HORNBACH PRODUCT. This product is intended for use in well-insulated areas and for occasional use only.
- Page 152 TABLE OF CONTENTS Important information on safety, place of use and electrical connections Recycling, disposal and Declaration of Conformity Scope of delivery Description of the appliance Place of use and connection to power supply Wall mounting and free standing Starting up and functions Safety features Cleaning and maintenance Technical information...
- Page 153 Intended Use This appliance is intended exclusively for the heating of domestic living spaces and may not be used for any other purpose. The appliance is suitable for wall-mounting only. It must be installed such that the lowest part of the appliance is 180 cm above the floor.
- Page 154 current load required, and above all must be reliably earthed. 6. Avoid using an extension cable, because this could overheat and cause a fire. 7. If the power supply cable is damaged, it must be replaced by the manufacturer or an authorised service centre to avoid all possible risks.
- Page 155 under 8 years must not be allowed to insert the plug into the socket, alter the settings, clean the appliance or perform user maintenance on the appliance. 14. Do not operate the appliance unattended. Whenever you leave the room, always switch off the appliance. 15.
- Page 156 23. Do not use the appliance in close proximity to petrol, gas, oil, alcohol or other explosive or flammable liquids or gases. 24. To minimise the risk of fire, ensure a distance of at least one metre between the air outlet of the appliance and any flammable materials such as: a.
- Page 157 allow children to clean or perform user maintenance on the appliance without supervision. 31. To avoid electric shocks, do not touch the plug with wet hands. RISK OF INJURY ATTENTION This appliance becomes hot during use. Never touch the appliance while it is in use → this may result in severe BURNS.
-
Page 158: Recycling, Disposal And Declaration Of Conformity
Symbol markings on the appliance Symbol: Meaning: Attention: Do not cover The symbol on the device indicates that it is not permitted to suspend any item (e.g. towels, clothing etc.) above the appliance or directly in front of it. To prevent overheating and the risk of fire, the heater must not be covered. -
Page 159: Scope Of Delivery
We hereby confirm that this article complies with the essential requirements, regulations and guidelines of the EU. The detailed declaration of conformity can be viewed at any time via following link: https://www.hornbach.com/productcompliance/ Errata and technical changes reserved. Scope of delivery ▪... -
Page 160: Description Of The Appliance
Description of the appliance Main switch with indicator lamp Display Timer button Function button (F) Air inlet grille (rear) Air outlet grille (front) Place of use and connection to power supply 1. Remove all packaging material and keep this away from the reach of children. After removing the packaging, check for any damage or signs of damage to the appliance. - Page 161 Open the battery cover on the bottom of the remote control unit, press the clasp on the battery cover inwards and pull it out. Remove the battery securing strips. Be sure to observe the correct polarity (+/-). To replace the battery: 1.
-
Page 162: Starting Up And Functions
1. Fit the mounting brackets to the top of the bathroom fan heater with the short side to the wall. Place against the wall, mark the drilling hole positions on the wall and remove the heater. 2. Drill two 8-mm holes in the wall at the places marked, horizontal and with a spacing of 18.7 cm. 3. - Page 163 NOTE The remote control unit only works when its sensor is aimed directly at the bathroom fan heater. The appliance must be in standby mode (Check the display) • Press the ON/OFF button to switch the appliance on. The display appears as in Fig.
- Page 164 Setting the temperature: • Press the plus or minus button while the appliance is in operation. The display shows the default value ‘23’. Next, press the plus or minus button to set the desired temperature (10-35°C). Press OK to confirm your setting. The display now shows the set temperature and the power level.
- Page 165 . The display shows the default value ‘00’. Press TIME/ON repeatedly to set the 5. Now press start time (0-24), e.g. to 07:00, see Fig. G. 6. Now press . By default the display now shows the start time. Press TIME/OFF repeatedly to set the end time (0-24), e.g.
-
Page 166: Safety Features
Remarks: • To check your settings, press the following sequence of buttons: DAY, EDIT, TIME/ON and TIME/OFF. The settings appear on the display. • The timer can be set to whole hours but not to minutes. • TIME/OFF must always be later than TIME/ON. •... -
Page 167: Technical Information
Dust can be removed from the rear of the appliance with a duster. To clean the rear thoroughly, unscrew the bathroom fan heater from the wall. TECHNICAL INFORMATION Article number: black: 10530795, 10530804 white: 10530796, 10530805 Input voltage: 220-240 V~... -
Page 168: Required Data For Single-Room Electrical Heating Devices
Required data for single-room electrical heating devices Article number 10530795, 10530804, 10530796, 10530805 Information Symbol Value Unit Information Unit Single-room electric storage heaters only: Heat output Method of heat transfer control Manual control of heat transfer with integrated Nominal heat output... - Page 169 Manufactured for HORNBACH Baumarkt AG Hornbachstraße 11 76879 Bornheim / Germany 10530795_10530804_10530796, 10530805_2022/04_V1.0...
Need help?
Do you have a question about the 10530795 and is the answer not in the manual?
Questions and answers