
Subscribe to Our Youtube Channel
Related Manuals for Advantech EPD-230


Summary of Contents for Advantech EPD-230
- Page 1 User Manual EPD Device EPD-230, EPD-232 System Solution Wireless ePaper Display Solution...
- Page 2 No part of this manual may be reproduced, copied, translated, or transmitted in any form or by any means without the prior written permission of Advantech Co., Ltd. The information provided in this manual is intended to be accurate and reliable.
- Page 3 Product Warranty (2 years) Advantech warrants the original purchaser that each of its products will be free from defects in materials and workmanship for two years from the date of purchase. This warranty does not apply to any products that have been repaired or altered by persons other than repair personnel authorized by Advantech, or products that have been subject to misuse, abuse, accident, or improper installation.
- Page 4 Note! If some optional modules are offered with the system, additional system certificates may be required in certain regions/countries. Please check with Advantech Sales or Product Manager for certificate application ser- vices. FCC Caution Any changes or modifications not expressly approved by the party responsible for compliance could void the user’s authority to operate this equipment.
- Page 5 干擾現象時,應立即停用,並改善至無干擾時方得繼續使用。前項合法通信,指 依電信法規定作業之無線電通信。低功率射頻電機須忍受合法通信或工業、科學 及醫療用電波輻射性電機設備之干擾。 Technical Supports and Assistance Visit the Advantech website at www.advantech.com/support to obtain the latest product information. Contact your distributor, sales representative, or Advantech's customer service center for technical support if you need additional assistance. Please have the following information ready before calling: –...
- Page 6 Packing List Before system installation, check that the items listed below are included and in good condition. If any item does not accord with the list, contact your dealer immediately. EPD-230, EPD-232 System Device Ordering Information Part No. Description EPD-023B2AG-NTC02 2.9"...
- Page 7 sion or the leakage of flammable liquid or gas. DISCLAIMER: These instructions are provided according to IEC 704-1 standards. Advantech disclaims all responsibility for the accuracy of any statements contained herein. EPD-230/232 User Manual...
- Page 8 Equipment L'équipement est tombé et a été endommagé. Equipment L'équipement présente des signes évidents de rupture. AVERTISSEMENT: Cet ensemble d'instructions est donné conformément à la norme CEI 704-1. Advantech décline toute responsabilité quant à l'exactitude des déclara- tions contenues dans le. EPD-230/232 User Manual viii...
-
Page 9: Table Of Contents
Chapter Product Overview ........1 Introduction ....................2 Specifications .................... 2 System implementation................3 1.3.1 Advantech EPD-230, EPD-232 & DeviceOn/ePaper Solution ..3 Chapter EPD-230, EPD-232 Network Specification5 System Architecture .................. 6 Figure 2.1 EPD-230, EPD-232 Network Topology ...... 6 2.1.1 System Environment.............. - Page 10 Final Association Between EPD Device, Target Product and Product Data................51 4.3.8 Smart Warehouse Pick to Light Scenario ........52 Integrate EPD APIs Into Your System ............ 53 Control EPD Data Through DeviceOn/ePaper API......... 54 DeviceOn/ePaper Feature list..............58 4.6.1 Component List................58 EPD-230/232 User Manual...
-
Page 11: Chapter 1 Product Overview
Chapter Product Overview... -
Page 12: Introduction
Introduction EPD-230, EPD-232 is an ePaper device which Supportss ultra low power 2.4GHz RF wireless integrated with a 2.9” EPD with an ARM Cortex-M3 processor. The device is designed for hospital, pharmacy, factory, warehouse and retail applications. With optimization on power consumption and device management, low data rate applica- tions can achieve years of battery life and thousand of device connections. -
Page 13: System Implementation
Image for EPD needs to follow these instructions. Image needs to set as 296 x 128 pixels, do not resize which will cause jaggy edges 24 bit / BMP format for EPD-230, EPD-232 Black: (0,0,0) / White (255, 255, 255)/ Red (255,0,0) System implementation The EPD device can be applied to different applications and system integrators can control the RESTful APIs to design for different scenarios. - Page 14 Advantech provides a total solution for development to select the different architec- ture according to the end customer’s system requirements. EPD-230, EPD-232 is the end node of the system. Developers can apply Advantech WISE-3240 to connect to DeviceOn/ePaper which is installed in Advantech’s Embed- ded Computer /EPD-Server.
-
Page 15: Chapter 2 Epd-230, Epd-232 Network
Chapter EPD-230, EPD-232 Network Specification... -
Page 16: System Architecture
System Architecture Figure 2.1 EPD-230, EPD-232 Network Topology 2.1.1 System Environment Device1 Version ARK 2250L/DeviceOn/ePaper Ubuntu 18.04 WISE Router: WISE3240 OpenWRT 15.05.1 EPD Device CC2650 TI RTOS zstack 1.2.2a System Specification One single network can be built by WISE-3240. One WISE-3240 can support up to 400 EPD devices in one channel. -
Page 17: Epd Device
25 degree environment.) Supports multi-image storage. – Full size image: EPD-230, EPD-232: 20 pages in total. The first 3 pages are mapped to the 3 buttons. The other 17 pages can be controlled from the DeviceOn/ePaper directly. –... -
Page 18: Epd System-Initial Flow On Device Side
RF Scanning and go back to deep sleep mode until the button of the device has been pressed. The device will start scanning from the beginning. 2-Recon m 1-Recon m Stop scanning Ini al Scan scan scan EPD-230/232 User Manual... -
Page 19: Registration
(3) EPD device can auto join the network after the whitelist has been properly setup in DeviceOn/ePaper and Router. Note! End users need to be aware which 2.4Ghz wi-fi channels have been used to avoid to using the same channels. EPD-230/232 User Manual... -
Page 20: Secure Key Mechanism
Secure Key Mechanism Advantech EPD-230, EPD-232 asks users to change the secure key when data exchanges between devices. Users can setup a new secure key from DeviceOn/ ePaper and the router will start passing the new key to connected devices. As long as the key has been changed, the device can not operate in the original system which has a different secure key setting. -
Page 21: Chapter 3 Hardware Specification
Chapter Hardware Specification... -
Page 22: System Specification
System Specification EPD-230, EPD-232 is designed for customers to directly install on the application side. 3.1.1 ID Dimensions 3.1.2 Battery Installation Connect the power connector into the board connector. EPD-230/232 User Manual... - Page 23 Put the battery back into the housing. Replace the back cover. Screw it back on to finish. EPD-230/232 User Manual...
-
Page 24: Device Led Button Behavior
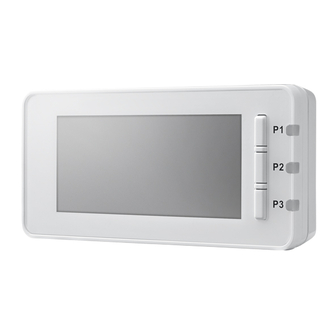
Device LED Button Behavior 3.2.1 EPD-230, EPD-232 button behaviors: item Status Action Result Press button for 0.5 sec and SW1 (P1) no press Refresh EPD to Page 1 release button Press button for 0.5 sec and SW2(P2) no press Refresh EPD to Page 2 release button Press button for 0.5 sec and... -
Page 25: Chapter 4 Epd-230, Epd-232 In Deviceon
Chapter EPD-230, EPD-232 in DeviceOn/ePaper... -
Page 26: Epd-230, Epd-232 With Deviceon/Epaper Solution
EPD-230, EPD-232 with DeviceOn/ePaper Solution Previously, we looked at EPD-230, EPD-232 as an end device. To build up a solution, we need a router to connect to our CMS: DeviceOn/ePaper provides a complete solution to help you import device data, design templates and manage devices easily. -
Page 27: Preparation
Preparation 4.2.1 Hardware Component List Advantech Embedded Computer: ARK-2250L or ARK-1123H Advantech IoT Router: WISE-3240 & Advantech EPD devices. 4.2.2 Software Component List Ubuntu 18.4 for ARK-2250L & ARK-1123H DeviceOn/ePaper Installation & License on ARK-2250L & ARK-1123H 500 connection licenses on ARK-2250L & ARK-1123H. - Page 28 4.2.3.1 Activate the Server Click the System in Setting. Click the Activate Server and enter the License Key provided in our sales pack- age. EPD-230/232 User Manual...
- Page 29 4.2.3.2 How to configure your FTP server on DeviceOn/ePaper Click the Storage button item under the OTA icon. EPD-230/232 User Manual...
- Page 30 Port, and Account Name as shown below. Storage Name: local [default] Security: NONE Domain: [Your Server IP] Port: 21 Account Name: user1 [default] Password: 123456 [default] Scroll down to choose the values for CMC and SMC and click Confirm. EPD-230/232 User Manual...
-
Page 31: Setup Wise-3240 With Ark And Deviceon/Epaper
If successful you will see the system show the Success screen, then click OK. 4.2.4 Setup WISE-3240 with ARK and DeviceOn/ePaper EPD-230/232 User Manual... - Page 32 IP Address: http://192.168.1.1 Login: The default the username and password are root and ePaper. Click the Login button to open the web configuration page. Click EPD Hub Configuration. Enter the server IP address and click Save & Apply. EPD-230/232 User Manual...
-
Page 33: Hands-On Epd Device On Deviceon/Epaper
Target Item ID is the key e.g. PN (part number). EPD device screen setup is via the EPD image template. 4.3.1 DeviceOn/ePaper Login Login to your ePaper Manager by entering the IP address. Enter the default User name and Password. User name: root Password: P@ssw0rd EPD-230/232 User Manual... - Page 34 If the user wants to change the password, please click root and click change pass- word. Then click OK. EPD-230/232 User Manual...
-
Page 35: Add Group & Device Into Deviceon/Epaper
4.3.2 Add Group & Device into DeviceOn/ePaper Add group by clicking add icon in Device Group in Setting. Add group by entering the Group Name and Description (optional), then click Save. EPD-230/232 User Manual... - Page 36 Add Router to Group. EPD-230/232 User Manual...
- Page 37 Note: Users may receive the mac address file when the EPD device ships. Single Item Added. Click "+" icon to Add single EPD tag to your Router. Multiple Items Added Click Upload white list file to add multiple EPD tags to your router. EPD-230/232 User Manual...
- Page 38 Add EPD device into DeviceOn/ePaper whitelist. There is a mac address label on the EPD-230, 332 back, users may scan QR Code to map the target item. Dispatch the EPD device to the Router (Option) Setup Router Channel ...
- Page 39 1). EPD device online. Click any button of the EPD device and you will see it on- line (30 mins for 400 pcs). 2).Click device list on the side bar menu, and select the group you want to add devices to. 3). Click the add button on the top-left corner. EPD-230/232 User Manual...
- Page 40 5). Open the hierarchy view until you see the device. Change the show number in order to select all devices under this router. 6). Select all by click the checkbox above. EPD-230/232 User Manual...
- Page 41 Set Router Encrypted Key Note: An optional step, since the system already has an encrypted key to pro- tect all transmission data. 1).Click Device List on the side bar menu, and select the device group for the router. EPD-230/232 User Manual...
- Page 42 2). Find the router device, and change to edit mode by clicking the edit button. 3). Click the name of router device to enter edit mode. 4.) Fill in the Encrypted Key field (32-characters with A-Z and 0-9), then click Save to finish the configuration. EPD-230/232 User Manual...
- Page 43 1). Click Device List on the side bar menu, and select the device group for the router. 2). Find the router device, and change to edit mode by clicking the edit icon. 3). Click the name of router to enter edit mode. EPD-230/232 User Manual...
-
Page 44: Import Item Data To Deviceon/Epaper
"content": { "device Content Title 01": "device Content01", "device Content Title 02": "device Content02" } }, { "code": "uniqueID_user_provide_2", "name": "item_name_user_provide_2", "content": { "device Content Title 11": "device Content11", "device Content Title 12": "device Content12" } }, ] } EPD-230/232 User Manual... - Page 45 Click the Data icon on the left-side navigation bar and click left side button as shown below. The detail steps are demonstrated as below. Step1. Click Data icon. Step2. Click "+Add" and enter the group name EPD-230/232 User Manual...
- Page 46 Step3. Click the Upload new items icon to import file Step4. Choose the Excel file to import, and it will show Uploaded successfully! EPD-230/232 User Manual...
-
Page 47: Design Your Own Template
We have provided you with a drag & drop user interface to help you design your templates more easily. Click the Template icon in the left-side navigation bar and choose various tools to design templates, such as Label, Text, Image, Shape, Barcode and QRcode. EPD-230/232 User Manual... -
Page 48: Combing Template And Item Data
System supports code 39 barcodes. QRcode 4.3.5 Combing Template and Item Data After importing data and making the template, we can combine them for regular data auto updates. 1) Select the desired Template 2) Choose the Item Group. EPD-230/232 User Manual... - Page 49 For example, word becomes red when temperatures are over 40 degrees. The next step demonstrates how to achieve this goal. a. Make two objects which show conditions are opposite. Click one object. Click the radio button option in the show condition. EPD-230/232 User Manual...
- Page 50 A pop up dialog will appear. Fill in the conditions to show this object. Note: if this item value is a number, you can use all operations. If this item value is a character, you only can use "==" or "!=" ). Finish the show condition setting. Click another object. EPD-230/232 User Manual...
- Page 51 In the dialog, fill in the conditions to show this object. Note: If this item value is number, you can use all operations. If this item value is character, you only can use "==" or "!=" ). Finish the show condition setting. EPD-230/232 User Manual...
- Page 52 The following will demo how to trigger the dithering function in ePaper Manager. Step1. Choose an image in the template and open the dithering function. EPD-230/232 User Manual...
- Page 53 Step2. Click save and preview buttons to preview it Step3. Then, users can close the dithering function to check the difference between dithering-ready and without dithering Step4. Click preview again to see the results without dithering the image EPD-230/232 User Manual...
-
Page 54: Epd Controller For Epd Device Management
2-6 Schedule: Users need to setup an EPD device data delivery schedule: Note: The timezone is determined by browser’s UTC time. – The user needs to setup the EPD device data delivery schedule: Device Task: Select Transmit. EPD-230/232 User Manual... - Page 55 Set EPD Template: select the EPD Template from the list which you’ve already designed. – Working Page: select which page in the EPD device. – The user may setup the schedule date and time for the system. EPD-230/232 User Manual...
- Page 56 The user can import data and bind data to the EPD device in this web page. We also offer a handset APP to bind device data to the EPD. 3. Binding Product item data with the APP. EPD-230/232 User Manual...
- Page 57 5" Industrial-grade handheld terminal with 1D barcode scanner. You will see the icon in your desktop. Please check your device link. Launch the app by clicking the icon. Enter the server location, account, and password to sign into e-Paper Manager. EPD-230/232 User Manual...
- Page 58 Enter your device code and Item code information to perform bind action. The PWS-472 device can scan a barcode quickly, which brings the device code and item code information into the fields. The Bind success! window will show up if successful. EPD-230/232 User Manual...
- Page 59 Click the Transmit button to transmit the image to the device. An information success window will show up. EPD-230/232 User Manual...
- Page 60 4. Binding template: 5. There are four actions for you to select. Preview: Current EPD device image preview Refresh: Re-fresh image Transmit: Transmit image Un-bind the EPD device and item EPD-230/232 User Manual...
-
Page 61: Final Association Between Epd Device, Target Product And Product Data
ID. 2) Target Item Product: Get a physical working ID Lot num as associate attribute. 3) The user needs to associate items above 4) Import RunCard Data needs to include field name: WorkID and data: Work001. EPD-230/232 User Manual... -
Page 62: Smart Warehouse Pick To Light Scenario
Action1: Picker take out the material according to the EPD's information| Action2: Picker uses barcode scanner to scan the QR code Aciton3: ERP system will update the stock status and trigger the API to request EPD to update the information Action4: Printer print out the label directly. EPD-230/232 User Manual... -
Page 63: Integrate Epd Apis Into Your System
// update Item Data function setItemData(){ var url = HOST + '/esl/v1/items'; var type = 'PUT'; var data = { "items": [ JSON.parse($('#log').val()) ] console.log(data); api(url, type, data, function(res){ if(res && res.result) alert("Item Successfully Updated!"); else alert("Ajax request error!"); EPD-230/232 User Manual... -
Page 64: Control Epd Data Through Deviceon/Epaper Api
{ "items": [ { "code": "X001", "name": "John", "content: "{"name": "John","age": "18"}" } ] } response(example) { "result": true } 2. Upload EPD Data for a specific item group path: /esl/v1/items/name/{name} method: POST header: Basic Authorization EPD-230/232 User Manual... - Page 65 ?agentid=[DEVICE AGENT ID] response(example) (Notes: all possible status are "sending command", "com- mand timeout", "setting image", "set image okay", "set image error", "refreshing image", "refresh image okay", "refresh image error") { "status": "set image okey" } EPD-230/232 User Manual...
- Page 66 { "agentid": "00000001-0000-0000-0012-4b001557aa72", "refresh": 1, "page": 0 response(example) { "status": "setting image" } 10. Transmit Image with Item Data path: /esl/v1/devices/setImageWithData method: POST header: Basic Authorization body parameters: – agentid: string – item: JSON EPD-230/232 User Manual...
- Page 67 { "agentid": "00000001-0000-0000-0012-4b001557aa72", "page": 0 } response(example) "status": "refreshing image" } 12. Get Item path: /esl/v1/items/itemcode/{itemcode} method: GET header: Basic Authorization response(example) { "code": "device_00001", "iid": 243, "name": "RunCard", "content": "{\"device_Number\":\"device_00001\",\"Template_ID\":\"RunCard\",\"Wor- kOrder\":\"YSI5001ZA\",\"PartNumber\":\"DLV8315- 1J30000\",\"Qty\":\"20\",\"Station\":\"Assy\",\"NextStation\":\"BurnIn\",\"Arrival- Time\":\"5/22/18 9:11\",\"LeaveTime\":\"\",\"StayTime\":\"0\",\"Cau- tions\":\"\",\"Remark\":\"\"}" } EPD-230/232 User Manual...
-
Page 68: Deviceon/Epaper Feature List
3. EPD Device: Shows image update status. 4. Schedule tasks: Users can select current schedule in the system EPD device search Search criteria Account/ Group/Connecting Status/ EPD Device Mode Controller Properties Name / Panel type/ total page /Connecting status / Update Status EPD-230/232 User Manual... - Page 69 Action Step3: The users can setup Transmit/Refresh as the scheduling task daily/ weekly/monthly/yearly, and choose EPD Type, Item and Template of schedule Step4: After the save is clicked, the arranged schedule will be added in the list EPD-230/232 User Manual...
- Page 70 Step2: Click the “add” icon for schedule creation Step3: Users can setup Transmit/Refresh as the scheduling task daily/weekly/ Action monthly/yearly, and choose EPD type, item and template of the schedule. Step4: After the saving, the arranged schedule will be added in the list EPD-230/232 User Manual...
- Page 71 2. Select the bind icon Action 3. The system will pop-up another page for available target product and data. Bind Template The user can manually bind TEMPLATE to EPD device Preview The user can preview the EPD Device image. EPD-230/232 User Manual...
- Page 72 3. If the user clicks "transmit" or "re-fresh" for the device, then the system keeps busy, not responding from the device side. The user can click "reset" to cancel the execution. Action 4. LED blinking values: maximum is 86400, minimum is 0, duration cycle 1.5 secs. EPD-230/232 User Manual...
- Page 73 Supports CSV, EXCEL , JASON Format Add new data into current item Item Data Working Group 1. The user can perform a different working group in the same system. 2. The user can add a new group by clicking the Add icon. EPD-230/232 User Manual...
- Page 74 The user can create a new template, import from JSON file, or copy from cur- rent one Template Provides image tool Save / Preview / Delete / Previous Movement or Next Movement / Zoomin or Zoomout / Dynamic or Static Text / Shape / Image / Barcode / QRcode EPD-230/232 User Manual...
- Page 75 Display orientation: Forward/Reverse Schematic view Template 1.EPD controller should setup the binding template. 1. Select on component 2. Right side shows the component properties. 3. Select the field “Value” and drop down menu shows data field from item data. EPD-230/232 User Manual...
- Page 76 FTP server. Before proceeding this step, you need to upload the package file in the upload page. Deploy: This step will deploy the file and upgrade the EPD devices firmware to the specific version. Select upgrade device Package File preparation for the upgrade EPD-230/232 User Manual...
- Page 77 Storage FTP & File path setting Role Definition as below Super Admin: Super Administrator Admin: System Administrator Device Admin: Device Administrator Account & Group Setting Sets the device into group. Email Service EPD-230/232 User Manual...
- Page 78 1.Click System button under the setting list 2.Click Email Service Setting, and fill in the following form. Setting 3.Success. EPD-230/232 User Manual...
- Page 79 4.Add email account list for this service. Click Account button under the Set- ting List. 5.Add an admin account. Click Save button. An email will be sent to this local user when an event occurs. Setting Add EPD connection number license. EPD-230/232 User Manual...
- Page 80 Event Setting The user can query the event by clicking the calendar. Document Document: User Manual - RESTful API EPD-230/232 User Manual...
- Page 81 EPD-230/232 User Manual...
- Page 82 No part of this publication may be reproduced in any form or by any means, electronic, photocopying, recording or otherwise, without prior written permis- sion of the publisher. All brand and product names are trademarks or registered trademarks of their respective companies. © Advantech Co., Ltd. 2021...
Need help?
Do you have a question about the EPD-230 and is the answer not in the manual?
Questions and answers