
Related Manuals for SUMERAIN S2096 W Series


Summary of Contents for SUMERAIN S2096 W Series
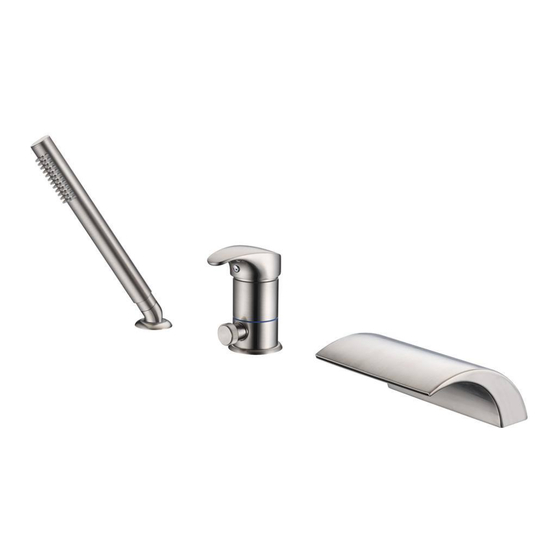
- Page 1 MODEL: S2096XW Version: 3.0 INSTALLATION GUIDE ROMAN WATERFALL BATHTUB FAUCET MODEL FINISH S2096CW CHROME S2096NW BRUSHED NICEKL S2096DW MATTE BLACK S2096BGW BRUSHED GOLD SUMERAIN SANITARY GROUP WWW.SUMERAIN.COM...
-
Page 2: Before Proceeding
THANK YOU Dear Valued Customer, SUMERAIN would like to take this opportunity to thank you for purchasing SUMERAIN products. It is our sincere hope that you are completely satisfied with your new purchase. All SUMERAIN products are carefully engineered, and factory tested to provide long trouble-free use under normal conditions. This product is easy to install using basic tools and our easy to follow illustrated instructions. -
Page 3: Limited Lifetime Consumer Warranty
If a defect is found in normal residential use, SUMERAIN will, at its election, repair, provide a replacement part or product, or make appropriate adjustment. - Page 4 2.7 KG [ 5.96 lbs ] Net Weight Gross Weight 3.1 KG [ 6.95 lbs ] Working water press 0.2 ~0.8 Mpa 13.4L/M [ 3.54GPM ] Flow Rate Packing box size 400mm[15-7/10”] x 260mm[10-3/10”] x 90mm[3-1/2”] SUMERAIN SANITARY GROUP WWW.SUMERAIN.COM...
- Page 5 DIMENSION FRONT VIEW OF FAUCET SUMERAIN SANITARY GROUP WWW.SUMERAIN.COM...
- Page 6 SIDE VIEW OF SPOUT SIDE VIEW OF CONTROL VALVE FRONT VIEW OF CONTROL VALVE SUMERAIN SANITARY GROUP WWW.SUMERAIN.COM...
-
Page 7: Installation Steps
2096019 2096020 Lock Nut 1PCS G1/2” (G3/8) hose 3PCS 2096021 2096022 Extended hose 1PCS 1.5m handshower hose 1PCS 2096023 2096024 If any of these items are missing, please contact SUMERAIN consumer service by email to: supports@sumerain.com SUMERAIN SANITARY GROUP WWW.SUMERAIN.COM... - Page 8 4. INSTALLATION HOLES INSPECTION Verify that the hole sizes and positions in the wall are correct, the diameter of mounting hole recommend 32mm(1-1/4”) and 48mm(1-7/8”) for spout hole ,the max thickness of deck should be 22mm(7/8’’) SUMERAIN SANITARY GROUP WWW.SUMERAIN.COM...
-
Page 9: Installation
3~5 minutes to flush out dirt and debris. Shut off the water supply again after done. 5.2 Position spout with shank onto mounting surface, attach rubber washer on spout shank and fasten with spout shank lock nut by Wrench from underneath. SUMERAIN SANITARY GROUP WWW.SUMERAIN.COM... - Page 10 5.3 Screw in the hoses to the bottom of control valve as below drawing Bottom view of control valve Hoses connection SUMERAIN SANITARY GROUP WWW.SUMERAIN.COM...
- Page 11 5.4 Place control valve with hoses across the mounting surface, secure it with lock nut by screwdriver. Connect the hoses to the spout shank as below drawing SUMERAIN SANITARY GROUP WWW.SUMERAIN.COM...
- Page 12 Install spray support assembly as below. Tighten the rubber washer and fasten with lock nut from underneath. Through the sprayer hose across the center hole of sprayer holder as below diagram, Insert hand shower sleeve in to the hose. SUMERAIN SANITARY GROUP WWW.SUMERAIN.COM...
- Page 13 Connect shower hose to the extender hose of control valve as drawing. Screw the hand shower in the hand shower adapter. Please don’t forget to put into the rubber washer for leaking proof. 5.10 Install the hand shower into the end of shower hose with correct position. SUMERAIN SANITARY GROUP WWW.SUMERAIN.COM...
- Page 14 Connect all components with flexible hose. 7. INSPECTION 7.1 Turn on hold and cold water supply and check all connection for ensuring no leaking anywhere. INSTALL FINISH SUMERAIN SANITARY GROUP WWW.SUMERAIN.COM...
- Page 15 Please note: if the surface is already damaged, the effect of cleaning materials will cause further damage. Components with damaged surfaces must be replaced or injury could result. Damage caused by improper treatment is not covered under the warranty. HONGKONG SUMERAIN SANITARY INDUSTRY CO., LIMITED Address: ROOM 1018, HOLLYWOOD PLAZA 610 NATHAN ROAD MONGKOK, KL,HONGKONG...
Need help?
Do you have a question about the S2096 W Series and is the answer not in the manual?
Questions and answers