Table of Contents
Advertisement
Quick Links
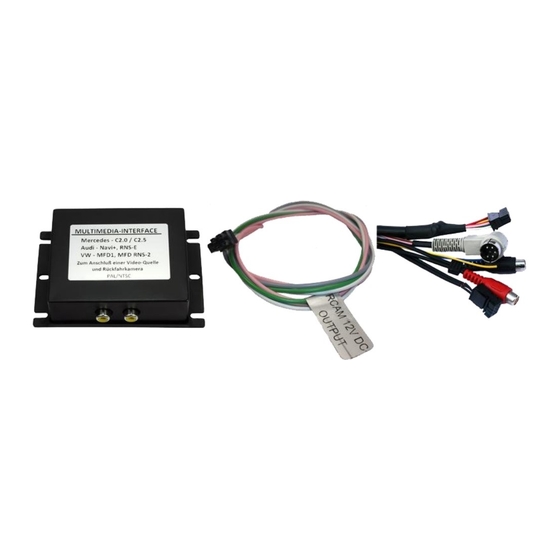
c.LOGiC lite-Interface
C1-C25
For navigation systems
Mercedes Benz
Comand 2.5
Product features
• full plug and play multimedia interface
• 1 AV-input with separate IR-control channel
• control of after-market devices, e.g. DVB-T tuner, DVD-player, DVD-changer, ...
• after-market rear-view camera input activation
• automatic switching to rear-view camera input (only from c.LOGiC-mode)
• rear-view camera power (+12V max. 1A)
• power on remote out trigger signal (+12V max. 1A) to switch on connected devices
• video-in-motion
Version 01.09.2011
C1-C25
Advertisement
Table of Contents

Subscribe to Our Youtube Channel
Related Manuals for Caraudio-Systems c.LOGiC lite C1-C25


Summary of Contents for Caraudio-Systems c.LOGiC lite C1-C25
- Page 1 c.LOGiC lite-Interface C1-C25 For navigation systems Mercedes Benz Comand 2.5 Product features • full plug and play multimedia interface • 1 AV-input with separate IR-control channel • control of after-market devices, e.g. DVB-T tuner, DVD-player, DVD-changer, … • after-market rear-view camera input activation •...
-
Page 2: Table Of Contents
Contents 1. Prior to Installation 1.1. Delivery contents 1.2. Check compatibility of vehicle and accessories 2. Connection schema 3. Installation 3.1. Connections to the Comand 3.2. Interconnecting Interface-box and harnesses 3.3. Connecting peripheral devices 3.3.1. AV-source 3.3.2. Installing AV-source’s IR-sensor additionally 3.3.3. -
Page 3: Prior To Installation
Legal Information By law, watching moving pictures while driving is prohibited, the driver must not be distracted. We do not accept any liability for material damage or personal injury resulting, directly or indirectly, from installation or operation of this product. This product should only be used while standing or to display fixed menus or rear-view-camera video when the vehicle is moving, for example the MP3 menu for DVD upgrades. -
Page 4: Check Compatibility Of Vehicle And Accessories
1.2. Check compatibility of vehicle and accessories Requirements Vehicle CL-class (C215) til 08/2002, S-class (W220) til 08/2002 Navigation Comand 2.5 Limitations Factory-TV-tuner Must NOT be installed. After-market rear-view cam Automatic switching to camera only works from c.LOGiC-mode 2. Connection schema Version 01.09.2011 C1-C25... -
Page 5: Installation
3. Installation Switch off ignition and disconnect the vehicle’s battery! If according to factory rules disconnecting the battery has to be avoided, it is usually sufficient to put the vehicle in sleep-mode. In case the sleep-mode does not show success, disconnect the battery with a resistor lead. -
Page 6: Interconnecting Interface-Box And Harnesses
3.2. Interconnecting Interface-box and harnesses Plug harness C1C-MB25 into 12pin Molex of Interface-box C1C-M01. 3.3. Connecting peripheral devices It is possible to connect one after-market AV-source and an after-market rear-view camera to the c.LOGiC Interface. Before final installation of the peripheral devices, we recommend to test-run the c.LOGiC functions to detect incompatibility of vehicle, navigation, factory accessories or peripheral devices as soon as possible. -
Page 7: Av-Source
3.3.1. AV-source The c.LOGiC interface has the possibility to connect and remotely control by navigation buttons one pre-programmed device. The device list in the device control table (Appendix A) shows the pre-programmed remote channels and the related IR-remote cables STA-xxx which must be ordered separately for the control of the device. -
Page 8: After-Market Rear-View Camera
3.3.3. After-market rear-view camera Connect the video RCA of the after-market rear-view camera to female RCA connector R-CAM IN of Interface-box C1C-M01. Connect the green wire of the 4pin cable to the camera power supply (+12V max. 1A) of the after-market rear-view camera and the grey wire to ground of the vehicle. The green wire is high (+12V max. -
Page 9: Assigning Device Control
4.3. Assigning device control After selecting the c.LOGiC as current AV source, longpress the number “1”-button or shortpress the “RET”-button. The display in the instruments will show “TV 1” and “RC01”. Turn right knob until the device-related IR-code as described in device control table (appendix A) is reached. Push right knob to confirm the assignment. -
Page 10: Picture Settings
Button assignment table c.LOGiC Comand 2.5 COMAND DVB-T USB-LiNK DVD-player DVD- iPod®-control Analog-tuner button changer SCAN POWER PLAY PLAY PLAY/PAUSE SCAN ↑ ↑ ↑ ↑ ↑ VOL + EXIT STOP STOP POWER ← ← ← ← ← CH - 4 long DISPLAY VOL- DISPLAY... -
Page 11: Audio Settings
Power consumption Temperature range -30°C to +80°C Weight Measurements (box only) B x H x T 106 x 30 x 71 mm 6. Technical Support Caraudio-Systems Vertriebs GmbH NavLinkz GmbH manufacturer/distribution corporate sales/tech dealer-support Rheinhorststr. 22 Eurotec-Ring 45 D-67071 Ludwigshafen am Rhein...
Need help?
Do you have a question about the c.LOGiC lite C1-C25 and is the answer not in the manual?
Questions and answers