Advertisement
INT-TSI
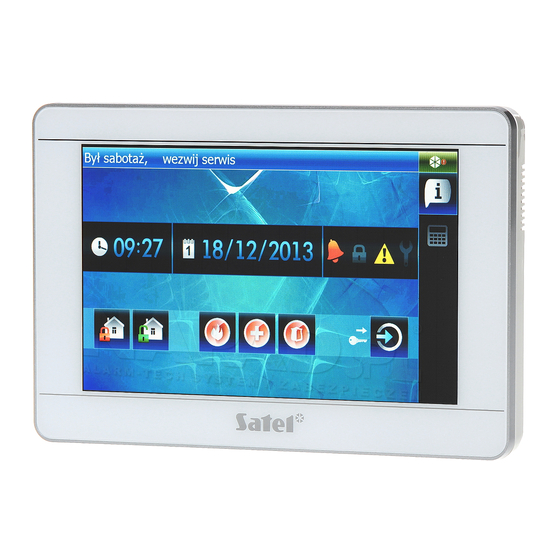
Keypad
Full manual is available on
to our website and download the manual.
The device should be installed by qualified personnel.
Changes, modifications or repairs not authorized by the manufacturer shall void
your rights under the warranty.
Disconnect power before making any electrical connections.
This is a Class A product. In a domestic environment this product may cause
radio frequency interference. The ferrite ring is delivered with the device. Use it
to decrease the electromagnetic interference (see the installation instructions
below).
The device is designed to be used only in the local area networks (LAN). It must
not be connected directly to the public computer network (MAN, WAN).
Connection to the public network may only be done through a router or xDSL
modem.
The keypad is designed for indoor installation. The place of installation should be readily
accessible to the system users.
The INT-TSI keypad can work in one of the following modes:
MASTER – default mode – the keypad is to be connected to the keypad bus of the control
panel. The keypad is to be connected to the Ethernet if you want:
the image from cameras to be displayed,
the door station to be supported,
the "Weather" widget to be used,
the additional INT-TSI keypad to work in SLAVE mode.
SLAVE – the keypad is to be connected to the Ethernet. Communication with the control
panel will take place by means of the keypad working in MASTER mode. The keypad
working in SLAVE mode does not support the zones.
There can be one additional keypad working in SLAVE mode to each keypad working in
MASTER mode.
Description of terminals
COM
- common ground.
+12V
- power supply input.
CKM
- clock.
Quick installation guide
www.satel.eu
. Scan the QR code to go
int-tsi_sii_en 07/22
Advertisement
Table of Contents

Related Manuals for Satel INT-TSI


Summary of Contents for Satel INT-TSI
- Page 1 The keypad is designed for indoor installation. The place of installation should be readily accessible to the system users. The INT-TSI keypad can work in one of the following modes: MASTER – default mode – the keypad is to be connected to the keypad bus of the control panel.
- Page 2 INT-TSI SATEL - data. Z1, Z2 - zones. RSA, RSB - terminals intended for future applications (RS-485). Installation of the keypad working in MASTER mode 1. Open the keypad enclosure (Fig. 1). The enclosure opening tool is included in the keypad delivery set.
- Page 3 (Fig. 3), from an expander with power supply or from an additional power supply unit. The INT-TSI keypad cannot be powered from the +KPD output of the INTEGRA 24, INTEGRA 32 and INTEGRA 128-WRL control panels. Use the OUT1 or OUT2 output programmed as “41.
- Page 4 The INT-TSI keypad cannot be powered from the +KPD output of the INTEGRA 24, INTEGRA 32 and INTEGRA 128-WRL control panels. Use the OUT1 or OUT2 output programmed as “41.
Need help?
Do you have a question about the INT-TSI and is the answer not in the manual?
Questions and answers