
Related Manuals for Hammer Strength MTS HIGH ROW


Summary of Contents for Hammer Strength MTS HIGH ROW
- Page 1 MTS HIGH ROW UNPACKING AND ASSEMBLY INSTRUCTIONS QUESTIONS OR PROBLEMS? CONTACT US AT 1-800-216-8896. ASK FOR JOHN MORLEY (ext. 4606) M051-K50-C111...
- Page 2 Follow the steps below when unpacking the components of the pallet. Keep in mind that the sides of the MTS HIGH ROW are heavy and not stable once they are unbolted from the pallet. 1. Remove the protective plastic wrap.
- Page 3 MTS HIGH ROW Assembly Instructions 2. Remove the loose parts (upholstery, seat bracket, counterweights, bolt bag). Using a ½” socket, remove the lag bolts that secure the bottom brace, front brace, top, and seat assembly to the pallet. 3. Remove the two lag shipping bolts from the 2 x 4 on top of the sides (shown in Figure 2).
-
Page 4: Tools Needed
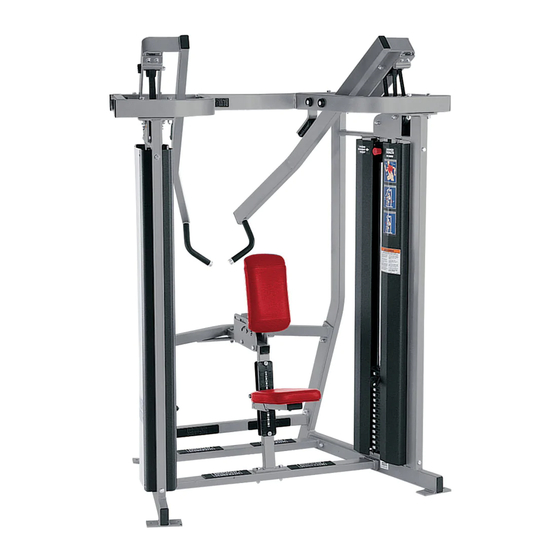
MTS HIGH ROW Assembly Instructions 2. ASSEMBLY TOOLS NEEDED 3/4” & 9/16” 3/4” & 9/16” Pinch bar socket wrench combination wrench ASSEMBLY TIME Two people can accomplish this assembly in approximately 1 hour. PRIMARY HARDWARE COMPONENTS MTS HIGH ROW Primary Hardware Components. - Page 5 MTS HIGH ROW Assembly Instructions 1. Left side 2. Right side 3. Bottom brace 4. Front brace 5. Top 6. Left arm 7. Right arm (attached 8. Seat 9. Shields (attached to to right side) assembly (attached to left side)
- Page 6 1. Bolt the bottom brace to the left side of the MTS HIGH ROW. Slide the left side of the MTS HIGH ROW up to the bottom brace and bolt it to the bottom brace using two of the ½” x 2-3/4”...
- Page 7 MTS HIGH ROW Assembly Instructions 2. Bolt the bottom brace to the right side of the MTS HIGH ROW. Slide the right side of the MTS HIGH ROW up to the bottom brace. With a ¾” socket wrench and combination wrench, bolt it to the bottom brace using two of the 1/2”...
- Page 8 3. Bolt the front brace to the sides. Insert the two upper ½” x 2-3/4” hex head bolts with hammerhead washers from the outside of the MTS HIGH ROW into the locations shown at left. Put on a star washer and hand tighten the locknuts so that the front brace will be easier to install.
- Page 9 4. Bolt the top to the sides. Insert the four ½” x 3-1/4” hex bolts and nuts into the top of the MTS HIGH ROW as shown below. No star washers are used on these bolts since the nuts rest on the arm bearings.
- Page 10 MTS HIGH ROW Assembly Instructions 5. Bolt counterweights to arms. Bolt the counterweights to the arms as shown in the figure below. Use the ½” x 1-3/4” bolts with star washers. Make sure the counterweights are installed as shown below and are not installed upside down (tops should be flush with the flange).
- Page 11 MTS HIGH ROW Assembly Instructions 6. Bolt seat bracket to the seat assembly. Bolt upholstery to seat assembly. The bracket is attached with a rod and a 3/8” x 4-1/4” bolt. Remove the rod and bolt, place the bracket on the seat assembly and retighten the rod and bolt.
- Page 12 7. Bolt seat assembly to MTS HIGH ROW. Using the 1/2” x 2-3/4” bolts with star washers, fasten the seat back and bottom to the bottom brace of the MTS HIGH ROW as shown at left. Star washers go on the top and bottom of the bolt.
- Page 13 MTS HIGH ROW Assembly Instructions Assembly Figure 8. Connect the belts to the weight stacks (30 ft/lbs). Run the belts through the arm pulleys and bolt down the belts. Thread the belts from the weight stacks through the arm pulleys to the belt plate. With the weight stack pin in the bottom (150 lb.) plate, pull the belt until it’s tight.
- Page 14 MTS HIGH ROW Assembly Instructions WEIGHT STACK AND INCREMENT WEIGHT LABELS See Figure A See Figure B NOTE: STUDY THE FIGURE BELOW BEFORE APPLYING ANY LABELS. 5 POUND 5 POUND INCREMENT INCREMENT WEIGHT WEIGHT Figure A. Right side (as you’re sitting on Figure B.
- Page 15 MTS HIGH ROW Assembly Instructions 5 POUND INCREMENT WEIGHT Line up arrow on increment weight sticker Peel off backing on weight plate number with center of knob on increment weight. sheet and line up edge with holes. Press on numbers and remove top paper.
- Page 16 Hammerhead washers (circled) on inside of MTS HIGH ROW (10 each side) MTS HIGH ROW (2 each side) Assembly Figure 12. Hammerhead washer locations. Assembly Figure 12 shows the 24 bolt connections on the MTS HIGH ROW that need hammerhead washers.
- Page 17 MTS HIGH ROW Assembly Instructions CLEANING THE SHIELDS The shields on the MTS machine are made from LEXAN. Adherence to regular and proper cleaning procedures is recommended to preserve the appearance. Washing To Minimize Scratches Wash LEXAN with a mild soap or detergent (e.g. Joy Dishwashing Liquid) and lukewarm water using a clean sponge or a soft cloth.
- Page 18 1/2” x 2-3/4” 1/2” x 3-1/4” Hardware Figure 1. Hardware used to assemble MTS HIGH ROW. The parts shown in Hardware Figure 1 are used to bolt together the sides, bottom brace, front brace, seat assembly and arms. They are: 1A.
- Page 19 MTS HIGH ROW Assembly Instructions UPHOLSTERY HARDWARE Hardware Figure 2. Seat cushion bolts and washers. 2A. 3/8” x 1-1/2” hex head bolt (chest pad-seat frame) (4) (0017-00101-1411) 2B. 3/8” x 2-1/2” hex head bolt (seat-seat frame) (2) (0017-00101-1417) 2C. 3/8” flat washer (6) (0017-00104-0313)
-
Page 20: Preventive Maintenance Tips
MTS HIGH ROW Assembly Instructions PREVENTIVE MAINTENANCE TIPS ACTION DAILY MONTHLY QUARTERLY BI-ANNUALLY YEARLY AS NEEDED CLEAN Upholstery Guide Rods Linear Rods Shields Hand Grips INSPECT Belts Hardware Frame Hand Grips LUBRICATE Linear Bearing Guide Rods Range Limiter Clean: •...
Need help?
Do you have a question about the MTS HIGH ROW and is the answer not in the manual?
Questions and answers