Table of Contents
Advertisement
Quick Links
Advertisement
Table of Contents

Related Manuals for U-Reach MT Series


Summary of Contents for U-Reach MT Series
- Page 1 MT/MTC Series IDE/SATA Duplicator and Sanitizer User Manual v A.04...
-
Page 2: Table Of Contents
Index Table MT/MTCV vA.04 Product Disclaimer ....................3 Warranty ........................ 3 Piracy Statement ....................3 Before You Start ..................... 4 Notice Symbols....................... 4 Functions Table ...................... 5 Hardware Overview ....................9 Functions ......................12 1. Copy ......................12 2. Compare ....................13 3. -
Page 3: Product Disclaimer
U-Reach is not accountable for any incidental or consequential damages, including, but not limited to property harm, loss of time or data from use of any U-Reach products or any other damages attributable to product malfunction or failure of including without... -
Page 4: Before You Start
Before You Start Important Notice ⚫ Carefully read the entire manual before operating. ⚫ Make sure the source device is correct and functioning. ⚫ Equal capacity of source and target is recommended for guaranteed data consistency. ⚫ Using the Copy +Compare function provides the most flawless duplication. ⚫... -
Page 5: Functions Table
Functions Table Functions Descriptions Copies data from source device to targets. (There are four copy modes 1. Copy in function "6.2 Copy Area") 2. Compare Compares the source and targets to ensure copy accuracy. 3. Copy Automatically launches compare function after copy is completed. +Compare 4.1 Quick Erase Erases device(s)’... - Page 6 Updates system firmware by any device at the source port or through the USB port. 5.3 System Info. Displays system information such as controller, model number, software version, etc. 5.4 Verify HDD Scans device for any bad sectors by reading and writing. 5.5 Strict Verify HDD Scans device for any bad sectors by reading and writing two times.
- Page 7 6.7 Language Sets preferred language. 6.8.1 Unknown Format Allows user to copy or skip unknown format(s). 6.8.2 Erase Master Allows user to erase the source port or not. 6.8.3 Erase Pattern Sets whether to overwrite data in one-byte or Big random data.
- Page 8 completed. 6.8.10 Transfer Rate Allows user to select from UDMA2 to UDMA7. The UDMA7 is the fastest. 6.8.11 Stop Motor Time Sets device power down buffer time when tasks are completed. 6.8.12 Bytes Per Cmd Set the size of the data transfer between the duplicator and the HDD.
-
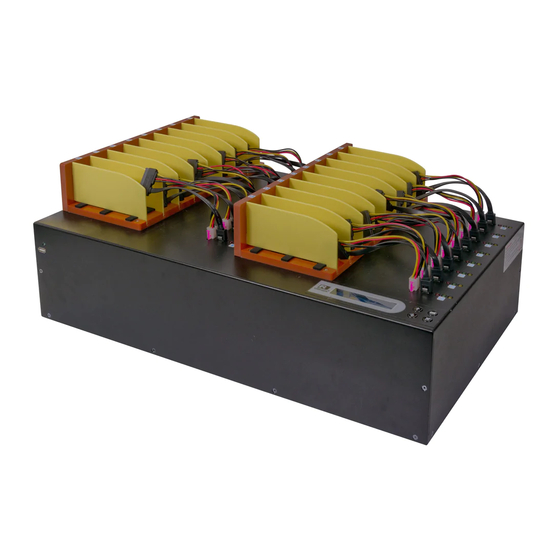
Page 9: Hardware Overview
Hardware Overview Front View USB port for Log Report Outputs Control and Firmware Updates. Buttons Display Back View Grounding Port USB Port for PC-LINK Power Input Daisy-Chain Daisy-Chain Output Port Input Port... - Page 10 LED Indicator Red: Fail Green: Pass Yellow: Powered LCD Configuration...
- Page 11 Daisy-Chain Connection (Available in MTC Series) Front View Daisy-Chain Cable Daisy-Chain Cable Back View If the connection is successful, the connected units will display “Networked Caution Duplicator” on the LCD screen and will disable the control buttons.
-
Page 12: Functions
Functions 1. Copy Step 1: Prepare source and target devices. Recommendation: Target device(s)’ capacity must be equal to or larger than the Note source device capacity. Step 2: Connect source and target devices. Step 3: Proceed to copy. Scroll to select "1. Copy", then press "OK" to start the duplication process. The number of working/connected targets will be displayed on LCD. -
Page 13: Compare
2. Compare Proceed to verify device(s). Scroll to select "2. Compare", then press "OK" to start the verification process. The number of working/connected targets will be displayed on the LCD. Press Note "OK" to start. 3. Copy+Compare Sequentially automates from Function 1, Copy to Function 2, Compare. Scroll to select "3. - Page 14 4.2 Full Erase This function will erase all data per NIST 800-88 Standards on the connected device(s). Scroll to select "Full Erase”, then press "OK" to start the erasing process. 4.3 DoD Erase This function will erase all data per DoD 5220.22-M Standards on the connected device(s). Scroll to select "DoD Erase", then press "OK"...
-
Page 15: Utility
4.8 US Army AR 380-19 This function will erase device(s) complying with Army Regulation 380-19 by the US Army. Scroll to select "US Army AR 380-19", then press "OK" to start the erasing process. 5. Utility This menu contains submenus related to device information, system information and updates. - Page 16 5.4 Verify HDD This function scans device for any bad sectors by reading and writing. Scroll to select "Verify HDD”, then press "OK" to initiate process. Then scroll through to view connected device(s) by port order. 5.5 Strict Verify HDD This function scans device for any bad sectors by reading and writing two times.
- Page 17 6. Setup This menu contains submenus related to device information, system information and updates. Scroll to select "6. Utility”, then press "OK" to view the submenus. 6.1 Start-up Menu This function allows user to select the default function to display during equipment initialization.
- Page 18 - 6.4 Skip Bad Sectors - 6.5 Minimum Speed - 6.6 Check Source Minimum Speed - 6.8.1 Unknown Format - 6.8.7 HPA Copy Mode Using appropriate copy modes can greatly reduce operation time and increase efficiency. There are four copy modes with different copy methods. ...
- Page 19 Whole HDD Copies all source data, bit-by-bit. Scroll to select “6.2 Copy Area > Whole HDD”, then press “OK” to save the copy method. Copies the whole source device, irrespective of content, format, partition, or empty space. This mode does not analyze the data. ...
- Page 20 Deep Analysis This copy area is designed to handle special format devices. It analyzes the whole device and then copies the data area. The target device is required to be wholly cleaned prior to copy. Scroll to select “6.2 Copy Area > Deep Analysis”, then press “OK” to save the copy method. 1.
- Page 21 GPT Index Partition Disabling function “Copy GPT Backup Area” will force the duplicator to ignore this area. GPT Backup Area If function is disabled, the target HDD will reconstruct the GPT Backup Area by Caution Windows system. It may require the HDD to restart in order to work. 6.4 Skip Bad Sectors Skips bad sectors during Copy/ Compare/ Erase.
- Page 22 6.7 Language Select English, Japanese, Spanish. Scroll to select "Language”, then press "OK.” Then scroll through to select the desired language. 6.8 Advanced Setup 6.8.1 Unknown Format This function only works with “6.2 Copy Area >> System and Files.” Scroll to select "Unknown Format”, then press "OK”. Unknown format includes all forms of modified and proprietary data and partitions.
- Page 23 Scroll to select "Erase Pattern >> One Byte”, then press "OK” to save this setting. ❷ Big Random Data Random character written in a set of area. Scroll to select "Erase Pattern >> Big Random Data”, then press "OK" to save this setting. 6.8.4 Skip Erase Errors Skip source bad sectors during Erase.
- Page 24 Scroll to select "Keep Target HPA”, then press "OK" to save this setting. ⚫ Clear Target HPA Does not copy HPA data and clears target device’s HPA setting. Scroll to select "Clear Target HPA”, then press "OK" to save this setting. ❷...
- Page 25 6.8.10 Transfer Rate Allows user to select the transfer rate. Scroll to select "Transfer Rate”, then press "OK". Select the desired transfer mode from UDMA2 to 7. The default is UDMA7. 6.8.11 Stop Motor Time Sets device power down buffer time when tasks are completed. Scroll to select "Stop Motor Time”, then press "OK"...
-
Page 26: Log Manager
7. Log Manager This menu allows users to access several submenus. Scroll to select "7. Log Manager”, then press "OK" access submenus. I. Log Report Diagram Source device Info. Copy Area and Check Sum Result Date Time Lapsed Time Model No. Revision Port No. - Page 27 ➊ Export Today’s Log Report Export today’s log report via USB port to a USB drive. ➋ Export Recent Log Report Exports a recent log report (1-28 days) via USB port to a USB drive. ➌ Export Custom Log Report Exports a specific time period’s log report via USB port to a USB drive.
- Page 28 If there is no record saved on the selected date, or record has been wiped out, Note the program would show "No match records!" Step 4: Save Log as Text File. At the top-left of Log Data screen, select <File> then <Save to Text File>. There are 4 files types to choose from when saving a Log Report: Note .txt, .csv, .xml, or .pdf.
- Page 29 Step 6: To Complete Output Log Reports. After successfully creating and saving the log, the report will be in the folder in which it was saved. 30,000 logs can be saved at one time. One device record is equal to one Caution recorded log.
-
Page 30: Real Time Pc-Monitoring
2. There are configuration files when launching LV07H. Make sure you are Caution launching the .exe file on the PC, and not with the provided U-Reach mini-CD software. Step 5: When the below screen is shown, the duplicator has linked to the computer successfully and is ready to use real-time monitoring function. -
Page 31: Using The Pc-Monitoring Feature
Using the PC-Monitoring Feature Please select only one computer to do all PC-Monitoring. This will prevent PC Note from operating other tasks simultaneously as PC-Monitoring information can rapidly synchronize. Step 1: When duplicator status indicates it’s online, open the monitoring screen. The program is ready to work when the status displays “STANDBY”. - Page 32 7.1 Out Today Report Outputs current day log report Scroll to select "Out Today Report”, then press "OK" to output log report to a USB drive. 7.2 Out Recent Report Outputs recent log report Scroll to select "Out Recent Report”, then press "OK" to output log report to a USB drive. 7.3 Out Period Report Outputs recent log report Scroll to select "Out Period Report”, then press "OK"...
- Page 33 7.4.2 Password Setup Allows password change. Scroll to select "Password Setup”, then press "OK" to change to desired password. If you want to change your Log password, please keep your password in a safe Note place in case you lose it. Please understand that the manufacturer does not provide password reset service due to the consideration of personal privacy.
Need help?
Do you have a question about the MT Series and is the answer not in the manual?
Questions and answers