Table of Contents
Advertisement
Quick Links
Advertisement
Table of Contents

Subscribe to Our Youtube Channel
Related Manuals for U-Reach Super1 Series


Summary of Contents for U-Reach Super1 Series
- Page 1 Super1 Series Hard Disk Duplicator & Eraser User Manual v A.02...
-
Page 2: Table Of Contents
Index Table Super1 V A.02 Product Disclaimer ....................1 Piracy Statement ....................1 Before You Start ..................... 2 Notice Symbols....................... 2 Function Table ......................3 Product Overview ....................6 Functions........................ 7 1. Copy ......................7 2. Compare ....................... 7 3. -
Page 3: Product Disclaimer
U-Reach is not accountable for any incidental or consequential damages, including, but not limited to property harm, loss of time or data from use of any U-Reach product, or any other damages attributable to product malfunction or failure of including without... -
Page 4: Before You Start
Before You Start Important Notice ⚫ Carefully read the entire manual before operating. ⚫ Make sure the source device is correct and functioning. ⚫ Equal capacity of source and target is recommended for guaranteed data consistency. ⚫ Using the Copy +Compare function provides the most flawless duplication. ⚫... -
Page 5: Function Table
Function Table Function Description Copies data from source device to targets. (There are four copy 1. Copy modes for selection at function "6.1 Copy Area") 2. Compare Compares the source and targets to ensure copy accuracy. 3. Copy + Compare Automatically launches compare function after copy is completed. - Page 6 6.1.1 System and Files Copies data and skips empty space. Only supports standard formats. 6.1.2 All Partitions 6.1 Copy Area Copy all the partitions and data, not include Setup copy unallocated partition. mode. 6.1.3 Whole HDD Copies all source data, bit-by-bit. 6.1.4 Percentage (%) Sets percentage of source capacity to copy 6.2 Copy GPT Backup Area...
- Page 7 6.6.7 Stop Motor Time Sets device power down buffer time when tasks are finished. 6.7 Restore Default Reinstates manufacturer settings. *Above functions and features subject to change without notice.
-
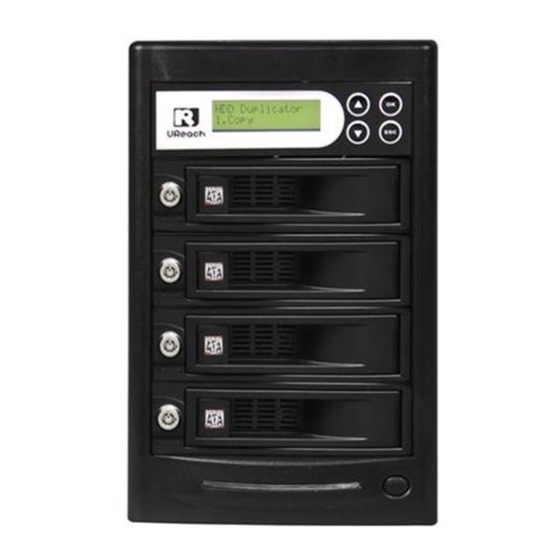
Page 8: Product Overview
Product Overview Example: 1-3 Model Control Buttons Locker Mobile Rack LED Indicator (Blue/Red) Power Switch LCD Configuration Confirm/OK Number of Target HDD Total Size Forward Function Copy x2 298G 7:44 25.4G Time Elapsed and Copied Backward Copy Progress Processed Size Cancel/Back... -
Page 9: Functions
Functions 1. Copy Step 1: Prepare Source & Targets Prepare a source HDD and target HDDs. (It’s strongly recommended the source and target are the same capacity.) Caution Required adapters to copy SSDs and 2.5” HDDs. Step 2: Place Source & Targets Place source HDD at source port, target HDDs to other ports. -
Page 10: Copy+Compare
The number of working/connected targets will be displayed on the LCD. Press Note "OK" to start. 3. Copy+Compare Sequentially automates from Function 1, Copy to Function 2, Compare. Scroll to select "3. Copy+Compare", then press "OK" to start the automated duplication and verification process. - Page 11 User is responsible for verification of targets’ quality. Testing a few completed Caution targets in a mass production environment for quality control is recommended. 4.1 Quick Erase This function will erase the index table from the connected device(s). Scroll to select "4.1. Quick Erase”, then press "OK" to start the erasing process. 4.2 Full Erase This function will erase all data per NIST 800-88 Standards on the connected device(s).
-
Page 12: Utility
If Secure Erase process is interrupted, the device will be locked. Please Caution execute again and wait until it finishes. 4.7 Enhanced Secure Erase This function erases devices that supports this feature. Scroll to select "4.7 Enhanced Secure Erase", then press "OK" to start the erasing process. -
Page 13: Setup
Step3: Proceed to update firmware. Connect this device to the source port. Scroll to select "5.2.1 Update BIOS”, then press "OK" to start the firmware update process. The firmware update process may take longer than 5 minutes. Please do not disrupt power or process during BIOS update. - Page 14 6.1 Copy Area There are 4 submenu modes. Scroll to select "6.1 Copy Area”, then press "OK.” Then scroll through to select one of the four copy methods. ⚫Selecting the Proper Copy Modes Example: There are two defined partitions in a 500GB device. The charts below illustrate what portion would be duplicated.
- Page 15 ❶System and Files Copies data and skips empty space. Only supports standardized formats. Scroll to select "System and Files”, then press "OK" to save the copy method. Allows user to copy source device’s System and Files, instead of the entire device.
- Page 16 Target Source Duplication Partition1 (150GB) Data 30 GB 350GB Data 30G Partition2 (200GB) 500GB Data 90GB 150GB Unallocated Partition 350GB of all Partitions along with its contents will be copied. ❸Whole HDD Copies all source data bit by bit. Scroll to select "Whole Device”, then press "OK" to save the copy method. Copies the whole source device, irrespective of content, format, partition or empty space.
- Page 17 Scroll to select "Percentage”, set the upper and lower %, then press "OK" to save the copy method. Target Source Duplication 500GB 150GB Unallocated Partition Only copies the selected area. 6.2 Copy GPT Backup Area Disabling this function allows the duplicator to copy from big capacity device to small capacity device(s).
- Page 18 If function is disabled, the target HDD will reconstruct the GPT Backup Area by Caution Windows system. It may require the HDD to restart in order to work. 6.3 Skip Errors Skips bad sectors during Copy/ Compare/ Erase. Scroll to select "6.3 Skip Bad Sectors”, then press "OK" to scroll through the available values for skipping bad sectors.
- Page 19 Scroll to select "6.6.1 Unknown Format >> Copy Unknown”, then press "OK" to save this setting. ❷ Skip Unknown Skip unknown format(s). Scroll to select "6.6.1 Unknown Format >> Skip Unknown”, then press "OK" to save this setting. 6.6.2 Erase Master This function allows user to enable or disable the source port for sanitization.
- Page 20 6.6.4 Wait HDD Time Sets device power up buffer time prior to copy, erase, etc... Scroll to select "6.6.4 Wait HDD Time”, then press "OK" to set buffer time from 3 to 50 seconds. The default is 30 seconds. 6.6.5 Mark After Erase Creates watermark on the device(s) after erase job is completed.
Need help?
Do you have a question about the Super1 Series and is the answer not in the manual?
Questions and answers