
Related Manuals for U-Reach PRO198


Summary of Contents for U-Reach PRO198
- Page 1 SATA III Ultra-High Speed 1 to 1 SATA HDD/SSD Sanitizer and Duplicator User Guide v A.02...
-
Page 2: Table Of Contents
PRO198 v A.02 Index ....................2 RODUCT ISCLAIMER ......................2 ARRANTY ....................2 IRACY TATEMENT ....................3 EFORE TART ....................3 OTICE YMBOLS ....................4 RODUCT VERVIEW ..................... 5 UNCTION ABLE ......................8 UNCTIONS 1. C ......................... 8 2. C ...................... -
Page 3: Product Disclaimer
Product Disclaimer The manufacturer is not accountable for any incidental or consequential damages, which includes, but is not constrained to property harm, loss of time or data from use of our product, or any other damages attributable to product malfunction or failure (including without limitation, those attributable to: (1) reliance of the materials provided, (2) costs of product replacement, (3) loss of use, data or profits, (4) delays or business interruptions, (5) and any principle of legal responsibility, arising out of or in reference to the use or overall... -
Page 4: Before You Start
Before You Start Important Notice Carefully read the entire manual before operating. ● Make sure the source device is correct and functioning. ● Equal capacity of source and target is recommended for guaranteed data consistency. ● Using the Copy+Compare function provides the most flawless duplication. ●... -
Page 5: Product Overview
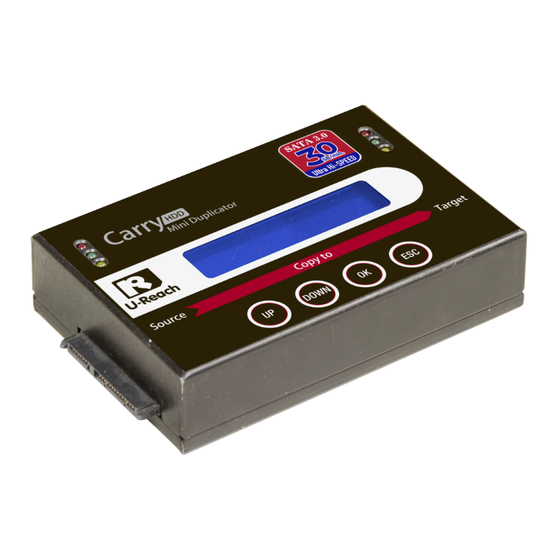
Product Overview Hardware overview Red: Fail Flashing Green: Operating Remain Green: Pass Yellow: Powered Port 1 Port 2 (Source) (Target 1) UP: Backward OK: Confirm/OK DOWN: Forward ESC: Cancel/Back LCD configuration Total Size (Source) Target HDD Copy 2047M Function 0:11 41% 860M... -
Page 6: Function Table
Function Table Function Description To copy source HDD to multiple target HDDs. Refer to function 1. Copy [6.1 Copy Area] for 4 different copy modes selection. 2. Compare To compare data bit for bit between source and target HDDs. 3. Copy It makes copy first and then compare target HDD with source HDD to ensure data correctness. - Page 7 5.3 System Info. This function will show information of the duplicator system, including controller model, number and software version. 5.4 Read Speed To show the speed of reading. 5.5 Write Speed To show the speed of writing. 5.6 Unlock HDD Unlocks the HDD that has not completed Secure Erase so that the HDD can continue to be used.
- Page 8 6.4 Skip Bad Sectors Skips bad sectors during Copy/Compare/Erase. 6.5 Erase Master Allows user to erase the source port or not. Copy Unknown Copy unknown area when the device cannot identify the format. 6.6 Unknown Format Skip Unknown Skip copy unknown area when the device cannot identify the format.
-
Page 9: Functions
Functions 1. Copy Step 1: Prepare source and target devices. Recommendation: Target device(s)’ capacity must be equal to or larger than Note the source device capacity. Step 2: Connect source and target devices. Step 3: Proceed to copy. Scroll to select "1. Copy", then press "OK" to start the duplication process. ⚫... - Page 10 Note Source Port is disabled for erasing. Go to 6.8.2 to enable source port erasing. Step 2: Enter function "4. Erase" Scroll to select "4. Erase”, then press "OK" to view the 7 erase modes. Step 3: Select an Erase Function. Here are a couple tips to see port details during erase: ⚫...
-
Page 11: Utility
erasure of the connected device(s). Scroll to select "4.4 DoD EraseComp", then press "OK" to start the erasing and verifying process. 4.5 7-Pass Erase This function will erase device(s) 7 times complying with DoD 5220.22-M(ECE) Standards. Scroll to select "4.5 7-Pass Erase", then press "OK" to start the erasing process. 4.6 Secure Erase This function erases the non-loadable areas complying with NIST 800-88 Standards. - Page 12 Place a SDD/HDD to the duplicator. Select function "5.2.2 Create Update HDD". Step 2: Format BIOS HDD Click "OK" to format the BIOS hard disk. One FAT, 2GB partition will be formatted in HDD. That would reduce searching time and speed up firmware update. Caution The data saved in this HDD will be erased.
-
Page 13: Setup
6. Setup 6.1 Copy Area There are 4 submenu modes. Scroll to select "6.1 Copy Area”, then press "OK.” Then scroll through to select one of the four copy methods. 6.1.1 System and Files Copies data and skips empty space. Only supports standardized formats. Scroll to select "System and Files”, then press "OK"... - Page 14 Target Source Duplication Partition1 (150GB) Data 30 GB 350GB Partition2 (200GB) 500GB Data 90GB 150GB Unallocated Partition 350GB of all Partitions along with its contents will be copied. 6.1.3 Whole HDD Copies all source data bit by bit. Scroll to select "Whole Device”, then press "OK" to save the copy method. Copies the whole source device, irrespective of content, format, partition or empty space.
- Page 15 Target Source Duplication 500GB 150GB Unallocated Partition Only copies the selected area. 6.2 Reduce Partition in Copy if necessary This function can reduce the size of the last partition of an NTFS formatted hard disk. If the capacity of the source disk is larger than the target, but the actual data content does not exceed the capacity of the target, when the copy function is executed, enable this function to reduce the content of the last partition (must be NTFS) of the target in standard NTFS format.
- Page 16 Does not copy HPA data and clears target device’s HPA setting. Scroll to select "Clear Target HPA”, then press "OK" to save this setting. ❷ Setting Target HPA Copies HPA setting from source device to target. Scroll to select "HPA Copy Modes >> Setting Target HPA”, then press "OK" to save this setting.
- Page 17 ❶ Copy Unknown Copy unknown format(s). Scroll to select "Unknown Format >> Copy Unknown”, then press "OK" to save this setting. ❷ Skip Unknown Skip unknown format(s). Scroll to select "Unknown Format >> Skip Unknown”, then press "OK" to save this setting.
- Page 18 6.10 Delete Disk Signature After Copy Set at “Yes” means do not copy the disk signature part. This function is for Windows only. Windows will only recognize one device if you connect two or more with the same disk signature. “Compare”...
Need help?
Do you have a question about the PRO198 and is the answer not in the manual?
Questions and answers