
Related Manuals for Rexing W303


Summary of Contents for Rexing W303
- Page 1 W303 User Manual The information in this manual is subject to change without notice. www.rexingusa.com...
-
Page 3: Safety Information
REXING Dash Cam is not intended to be touched, modified, or calibrated while operating a vehicle. REXING is not responsible for any damages resulting from the user's misuse of the camera. Do not use damaged power cords or plugs, or loose electrical sockets. Faulty connections can cause electric shock or fire. - Page 4 Using an incompatible charger can cause serious personal injury or damage to your device. - REXING cannot be responsible for the user's safety when using accessories or supplies that are not approved by REXING. Do not drop the charger or device, or subject them to impact. Handle and dispose of the charger and device with care.
- Page 5 If you notice strange smells or sounds coming from your device, or if you see smoke or liquid leaking from the device, stop using the device immediately and take it to a REXING Service Center. Failure to do so may result in fire or explosion.
- Page 6 - Any changes or modifications to your device can void your manufacturer's warranty. If your device needs servicing, take it to an authorized REXING Service Center. Clean your device and charger by wiping with a towel or eraser. Do not use chemicals or detergents.
-
Page 7: Correct Disposal Of This Product
Correct disposal of this product (applicable in countries with separate waste collection systems) Waste Electrical & Electronic Equipment This symbol, found on the device, accessories or accompanying literature, indicates that the product and its electronic accessories (e.g. charger, headset, USB cable) should not be disposed of with other household waste. - Page 8 "THIRD PARTY CONTENT AND SERVICES ARE PROVIDED "AS IS." REXING DOES NOT WARRANT CONTENT OR SERVICES SO PROVIDED, EITHER EXPRESSLY OR IMPLIEDLY, FOR ANY PURPOSE. REXING EXPRESSLY DISCLAIMS ANY IMPLIED WARRANTIES, INCLUDING BUT NOT LIMITED TO, WARRANTIES OF MERCHANTABILITY OR FITNESS FOR A PARTICULAR PURPOSE.
-
Page 9: Warm Prompt
Third party services may be terminated or interrupted at any time, and REXING makes no representation or warranty that any content or service will remain available for any period of time. Content and services are transmitted by third parties by means of networks and transmission facilities over which REXING has no control. - Page 10 3. If the Micro SD Card is not compatible with the dash cam, please DO NOT insert it again, as you will damage the Card and the dash cam. Please buy the correct card and then try again. 4. The dash cam supports the Micro SD card from 32GB to the highest 128GB, Class 10 only.
- Page 11 Windows OS, and Movist + VLC on MAC OS. 12. After several weeks of daily recording it may be necessary for you to format your Micro SD Card - if that is the case, please note that you will lose all of your files, so please back up a copy on your computer first in a unique dash cam Folder that you have created.
-
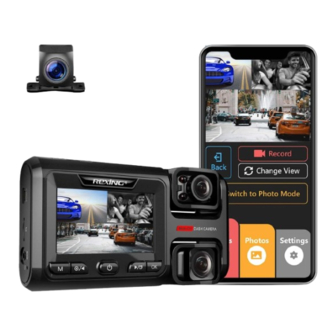
Page 12: Device Layout
Device Layout 1. Power Slot 2. Micro SD Card Slot 3. Rear Camera Slot 4. Reset Button 5. Menu Button & Mode Switch Button 6. Video & Audio Recording Button 7. Power & Screen On/Off Button 8. Front/Rear Screen Switching & Photo Button 9. - Page 13 Button Functions • Press to turn on or off screen • Press and hold 3 seconds to turn the device on or off • Press to confirm a selection while in setting mode • Recording Mode Hot Key: Emergency Lock (Press to manually lock/unlock the video file during recording) •...
-
Page 14: Installation
Installation 1. Attaching the camera to the window mount Before the device can be used in a car, it is essential to first install a properly attached window mount. Make sure that you place the recorder in a safe, appropriate location where it will not obstruct the driver’s view. - Page 15 3. Connecting the charger to the vehicle's 12V-24V DC outlet Be sure to connect only the REXING-approved charger designed and supplied specifically for use with your device. Using an incompatible charger can cause serious personal injury or damage to your device.
-
Page 16: Inserting The Memory Card
Please let the screen of the W303 dash cam face you. • Insert memory card with the gold-colored contacts facing you. • Push the memory card into the slot until it locks in place. -
Page 17: Removing The Memory Card
Do not remove the memory card while the device is transferring or accessing information. Doing so can result in data loss or corruption, or damage to the memory card or device. REXING is not responsible for losses that result from the use of damaged memory cards, including the loss of data. -
Page 18: Loop Recording
1. Press the video recording button to stop the device from recording 2. Press the MENU button twice to enter System Settings 3. Press the DOWN button to navigate to the "Format" option 4. Press OK to confirm your selection Before formatting a memory card, always remember to make backup copies of all important data stored on the device. -
Page 19: Recording Audio
It is recommended that you reformat a memory card after every time that videos are transferred from it to a computer, or at least once a month. This keeps important elements of data and file structure clean, helping to prevent error messages and missing videos. Remember to always make backup copies of all important data stored on the device. -
Page 20: Video Mode
6. Press MENU to exit System Settings Alternatively, you can use a hot key shortcut for this feature. Press and hold the Video Recording button for about 3 seconds to mute / unmute the microphone for video recording. IR LED Use the following procedure to turn on or off the Infrared Lights. - Page 21 Note: Locked video files won’t be erased by Loop Recording, they will remain on the memory card until they are manually deleted, or when the card is formatted. 1. Press MENU once to enter System Settings 2. Press the UP or DOWN button to navigate to the "Gravity Sensing" option 3.
-
Page 22: Date/Time Setup
1. Press MENU once to enter System Settings 2. Press the UP or DOWN button to navigate to the "Volume" option 3. Press the up or down button to increase or decrease the volume of your dash cam. Date/Time Setup Use the following procedure to change the device’s time and date: 1. -
Page 23: Light Frequency
Language Use the following procedure to change the device’s Language. 1. Press MENU twice to enter System Settings 2. Press the UP or DOWN button to navigate to the "Language" option 3. Press OK to view the current language selection 4. - Page 24 4. Press the UP or DOWN button to make your selection 5. Press OK to confirm your entry 6. Press MENU to exit System Settings Alternatively, you can use a hot key shortcut for this feature. During Recording Mode, press the Power button to turn the LCD screen on or off.
- Page 25 4. Press the UP or DOWN button to make your selection 5. Press OK to confirm your entry 6. Press MENU to exit System Settings Version Displays the current device firmware information. WiFi With the dash cam built-in Wi-Fi, you can use your smart device as a remote camera, viewfinder, and download files to your phone.
- Page 26 • Android users: Enter the Google Play Store™, search for ‘TMcam’ or ‘Rexing Connect’ download and install, following this user manual to connect the Wi-Fi and operate. • iPhone users: Enter the Apple App Store™, search for ‘TimaCam’ or ‘Rexing Connect’, download and install, following this user manual to connect the Wi-Fi and operate.
- Page 27 FCCID: 2AW5W-S1 This device complies with part 15 of the FCC Rules. Operation is subject to the following two conditions: (1) This device may not cause harmful interference, and (2) this device must accept any interference received, including interference that may cause undesired operation.
Need help?
Do you have a question about the W303 and is the answer not in the manual?
Questions and answers