Rexing V2 User Manual
Hide thumbs
Also See for V2:
- Getting started (6 pages) ,
- User manual (45 pages) ,
- User manual (32 pages)

Related Manuals for Rexing V2


Summary of Contents for Rexing V2
- Page 1 USER MANUAL All brand and product names are trademarks or registered trademarks of REXING INC. The information in this manual is subject to change without notice. www.rexingusa.com 8/2019Rev3...
- Page 2 Failure to comply with safety warnings and regulations can result in serious injury or death. Rexing Dash Cam is not intended to be touched, modified, or calibrated while operating a vehicle. Rexing is not responsible for any damages resulting from the user's misuse of the camera.
- Page 3 • your device. Using an incompatible charger can cause serious personal injury or damage to your device. Rexing cannot be responsible for the user’s safety when using • accessories or supplies that are not approved by Rexing. Do not drop the charger or device, or subject them to impact. Handle and dispose of the charger and device with care.
- Page 4 If you notice strange smells or sounds coming from your device, or if you see smoke or liquid leaking from the device, stop using the device immediately and take it to a Rexing Service Center. Failure to do so may result in fire or explosion.
- Page 5 Overview of your V2 Dashboard Camera For your own safety, do not operate the controls of this product while driving. The window mount is needed when using the recorder in a car. Make sure that you place the recorder in a location where it will not obstruct the driver’s view.
- Page 6 Overview of your V2 Dashboard Camera Take care to maximum battery and charger life: Your device may wear out over time. Some parts and repairs are • covered by the warranty within the validity period, but damage or deterioration related to the use of unapproved accessories is not.
- Page 7 Overview of your V2 Dashboard Camera This symbol, found on the device, accessories or accompanying literature, indicates that the product and its electronic accessories (e.g. charger, headset, USB cable) should not be disposed of with other household waste. To prevent possible harm to the environment or human health from uncontrolled...
- Page 8 SERVICE BY YOU OR ANY THIRD PARTY, EVEN IF ADVISED OF THE POSSIBILITY OF SUCH DAMAGES.” Third party services may be terminated or interrupted at any time, and Rexing makes no representation or warranty that any content or service will remain available for any period.
- Page 9 • Content may differ from the final product or from software provided by service providers, and is subject to change without prior notice. For the latest version of this manual, refer to the Rexing website at • www.rexingusa.com. Available features and additional services may vary by device and software.
-
Page 10: Table Of Contents
Overview of your V2 Dashboard Camera about an application provided with the device, contact an authorized Rexing Service Center. Contents What’s in the box? ..............14 Camera Overview ............... 15 Buttons ................... 17 Status Icons ................18 Getting Started ................20 Installation ................ - Page 11 Overview of your V2 Dashboard Camera Video Settings ................31 Resolution ................31 Loop Recording ..............31 WDR (Wide Dynamic Range) ..........32 Exposure ................32 Recording Audio ..............32 Date Stamp ................. 33 Gravity Sensing ..............33 Plate Number ..............33 Infrared light ...............
- Page 12 Overview of your V2 Dashboard Camera Frequency ................35 Auto Display Off ..............35 Delayed Shutdown .............. 35 Daylight Saving..............36 GPS Speed Unit ..............36 Set Time Zone ..............36 Format ................36 Default Setting ..............36 Version ................36 Photo Settings ................
- Page 13 Overview of your V2 Dashboard Camera Exposure ................38 Anti-Shaking ................ 38 Quick Review ..............38 Date Stamp ................. 38 Updating Firmware ..............40 Product Specifications ..............41 Warranty & Support ..............42 Warranty ................42 Support ................42 Your opinion matters ............42...
-
Page 14: What's In The Box
All supplied items are designed for use only with this device and may not be compatible with other devices. Malfunctions resulting from the use of unapproved accessories are not covered by the warranty service. For more information about available accessories, refer to the Rexing website at www.rexingusa.com. -
Page 15: Camera Overview
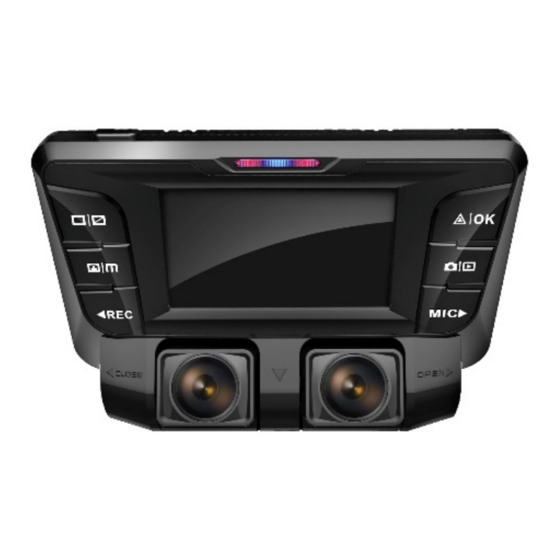
Overview of your V2 Dashboard Camera Camera Overview 1. Power On/Off Switch 8. Mode Button 2. Screen Button 9. Down Navigation Button 3. Menu Button Mute/Unmute Button 4. Up Navigation Button 10. GPS Module Port Record Button 11. HDMI Port 5. - Page 16 Overview of your V2 Dashboard Camera...
-
Page 17: Buttons
Unpacking your V2 Dashboard Camera Buttons Button Functions • Press to turn on and off screen • Hold to turn the device on or off • Press to confirm a selection while in Setting Mode • Recording Mode Hot Key: Emergency Lock (Press to manually lock the file during recording) MENU –... -
Page 18: Status Icons
Unpacking your V2 Dashboard Camera Status Icons Icon Meaning Video Resolution Blinking – Recording Wide Dynamic Range Charging Battery Power Level Microphone Mute Microphone On Video Recording Mode Video Playback Mode Photo Mode Loop Recording Memory Card Inserted... - Page 19 Unpacking your V2 Dashboard Camera White Balance License plate number Current video file locked...
-
Page 20: Getting Started
Getting Started Quick Start Getting Started Installation Video guide: video.rexingusa.com 1. Mount the Front Camera to the Windshield Make sure that you mount the front camera in a safe, appropriate location where it won’t obstruct the driver’s view. Clean your windshield before applying the mount. -
Page 21: Inserting The Memory Card
Getting Started Quick Start 2. Inserting the Memory Card The V2 accepts Micro SD memory cards (class 10 or higher) with a maximum capacity of 256GB. Inserting a memory card a. If the device is powered on, press and hold the POWER button to power down. -
Page 22: Formating A Memory Card
3. Formating a Memory Card 3.1 Powering the Camera You must always connect the V2 to a power source while operating the camera. Connect the camera to your vehicle via the included car charger cable. Connect the larger end of the car charger cable to your car’s cigarette lighter (12V DC power outlet), and connect the other Mini-USB end to the Mini-USB port on the device. - Page 23 Getting Started Quick Start 3.2 Formatting the Memory Card Before formatting your memory card, always remember to make backup copies of all important data stored on the device. The manufacturer’s warranty does not cover loss of data resulting from user actions. For best results, format the memory card using the Format function on your camera.
-
Page 24: Connect The Car Charger To The Car's 12V Dc Outlet
To turn off the device, again press and hold the POWER button for a few seconds. A goodbye message will be displayed onscreen. The V2 will switch on or off automatically if you keep it connected using the car charger. The camera will automatically start recording when it is powered on. -
Page 25: Basic Operating
Getting Started Quick Start Basic Operating 1. Automatic Recording The device will automatically turn on and begin recording once it receives power, such as when you start your car. The indicator and the red dot icon on screen will flash while recording. Display Control To switch between camera views on the LCD display, press the SCREEN button. -
Page 26: Playback
Getting Started Quick Start In Video Recording Mode, while recording is stopped, hold the SCREEN button to enable Wi-Fi feature. For detailed instructions on how to use Wi-Fi feature, see page 29 – Wi-Fi Connect. 2. Playback Camera Playback Mode You can play back recorded video on your device using the following steps: 1. - Page 27 Getting Started Quick Start 4. Press OK once to view options for "Current MOV" file or "ALL" files. Select "Current MOV" 5. Press OK twice to delete file To delete all files: 1. Press on UP or DOWN button to navigate through the video files 2.
- Page 28 Getting Started Quick Start Minimum System Requirements Operating System: Windows 7, 8, or 10, MAC OS X Display Resolution: 1280x720 Installing the application: a. Locate your dash cam at support.rexingusa.com to access the GPS Playback software. b. Download the zip folder containing the software installer. c.
-
Page 29: Wi-Fi Connect
MPH to KM/H. Additionally, you have the option to change the map application used from Google Maps to Baidu Maps. 3. Wi-Fi connect Use your mobile device to download the “Rexing Connect” app from the App Store or Google Play Store. After you’ve done this, follow the instructions below:... - Page 30 Dash cam: Once connected, the screen should switch to the camera view and display a “WiFi Connected” message. Using the Rexing Connect app, you can view a live preview of the dash cam screen, start / stop recording, as well as view and save your captures with your mobile device.
-
Page 31: Video Settings
Operating your V2 Dashboard Camera Settings Video Settings On Video Recording Mode, Press REC to stop recording then press MENU button once open System Settings Menu. Resolution Recommend setting: 1080P FHD + 1080P FHD Use this setting to set the recording resolution: FHD P30 + FHD P30 (1080P+1080P, 30fps, dual channel) •... -
Page 32: Wdr (Wide Dynamic Range)
Operating your V2 Dashboard Camera Settings It is recommended that you reformat a memory card after every time that images are transferred from it to a computer, or at least once a month. This keeps important elements of data and file structure clean, helping to prevent error messages and missing images. -
Page 33: Date Stamp
Operating your V2 Dashboard Camera Settings Date Stamp You have the option to display the date and time in your videos. Note that the date and time stamp cannot be removed from videos if this feature was enabled at the time of recording. -
Page 34: System Settings
Operating your V2 Dashboard Camera Settings System Settings On Video Recording Mode, Press REC to stop recording then press MENU button twice open System Settings Menu. Wi-Fi Default setting: Off Turn this feature on to temporarily enable Wi-Fi feature (See Page 29). -
Page 35: Language
Operating your V2 Dashboard Camera Settings Language Use the following procedure to change the device’s time and date. Language availability may vary depending on the region. TV Mode Recommend setting: NTSC This feature will setup video output format. Frequency Recommend setting: US - 60Hz This option should be set according to the power supply specification used in your country or geographical region (U.S. -
Page 36: Daylight Saving
Operating your V2 Dashboard Camera Settings Daylight Saving Default setting: Off When enabled, time is advanced forward by 1 hour to match daylight savings time. GPS Speed Unit Recommend setting: MI/H Select GPS speed unit (GPS Logger required) Set Time Zone This feature need GPS Logger connected, select a time zone to enable automatic update time of GPS. -
Page 37: Photo Settings
Operating your V2 Dashboard Camera Settings Photo Settings On Photo Mode, Press MENU button once open System Settings Menu. Capture Mode Recommend setting: Single With this feature you can set a timer for automatically capturing images. Resolution Recommend setting: 5M This option allows you to set the pixel resolution for captured images. -
Page 38: Color
Operating your V2 Dashboard Camera Settings Color Recommend setting: Color This feature allows you to choose a color effect for captured images. Recommend setting: Auto This setting enable you to adjust the camera's sensitivity to light when taking photos. The higher the number, the greater the light sensitivity. - Page 39 Operating your V2 Dashboard Camera Settings This feature will automatically apply a date and/or time stamp to captured images.
-
Page 40: Updating Firmware
The firmware is put in place to fix any bugs or glitches that may occur during normal use. The following procedure will allow you to use the Rexing website to update firmware for your V2 Dashboard Camera. This is necessary for enabling all available features on your device. -
Page 41: Product Specifications
Operating your V2 Dashboard Camera Product Specifications Product Specifications Image Sensor 5MP CMOS Lens 6-Layer Fixed-focus with full-glass elements Novatek 2.7 inch, 16:9 TFT Audio Built-in high-sensitivity microphone/speaker External Memory Class 10 or above MicroSD card (up to 256GB) Gravity Sensor... -
Page 42: Warranty & Support
Operating your V2 Dashboard Camera Product Specifications Warranty & Support Warranty The Rexing V2 Dash Cam comes with a full 12-month warranty. If you register your product on our official site (https://www.rexingusa.com/support/registration), you can extend the warranty to 18 months.
Need help?
Do you have a question about the V2 and is the answer not in the manual?
Questions and answers