
Subscribe to Our Youtube Channel
Related Manuals for Rexing V1P Pro


Summary of Contents for Rexing V1P Pro
- Page 1 V1P Pro User Manual The information in this manual is subject to change without notice. www.rexingusa.com 06Rev4...
-
Page 2: About This Manual
Content may differ from the final product or from software provided by service providers and is subject to change without prior notice. • For the latest version of this manual, refer to the Rexing /rexingusa website at www.rexingusa.com. •... -
Page 3: Table Of Contents
Table of Contents page page About This Manual 5. Mode Setup Table of Contents Video Mode Settings 1. What’s in the box? System Settings Photo Settings 2. Camera Overview 6. Troubleshooting Device Layout Buttons Update Firmware Status Icons 7. Product Specifications 3. -
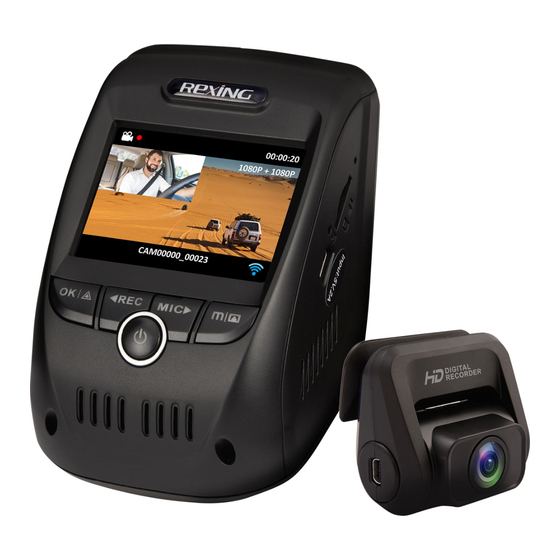
Page 4: What's In The Box
For more information about available accessories, refer to www. rexingusa.com. Rexing V1P Pro Dashboard Camera Full HD Rear Camera Rear Camera Cable (20ft) Car Power Connector (12ft) 3M Adhesive Mount... -
Page 5: Camera Overview
Press and hold for 4 seconds to reset the Reset Button RESET device in the event that it operates erratically, USB Charging Port Rear Camera Port hangs up, or freezes GPS Logger Port (not used by V1P Pro) Indicator Flashing Red – Recording... -
Page 6: Status Icons
Status Icons Memory card detected Icon Meaning Exposure Video resolution GPS searching for signal (animated) Currently recording (blinking) GPS signal acquired (no animation) Wide Dynamic Range enabled Current recording locked Connected to power source Audio recording enabled Audio recording disabled Video Recording Mode Playback Mode Photo Mode... -
Page 7: Getting Started
Step 2: Inserting the Memory Card Orient the mount as shown The V1P Pro accepts Micro SD memory cards (class 10 or higher) Plug Mini USB with a maximum capacity of 256GB. Connector to the Route power cable... -
Page 8: Removing The Memory Card
Push the card into the slot, listening for a click sound signaling the card is securely inserted. Removing a Memory Card Before removing a memory card from your V1P Pro, you must first dismount it for safe removal. With the device powered down, press down on the memory card until you hear a click. -
Page 9: Formatting The Memory Card
If the device is not operating Press the MENU button twice to enter the Setup Menu. properly using a Rexing-approved charger, please contact Use the REC and MIC buttons to navigate to the “Format” Customer Care (care@rexingusa.com). -
Page 10: Connect The Car Charger To The Car's 12V Dc Outlet
Run the cable down from your camera to the 12V cigarette 4.1 Automatic Recording lighter port of your vehicle. Be sure to connect only Rexing- approved chargers designed and supplied specifically for use with your device. Using an incompatible charger can cause Recording (on) serious personal injury or damage to your device. -
Page 11: Playback
the current video clip. This will ensure that Loop Recording Video recordings from the front and back cameras will be stored won’t overwrite the clip when the memory card is full. You can in chronological order on the memory card for easy navigation also lock videos after recording by using the Protect function in and playback. -
Page 12: Computer Playback
Press OK once to view options to “Delete Current” Using a USB cable recording or “Delete All” recordings. With “Delete All” selected, press OK. Connect your camera to your computer using the provided USB When prompted with “Erase All Images?” press the MIC cable and select “Mass Storage”... -
Page 13: Parking Monitor
“Wi-Fi Connect” message. Connect the dash cam to the Smart Hardwire Kit (need to purchase separately) to active the parking monitor function. Using the Rexing Connect app, you can view a live preview of the Please visit support.rexingusa.com to watch a video tutorial. -
Page 14: Mode Setup
your captures with your mobile device. 128GB 14 hours 20 hours To exit Wi-Fi, hold the REC button to return to Video Recording 256GB 28 hours 40 hours Mode. Note: Choosing a single-channel resolution such as UHD, QHD, etc. For further instruction regarding the Wi-Fi Connect feature, will disable recording with the please visit www.rexingusa.com/wifi-connect/. - Page 15 Exposure Default setting: +0.0 Manually adjust the camera’s exposure value to brighten or Gravity Sensing darken recordings. Positive values brighten recordings Default setting: Low while negative values darken them. If a change in gravitational forces is detected, such as in the event of a vehicular accident, the G-sensor will signal Record Audio to the camera, and an automatic file lock will be placed on the...
-
Page 16: System Settings
Device Sound System Settings Default setting: On Press MENU twice to open the Setup Menu (in Video Recording Mode, you must first stop recording which is done by pressing Enable or disable the device’s REC). sound effects. Wi-Fi Language Default setting: Off Default setting: English Turn this feature on to temporarily enable Wi-Fi mode (See Page 29). -
Page 17: Photo Settings
Daylight Savings Default Setting Default setting: Off Performing this operation will reset all settings to their When enabled, time is advanced default values. forward by 1 hour to match daylight savings time. Version GPS Speed Unit Displays the current device firmware information. - Page 18 Quality Default setting: Auto Default setting: Fine Set the quality level of captured Adjust the camera’s sensitivity to light when taking photos. images. Lower quality images The higher the ISO, the better will take up less space on the the camera operates in low memory card, but they are more visually compressed than light, although images are...
-
Page 19: Troubleshooting
before returning Photo Take note of your firmware version number (See Page 33 Mode. – Version). On a computer, visit the firmware section of rexingusa. Date Stamp com and follow the prompts to locate the correct firmware for your camera. Default setting: Date/Time Download the firmware zip file to your computer. -
Page 20: Warranty & Support
Audio I/O Internal high-sensitivity mic Warranty and speaker The Rexing V1P Pro Dash Cam comes with a full 12-month Memory Support Class 10 or higher Micro SD warranty. If you register your product on our official site card (up to 256GB) (https://www.rexingusa.com/support/registration),...
Need help?
Do you have a question about the V1P Pro and is the answer not in the manual?
Questions and answers