
Related Manuals for Lumens DC132U


Summary of Contents for Lumens DC132U
- Page 1 DC132U Document Camera User Manual - English [Important] To download the latest version of Quick Start Guide, multilingual user manual, software, or driver, etc., please visit Lumens https://www.MyLumens.com/support...
-
Page 2: Table Of Contents
Table of Contents Chapter 1 Package Contents ............... 2 Chapter 2 Product Overview ............... 3 2.1 Description of LED Indicator ................3 2.2 Relative Operation Position ................. 3 Chapter 3 Installation and Connections ..........4 3.1 Connecting to a computer..................4 3.2 Connecting to an Interactive Whiteboard (IWB) .......... -
Page 3: Chapter 1 Package Contents
Chapter 1 Package Contents Quick Installation 4-Step Instruction DC132U Guide Card USB cable... -
Page 4: Chapter 2 Product Overview
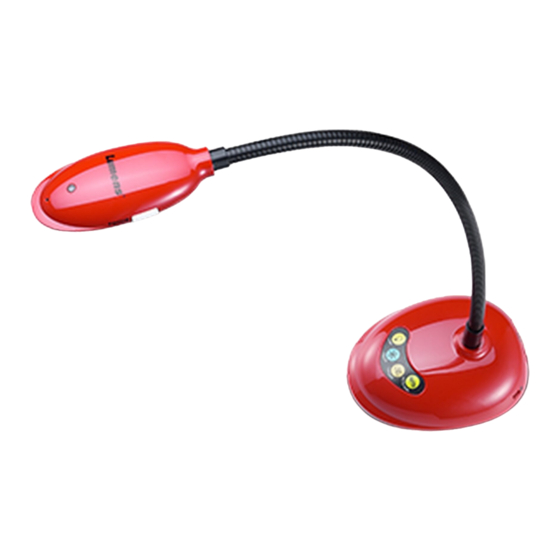
Chapter 2 Product Overview Gooseneck LED Indicator AF button Microphone Lens Control panel 2.1 Description of LED Indicator 1. Enable the image, and LED indicator will light up 2. Display the image, and LED indicator will light up 3. Disable the image, and LED indicator is OFF 2.2 Relative Operation Position Correct use Incorrect use... -
Page 5: Chapter 3 Installation And Connections
Chapter 3 Installation and Connections 3.1 Connecting to a computer 3.2 Connecting to an Interactive Whiteboard (IWB) 3.3 For use with VESA Installation Base 1. Please purchase the standard VESA installation base 2. Please use appropriate screws: Screw length = 5 mm + base thickness (H1); M4 screw (P=0.7) ... -
Page 6: Installing Application Software
3.4 Installing Application Software The Lumens Ladibug software installed on the computer enables you to: Control the DC132U. Capture and record images. Annotate the image, highlight important details and save it. Support the full screen function. -
Page 7: Chapter 4 Start Using
4. You are ready to teach/present. *Please download Ladibug software from Lumens website. *When connected to a computer via a USB cable, DC132U can also be used with video software, such as Skype and Zoom. -
Page 8: Chapter 5 Function Menu
Chapter 5 Function Menu 5.1 Function Descriptions of Control Panel Button Icon Name Function Descriptions LAMP Turn on/off LED indicator. Freeze the current image to remain temporarily on the screen. Press again to FREEZE defreeze. CAPTURE Capture the image to the computer. Automatically adjust the image to have the AUTO TUNE best brightness and focusing performance. -
Page 9: Chapter 6 Descriptions Of Major Functions
After the setting is completed, the video conference is ready to begin. It can also be used with Zoom, Teams, Google Meet, and other video software If the image of the video software is opposite to the actual image (mirror image), please use Lumens Ladibug software to rotate the image... -
Page 10: Chapter 7 Connecting To Microscope
Chapter 7 Connecting to Microscope Microscope adapters are optional. Please contact Lumens sales to purchase them 1. Attach the microscope adapter to the microscope. <Caution> Microscope adapter accessories are applicable to eyepieces of Ø 28 mm. 2. Connect the lens with the microscope adapter 3. -
Page 11: Chapter 8 Troubleshooting
Chapter 8 Troubleshooting This chapter describes problems you may encounter while using DC132U. If you have questions, please refer to related chapters and follow all the suggested solutions. If the problem still occurred, please contact your distributor or the service center. -
Page 12: Chapter 9 Safety Instructions
Chapter 9 Safety Instructions Always follow these safety instructions when setting up and using this Product: 1 Operation 1.1 Please use the product in the recommended operating environment, away from water or source of heat 1.2 Do not place the product on a tilted or unstable trolley, stand or table. 1.3 Do not block the slots and openings in the case of the product. -
Page 13: Copyright Information
Lumens is a trademark that is currently being registered by Lumens Digital Optics Inc. Copying, reproducing or transmitting this file is not allowed if a license is not provided by Lumens Digital Optics Inc. unless copying this file is for the purpose of backup after purchasing this product. -
Page 14: Supplier's Declaration Of Conformity 47 Cfr § 2.1077 Compliance Information
Supplier's Declaration of Conformity 47 CFR § 2.1077 Compliance Information Manufacturer:Lumens Digital Optics Inc. Product Name:DC132U Model Number:Document Camera Responsible Party – U.S. Contact Information Supplier:Lumens Integration, Inc. 4116 Clipper Court, Fremont, CA 94538, United States e-mail :support@mylumens.com FCC Compliance Statement This device complies with Part 15 of the FCC Rules.
Need help?
Do you have a question about the DC132U and is the answer not in the manual?
Questions and answers