Lumens DC125 User Manual
Hide thumbs
Also See for DC125:
- User manual (50 pages) ,
- Firmware upgrade instruction (3 pages) ,
- Firmware upgrade manual (3 pages)

Subscribe to Our Youtube Channel
Related Manuals for Lumens DC125


Summary of Contents for Lumens DC125
-
Page 1: Document Camera
DC125 Document Camera User Manual - English [Important] To download the latest version of Quick Start Guide, multilingual user manual, software, or driver, etc., please visit Lumens http://www.MyLumens.com/goto.htm... - Page 2 Table of Contents Copyright Information ..................4 Chapter 1 Safety Instructions ................ 5 Precautions ....................6 FCC Warning ....................6 Chapter 2 Package Contents ................. 7 Chapter 3 Product Overview ................. 8 Description of LED indicator ............... 8 Relative Operation Position ..............
- Page 3 6.2.5 Time Lapse (Burst Settings) ............. 27 6.2.6 Setting of annotation tool ..............28 6.2.7 Setting (Advanced) ................29 MAC Operation Interface ..............30 6.3.1 MAC Software Screen Introduction - Camera ........30 6.3.2 MAC Software Screen Introduction - Image Browser Thumbnail ..33 6.3.3 MAC Software Screen Introduction - Large Picture Of Image Browser ......................
- Page 4 I would like to optimize the image ............ 47 I would like to freeze the live image ..........47 I would like to turn on/off the lamp ............ 47 I would like to adjust the brightness ..........47 I would like to capture images ............47 I would like to capture images continuously ........
-
Page 5: Copyright Information
Inc. Copying, reproducing or transmitting this file is not allowed if a license is not provided by Lumens Digital Optics Inc. unless copying this file is for the purpose of backup after purchasing this product. In order to keep improving the product, Lumens Digital Optics Inc. hereby reserves the right to make changes to product specifications without prior notice. -
Page 6: Chapter 1 Safety Instructions
Chapter 1 Safety Instructions Always follow these safety instructions when setting up and using the Document Camera: 1. Do not place Document Camera in tilted position. 2. Do not place the Document Camera on an unstable trolley, stand or table. 3. -
Page 7: Precautions
Precautions Warning: To reduce the risk of fire or electric shock, do not expose this appliance to rain or moisture. Note Risk of Electric Shock Caution: To reduce the risk of electric shock, do not remove cover (or back). No user-serviceable parts inside. -
Page 8: Chapter 2 Package Contents
Chapter 2 Package Contents DC125 Quick Start Guide USB Cable (For download of other language versions, please visit Lumens website) 4-Steps Card (Note to Teacher) English... -
Page 9: Chapter 3 Product Overview
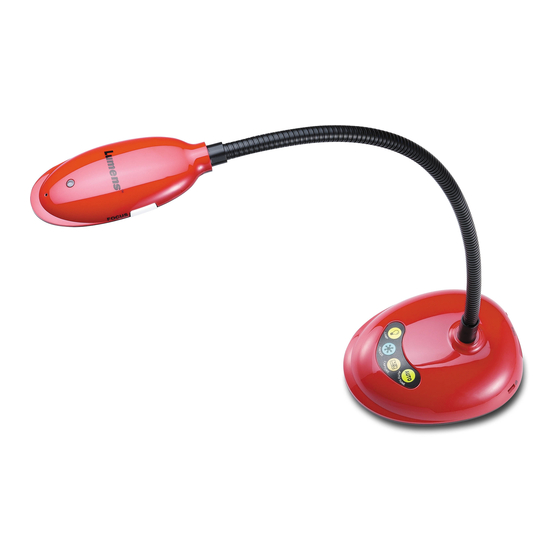
Chapter 3 Product Overview 5. Gooseneck 1. LED indicator 4. AF button 2. Microphone 3. Lens 6. Control panel 3.1 Description of LED indicator 1. Enable the image, and LED indicator will light up 2. Display the image, and LED indicator will light up 3. -
Page 10: Correct Use
3.3 Correct use 3.4 Incorrect use English... -
Page 11: Chapter 4 Installation And Connections
Chapter 4 Installation and Connections 4.1 System diagram USB Cable COMPUTER 4.2 Connecting to a computer See the picture above 4.3 Connecting to an Interactive Whiteboard (IWB) PROJECTOR USB Cable VGA Cable USB Cable COMPUTER English... -
Page 12: Installing Application Software
(H1) M4 screw (P = 0.7) 4.5 Installing application software After installing Lumens image software, you can use the following functions: Control the DC125. Capture and record images. Annotate the image, highlight important details and save it. - Page 13 4.5.2 Install with Windows XP/Vista Please download Ladibug™ software at Lumens website. Extract the file downloaded and then click [Ladibug] to install. The installation wizard will guide you through the process. Please follow the on-screen instructions and press [Next] for the next step.
- Page 14 Press [Yes] to create Ladibug™ shortcut on your desktop. Once the installation is completed, press [Finish] and restart the computer. English...
- Page 15 4.5.3 Install with MAC 1. Unlock software authentication: Due to the limitation of MAC system, please follow steps below to unlock software authentication. If unlocked, please skip to Step 2 to start the installation. 1.1. Select [System Preferences] in the Apple Menu. 1.2.
- Page 16 1.3. Click on the Authenticating icon on the lower left corner to unlock the panel, and enter the username and password of the Administrator. 1.4. Click on the [Anywhere] option as shown below. English...
- Page 17 1.5. Select [Allow From Anywhere], and confirm not to proceed with the authentication. Upon completion, start the installation. 2. Please download Ladibug™ software at Lumens website. 3. Extract the file downloaded and then click [Ladibug] to install. 4. Please finish the installation by following the on-screen instructions.
- Page 18 6. Click [Install]. 7. Enter the username and password, and then press [Install Software]. 8. Click [Continue Installation]. English...
- Page 19 9. Press [Restart] to finish the software installation. English...
-
Page 20: Chapter 5 Start Using
Chapter 5 Start Using <Note> Ensure that the USB cable is connected and Ladibug™ software is installed at first. Refer to Chapter 4 Installation and Connections in this user manual. FOCUS USB Cable 1. Double click on icon to open Ladibug™ Software. 2. -
Page 21: Chapter 6 Function Menu
Chapter 6 Function Menu 6.1 Function Descriptions of Control Panel Button <Remark> The below functions are listed alphabetically Name Function Descriptions Automatically adjust the image to have the best brightness and AUTO TUNE focusing performance. CAPTURE Capture the image to the computer. FOCUS AF Button. -
Page 22: Windows Operation Interface
6.2 Windows Operation Interface 6.2.1 Windows Software Screen Introduction - Camera 1. Preview window 2. Page switch Icon Function Descriptions Real-time image Image browser page Function settings page Software information page Switch to Full Screen Disable Ladibug English... - Page 23 . Left function menu Icon Function Descriptions Select the connection mode of camera Auto focus Freeze Capture Time Lapse Setting of annotation tool Eraser (Clear all the objects) Recover Redo Fold the menu English...
- Page 24 4. Right function menu Icon Function Descriptions Switch function menus Image setting Lamp On/Off Brightness Recording; this function is not supported in Wireless mode and Share Image mode. Free-hand drawing tool Arrow Circling tool Eraser Draw a rectangle Draw a line Edit text Mask Mode Spotlight Mode...
- Page 25 6.2.2 Windows Software Screen Introduction - Image Browser Thumbnail Icon Function Icon Function Descriptions Descriptions Upload the file to Move to the the cloud previous page Move to the next Send e-mail page Upload to Google Move to the last Drive page Move to a given...
-
Page 26: Windows Software Screen Introduction - Large Picture Of Image Browser
6.2.3 Windows Software Screen Introduction - Large Picture Of Image Browser Function Function Icon Icon Descriptions Descriptions Save files Circling tool Save as a new file Eraser Delete Setting of annotation tool Free-hand drawing Eraser (Clear all tool the objects) Arrow Recover Draw a line... -
Page 27: Camera Settings
6.2.4 Camera Settings Control the live image via the Camera Settings interface. The operating procedure is the same as the control panel and remote control of the Document Camera. <Remark> The display of the button may vary depending on product functions. An inactive button will grey out. Click to open Camera Settings interface. -
Page 28: Time Lapse (Burst Settings)
<Remark> In most parts of the world, it is 50 Hz. In the America, however, it is typically 60 Hz. 10. FW Version: FW version of the Document Camera. 11. Factory reset: The function of restoring the Document Camera to default is not supported in Wireless mode. -
Page 29: Setting Of Annotation Tool
6.2.6 Setting of annotation tool Click to open the setting menu 1. Set the pen color 2. Select the line width 3. Select the font size 4. Select the font English... -
Page 30: Setting (Advanced)
6.2.7 Setting (Advanced) Click to open the setting menu 1. Software factory reset: Reset to the default value. 2. Language: Select language. 3. File Directory: File storage path. 4. Enable Audio Recorder: Activate recording function and select audio output device. 5. -
Page 31: Mac Operation Interface
6.3 MAC Operation Interface 6.3.1 MAC Software Screen Introduction - Camera 1. Preview window 2. Page switch Icon Function Descriptions Real-time image Image browser page Function settings page Software information page Switch to Full Screen Disable Ladibug English... - Page 32 . Left function menu Icon Function Descriptions Select the connection mode of camera Auto focus Freeze Capture Time Lapse Setting of annotation tool Eraser (Clear all the objects) Recover Redo Fold the menu English...
- Page 33 4. Right function menu Icon Function Descriptions Switch function menus Image setting Lamp On/Off Brightness Recording; this function is not supported in Wireless mode and Share Image mode. Free-hand drawing tool Arrow Circling tool Eraser Draw a rectangle Draw a line Edit text Mask Mode Spotlight Mode...
-
Page 34: Mac Software Screen Introduction - Image Browser Thumbnail
6.3.2 MAC Software Screen Introduction - Image Browser Thumbnail Icon Function Icon Function Descriptions Descriptions Upload the file to Move to the first the cloud page Send e-mail Move to the previous page Upload to Google Move to the next Drive page Upload to Dropbox... -
Page 35: 6.3.3 Mac Software Screen Introduction - Large Picture Of Image Browser
6.3.3 MAC Software Screen Introduction - Large Picture Of Image Browser Icon Function Icon Function Descriptions Descriptions Save files Circling tool Save as a new file Eraser Delete Setting of annotation tool Free-hand drawing Eraser (Clear all the tool objects) Arrow Recover Draw a line... -
Page 36: Camera Settings
6.3.4 Camera Settings Control the live image via the Camera Settings interface. The operating procedure is the same as the control panel and remote control of the Document Camera. <Remark> The display of the button may vary depending on product functions. -
Page 37: Time Lapse
11. Factory reset: The function of restoring the Document Camera to default is not supported in Wireless mode. 6.3.5 Time Lapse Click to open Time Lapse menu. 1. Specify a file name. 2. Set the start time. 3. -
Page 38: Setting Of Annotation Tool
6.3.6 Setting of annotation tool Click to open the setting menu 1. Set the pen color 2. Select the line width 3. Select the transparency 4. Select the font size 5. Select the font English... -
Page 39: Setting (Advanced)
6.3.7 Setting (Advanced) Click to open the setting menu 1. Software factory reset: Reset to the default value. 2. File Directory: File storage path. 3. Enable Audio Recorder: Activate recording function. 4. Audio source: Select audio output device. 5. Audio Compression Type: Select audio output quality. 6. -
Page 40: Chapter 7 Descriptions Of Major Functions – Windows User
Chapter 7 Descriptions of major functions – Windows User I would like to optimize the image Auto Operation: Click Manually enabled function: Press the AF [FOCUS] button on the camera head of main unit. I would like to freeze the live image ... -
Page 41: I Would Like To Capture Images Continuously
I would like to capture images continuously Click to open burst mode setting. Click [OK] after setting. <Note> For more information about Time Lapse setting, please refer to 6.2.5 Time Lapse <Note> When the images are captured, please view the images on the image browser page I would like to record ... -
Page 42: I Would Like To Add Textual Annotation To Images
Mark or annotate the displayed image. <Remark> If they are live images, you can click to capture images. If the image files are opened on image browser page , you can press the [SAVE] or [SAVE AS] to save files I would like to add textual annotation to images ... -
Page 43: I Would Like To Use The Mask Mode
You can click [SAVE] or [SAVE AS] to save files if they are image files. 7.10 I would like to use the mask mode Click to open the mask mode. You can use the mouse to directly modify the length and the width of the block. - Page 44 Double click on the image to display a large picture Click to switch to Full Screen Click to return to image thumbnails 7.12.2 Delete Image Click the image or click Select All Then click Delete to delete the selected image 7.12.3 Share images ...
-
Page 45: I Would Like To Change The Operating Languages Of The Software
d. Click “Accept” to enable Ladibug™ to access information stored in Google Drive. e. Click “Upload” to upload files. Upload is complete when the “upload finished” message is shown. 7.13 I would like to change the operating languages of the software ... - Page 46 d. Please select Ladibug program in the list. e. If Ladibug was not listed, please click [Allow another program], and then you will find Ladibug program. f. Select Ladibug, and then click [Add]. If it was not listed, please click [Browse], select Ladibug program, and then click [Enable].
- Page 47 c. In the allowed application program list, find Ladibug, check the checkbox beside the application program, and then click or press [Confirm]. English...
-
Page 48: Chapter 8 Descriptions Of Major Functions - Mac User
Chapter 8 Descriptions of major functions - MAC User I would like to optimize the image Click I would like to freeze the live image Click to freeze the live image of Ladibug™. Click once again to lift the freeze. I would like to turn on/off the lamp ... -
Page 49: I Would Like To Capture Images Continuously
I would like to capture images continuously Click to open continuous mode setting. Click [OK] after setting <Note> For more information about Time Lapse setting, please refer to 6.3.5 Time Lapse <Note> When the images are captured, please view the images on the image browser page I would like to record ... -
Page 50: I Would Like To Add Textual Annotation To Images
Mark or annotate the displayed image. <Remark> If they are live images, you can click to capture images. If the image files are opened on image browser page , you can press the [SAVE] or [SAVE AS] to save files I would like to add textual annotation to images ... -
Page 51: I Would Like To Use The Mask Mode
8.10 I would like to use the mask mode Click to open the mask mode. You can use the mouse to directly modify the length and the width of the block. Click to modify the transparency of the block. ... - Page 52 Double click on the image to display a large picture Click to switch to full screen Click to return to image thumbnails 8.12.2 Delete images Click the image or click Select Then click Delete to delete the selected image 8.12.3 Share images ...
-
Page 53: I Would Like To Change The Operating Languages Of The Software
: Upload to Dropbox a. Click the image or click Select b. Click to select how to upload images c. Click “Log In”. Log in by entering your Dropbox username and password. d. Click “Accept” to enable Ladibug™ to access information stored in Dropbox. -
Page 54: Change The Setting Of Firewall
8.14 Change the setting of firewall Applicable to MAC OS X v10.6/10.7/10.8/10.9 8.14.1 Select the setting of [System Preferences] in the Apple Menu. 8.14.2 Click on the [Security] or [Security and Privacy] icon. 8.14.3 Click the tab [Firewall]. 8.14.4 Click the lock on the lower left corner to unlock the panel, and enter the username and password of the Administrator. - Page 55 English...
-
Page 56: Chapter 9 Connecting To Microscope
Chapter 9 Connecting to Microscope 1 Mount the microscope adapter onto the microscope. <Note> Please choose an appropriate microscope adapter. Microscope adapter accessories are applicable to eyepieces of Ø 28 mm. 2 Connect the lens with the microscope adaptor. 3 If the image is not clear 3.1. -
Page 57: Chapter 10 Troubleshooting
Chapter 10 Troubleshooting This chapter describes problems you may encounter while using DC125. If you have questions, please refer to related chapters and follow all the suggested solutions. If the problem still exists, please contact our distributors or service center.
Need help?
Do you have a question about the DC125 and is the answer not in the manual?
Questions and answers