Table of Contents
Advertisement
Advertisement
Table of Contents

Related Manuals for Lumens dc153


Summary of Contents for Lumens dc153
- Page 1 DC153 Digital Visualizer User Manual English - 1...
-
Page 2: Table Of Contents
Table of Contents CHAPTER 1 PRECAUTIONS ................5 CHAPTER 2 PACKAGE CONTENT ..............7 CHAPTER 3 PRODUCT OVERVIEW ..............8 ................ 8 RODUCT NTRODUCTION I/O C ..................9 ONNECTION DIP S ................9 WITCH ETTING ................10 EMOTE ONTROL CHAPTER 4 HOW TO USE IT ................11 .................. -
Page 3: English
CHAPTER 5 CONTROL MENU (OSD MENU) INTRODUCTION ....... 17 ................... 17 PERATION (OSD M ) .............. 17 ONTROL CHAPTER 6 TROUBLESHOOTING ..............20 English - 3... -
Page 4: Copyright Information
Lumens Digital Optics Inc. is in process the trademark registration of Lumens. No part of this document may be copied, reproduced, or transmitted by any means, without prior written permission from Lumens Digital Optics Inc. Except documentation kept by the purchaser for backup purposes. -
Page 5: Chapter 1 Precautions
Chapter 1 Precautions Always follow these safety instructions when setting up and using the Digital Visualizer: 1. Please do not tilt the machine while using. 2. Do not place the Digital Visualizer on an unstable trolley, stand or table. 3. Do not use the Digital Visualizer near water or source of heat. 4. -
Page 6: Safety Precautions
If liquid is spilled into it or the Digital Visualizer has been exposed to rain or water. Safety Precautions Warning: To reduce the risk of fire or electric shock, do not expose this appliance to rain or moisture. This Digital Visualizer has a 2 wires AC line Plug. This is a safety feature to ensure that the plug will fit into the power outlet. -
Page 7: Chapter 2 Package Content
Chapter 2 Package Content Please make sure the package comes with the following items when you unpack: (Total 13 items): DC153 & Remote Quick Start Guide Soft Bag (Big) Remote Soft Bag (Small) User’s Manual & CD Power Cable VGA Cable... -
Page 8: Chapter 3 Product Overview
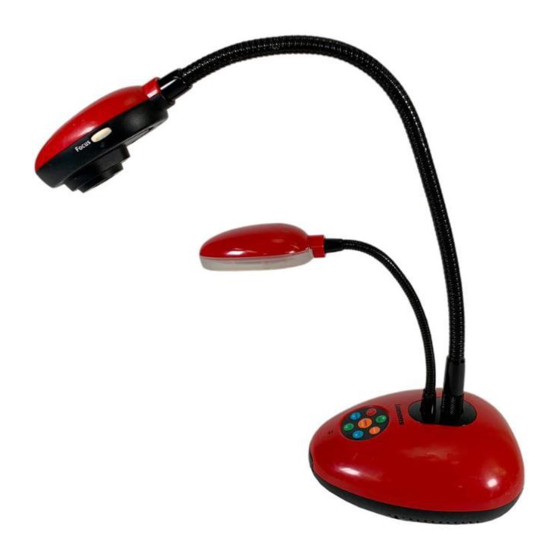
Chapter 3 Product Overview Product Introduction 1. Auto Focus Button Gooseneck 2. Lens 5. I/O Connection 4. Lamp 6. Power/Control keypad Infrared rays area 9. Auxiliary Stand 8. DIP Switch English - 8... -
Page 9: I/O Connection
3.2 I/O Connection 3.3 DIP Switch Setting Factory default settings are as the following: C-Video SVGA Reserved (Default) NTSC Reserved (OFF at all time) English - 9... -
Page 10: Remote Control
3.4 Remote Control *Only use CR2025 as replacement battery. Dispose used battery properly please. 1. Power: 8. Focus: Power on or off. Manual Focus for fine tune 2. Source: 9. AF: Switch between different signal Auto Focus sources. 10. Auto Tune: 3. -
Page 11: Chapter 4 How To Use It
Chapter 4 How to use it 4.1 Getting Start 4.1.1 Turn on the Digital Visualizer When plug on the power cord, the LED indicator will be "Red". When turn on DC153, the LED indicator will be "Blue". Remote Keypad Optimum 4.1.2... -
Page 12: Major Functions
4.2 Major Functions 4.2.1 Select Input Source The default input source is set as "Digital Visualizer", press 『Source』to switch. Remote Keypad Monitor Notebook Projector 4.2.2 『Photo/Text』 The default setting is "Photo". Users can switch mode by pressing "Photo/Text" button. Remote English - 12... -
Page 13: Zoom In / Out
4.2.3 Zoom in / out 4.2.4 Auto Focus Remote Goose-head 4.2.5 Brightness Adjustment English - 13... -
Page 14: Display Full Control Menu (Osd)
4.2.6 Display full control menu (OSD) Remote Keypad 4.2.7 Enter to select Remote Keypad 1. Press『^ v< >』navigate menu. 2. Press『Enter』to select. English - 14... -
Page 15: Advanced Functions
4.3 Advanced Functions 4.3.1 Capture Function Remote or Keypad::Press『Capture』button from remote control. 4.3.2 Play back captured Images Remote or Keypad: 1. Press『Play』to show thumbnail images in memory. 2. Use『』to select thumbnail. 3. Press『Enter』to display on full screen. 4. Use『』to view next image. 5. -
Page 16: Preset
8. Press 『Menu』to Exit 4.3.4 Preset Preset save: the customized user setting parameters (Ex. Zoom, Save brightness, color, AE setting). 1. Press『Preset』to entry the Preset menu. 2. Use『』to『Preset save』. 3. Use『』to『Yes』. Preset Load:Invoke the customized user setting parameters (Ex. Zoom, brightness, color, AE setting). -
Page 17: Chapter 5 Control Menu (Osd Menu) Introduction
Chapter 5 Control Menu (OSD Menu) Introduction 5.1 Operation A. Use『』to select main function. B. Use『』to select sub-item. C. The activated item with red line and yellow block. User『 』to select items. D. 『』: More items, you can press『』to execute. E. - Page 18 VGA Mode Layer 2 Layer 3 Description Layer 1 Normal/Gray/Slide/ Select Normal/Gray/Slide/ Display Image Microscope/Film Microscope/Film image mode Use Freeze to retain the image on ON /OFF Freeze the screen. Flip image by 180° ON /OFF Flip (Up→Down & Left→Right ) Zoom 100%~1600% Adjust Zoom 100% ~ 1600%...
- Page 19 Invoke the customized user Yes/No Preset Load setting values Save a set of customized user Yes/No Preset Save setting values C-Video Mode Layer 1 Layer 2 Layer 3 Content 100~300 Focus Select Photo/Text mode Photo/Text Gamma Select Normal/Gray mode Normal/Gray Image Display...
-
Page 20: Chapter 6 Troubleshooting
Problem 3: Can not see the desired image because it is too bright or dark. Solution - Adjust the Brightness +/- Button on the Digital Visualizer to get the desired image. *Please visit our web site www.lumens.com.tw for the latest updates.
Need help?
Do you have a question about the dc153 and is the answer not in the manual?
Questions and answers