
Related Manuals for Atlona AT-UHD-SW-510W-KIT


Summary of Contents for Atlona AT-UHD-SW-510W-KIT
- Page 1 4K/UHD Five-Input Universal Switcher with Wireless Presentation Link Atlona Manuals AT-UHD-SW-510W Switchers...
- Page 2 Version Information Version Release Date Notes 12/17 Initial release 01/18 Full API now found under the Resources tab at https://atlona.com/product/at-uhd- sw-510w/ AT-UHD-SW-510W...
- Page 3 Welcome to Atlona! Thank you for purchasing this Atlona product. We hope you enjoy it and will take a extra few moments to register your new purchase. Registration only takes a few minutes and protects this product against theft or loss. In addition, you will receive notifications of product updates and firmware.
- Page 4 Atlona requires that products returned are properly packed, preferably in the original carton, for shipping. Cartons not bearing a return authorization or case number will be refused. Atlona, at its sole discretion, reserves the right to reject any products received without advanced authorization. Authorizations can be requested by calling 1-877-536-3976 (US toll free) or 1-408- 962-0515 (US/international) or via Atlona’s website at www.atlona.com.
- Page 5 Damage, deterioration or malfunction resulting from the installation or removal of this product from any installation, any unauthorized tampering with this product, any repairs attempted by anyone unauthorized by Atlona to make such repairs, or any other cause which does not relate directly to a defect in materials and/or workmanship of this product.
- Page 6 The information bubble is intended to alert the user to helpful or optional opera- product. tional instructions in the literature accompanying the product. 11. Only use attachments/accessories specified by Atlona. 1. Read these instructions. 12. To reduce the risk of electric shock and/or damage 2. Keep these instructions.
-
Page 7: Table Of Contents
Table of Contents Introduction Features Package Contents Panel Description Installation RS-232 Audio Power Connection Instructions Connection Diagram IP Configuration Switching the IP Mode Using the Front Panel Getting the IP Address Setting the IP Address using the Web GUI Auto IP Mode Resetting to Factory-Default Settings Basic Operation Boot Sequence... -
Page 8: Introduction
The SW-510W is HDCP 2.2 compliant, and features an HDMI output and a mirrored HDBaseT™ output that can be used with the Atlona AT-UHD-EX-100CE-RX-PSE HDBaseT receiver. It also includes automatic input switching and automatic display control capability, both applicable to wired and wireless source connections. -
Page 9: Panel Description
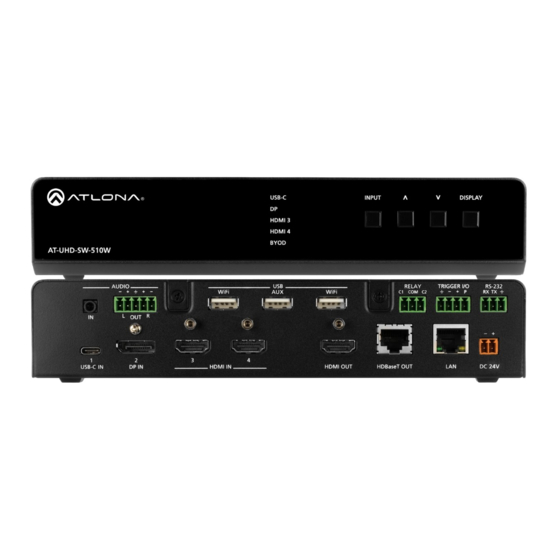
Panel Description USB-C INPUT DISPLAY USB-C INPUT DISPLAY HDMI 3 HDMI 4 HDMI 3 BYOD HDMI 4 AT-UHD-SW-510W BYOD AT-UHD-SW-510W Front AUDIO RELAY TRIGGER I/O RS-232 WiFi WiFi C1 COM C2 AUDIO RELAY TRIGGER I/O RS-232 WiFi WiFi C1 COM C2 USB-C IN DP IN HDMI IN... -
Page 10: Installation
Installation RS-232 The AT-UHD-SW-510W provides RS-232 control between an automation system and an RS-232 device. This step is optional. 1. Use wire strippers to remove a portion of the cable jacket. 2. Remove at least 3/16” (5 mm) from the insulation of the RX, TX, and GND wires. 3. -
Page 11: Power
Miracast™, only. The AUX port is reserved for obtaining the IP address of the unit. Refer to Getting the HDMI 4 IP Address (page 13) 10 for more information. BYOD AT-UHD-SW-510W IMPORTANT: Only use Atlona Wi-Fi USB modules. Other Wi-Fi modules may not be supported by this product. AUDIO RELAY TRIGGER I/O RS-232 WiFi... -
Page 12: Connection Diagram
Installation 6. Connect a 3.5 mm analog audio cable from an analog source to the AUDIO IN port. This audio source can be used to embed analog audio on any of the input sources. 7. Connect an Ethernet cable from the LAN port to the Local Area Network (LAN). 8. -
Page 13: Ip Configuration
Installation IP Configuration The AT-UHD-SW-510W is shipped with DHCP enabled. Once connected to a network, the DHCP server (if available), will automatically assign an IP address to the unit. Use an IP scanner, along with the MAC address on the bottom of the unit, to identify both the unit and its IP address on the network. -
Page 14: Setting The Ip Address Using The Web Gui
2. Log in, using the required credentials. The factory-default username and password are listed below: Username: admin Password: Atlona 3. Click Administration > Networking > Ethernet. 4. Click the Mode drop-down list and select DHCP, Static, or Factory Static. Refer to the Networking page (page for more information. -
Page 15: Auto Ip Mode
Installation Auto IP Mode If the AT-UHD-SW-510W is unable to detect a DHCP server within 15 seconds, then the unit will use a self-assigned IP address within the range of 169.254.xxx.xxx. If this occurs, connect the AT-UHD-SW-510W to a computer running Microsoft Windows®... -
Page 16: Basic Operation
Basic Operation Boot Sequence 1. After the power supply has been connected to the AT-UHD-SW-510W, the input indicators on the front panel will begin to flash, in an up-and-down pattern, as shown by the arrows. Input indicators USB-C INPUT DISPLAY HDMI 3 HDMI 4 BYOD... -
Page 17: Selecting The Input
Basic Operation Selecting the Input Press the INPUT button to cycle through each of the available inputs on the unit. If the unit is powered-off, then powered-on, the AT-UHD-SW-510W will set the default input to BYOD. USB-C INPUT DISPLAY HDMI 3 HDMI 4 BYOD AT-UHD-SW-510W... -
Page 18: Wireless Configuration
Basic Operation Wireless Configuration The AT-UHD-SW-510W features a wireless gateway, providing convenient Wi-Fi connectivity for an iOS, Android, ® Mac, Chromebook, or Windows-based device, and a built-in web GUI. In addition, the AT-UHD-SW-510W can be configured as a wireless access point (AP). The addition of a built-in firewall provides control of incoming and outgoing network traffic. - Page 19 Basic Operation 8. Enter the password in the Password field. This password will be required by clients connecting to the AT-UHD-SW-510W. 9. Click the Hide Password check box to mask the password. When the password is masked, the text in the Password field will appear as asterisks. 10.
-
Page 20: Connect Mode
Basic Operation Connect Mode To connect the AT-UHD-SW-510W to another wireless network, select the Connect Mode. 1. Launch a web browser and enter the IP address of the AT-UHD-SW-510W in the address bar. 2. Login to the web GUI. Refer to Introduction to the Web GUI (page 28) for more information. - Page 21 Basic Operation 6. Select the desired wireless network from the pop-up dialog box. 7. Click the OK button to accept the selection and dismiss the dialog box. Click the Cancel button to return to close the dialog and return the Wifi tab. Enter the password for the wireless network in the Password field.
- Page 22 Basic Operation Once a successful connection has been established, the Status field will display Connected, as shown below. The following table provides a list of possible status messages. State Description Connected The AT-UHD-SW-510W is connected to the wireless network. Not Connected Unsuccessful connection.
-
Page 23: Casting
Basic Operation Casting The AT-UHD-SW-510W interface provides the ability to transmit (“cast”) the screen of any iOS , Android , macOS ® ™ ® Chromebook, or Windows device over Wi-Fi, without having to install a separate application or driver. The AT-UHD- SW-510W can serve as an integrated, dual-band access point, or be networked into an existing Wi-Fi installation. -
Page 24: Macos
Basic Operation 7. Tap the SSID from the list of devices. 8. Close the Control Center by either swiping down or pressing the Home button. 9. The image of the iOS device will now appear on the connected display. Note that depending upon the application, the image on the screen can be rotated. - Page 25 Basic Operation AirPlay can be used to either mirror or extend the Mac display. • Mirroring Click the AirPlay icon in the menu bar and select the desired display to be mirrored. • Extending Click the AirPlay icon and select “Use As Separate Display” from the list of displays, to extend the Desktop to another display.
-
Page 26: Android
Basic Operation Android Casting on Android devices is only available on Android 4.4.2 or higher. NOTE: Although there are different ways to cast from an Android device, the easiest method is through the Google Home App. 1. Select the BYOD input on the AT-UHD-SW-510W. 2. -
Page 27: Microsoft Miracast
Basic Operation Microsoft Miracast Miracast is a wireless protocol that allows content to be transmitted from laptops and other mobile devices to displays. The latest release of Microsoft Windows 10 supports Miracast along with UIBC support, which provides ® wireless connectivity to touch screens, mouse devices, and keyboard. Displaying Miracast devices can be done in several ways. -
Page 28: Introduction To The Web Gui
Introduction to the Web GUI The AT-UHD-SW-510W includes a built-in web GUI. Atlona recommends that the web GUI be used to set up the AT-UHD-SW-510W, as it provides intuitive management of all features. Follow the instructions below to access the webGUI. -
Page 29: Menu Bar
The Web GUI 7. The Info page will be displayed. Menu Bar The window on the left side of the screen is the is the menu bar and lists all available menus. Click on the desired menu item to open that page. In this example, clicking Display, in the menu bar, will display the Display page. -
Page 30: Info Page
The model SKU of this product. Master Version The version of firmware. Firmware Version The version of firmware that the AT-UHD-SW-510W is running. Always make sure to check the AT-UHD-SW-510W product page, on the Atlona web site, for the latest version of firmware. AT-UHD-SW-510W... -
Page 31: General Page
The Web GUI General page Name Enter the desired name of the AT-UHD-SW-510W in this text field. Derived This field will automatically be filled-in by the AT-UHD-SW-510W. The system takes the text in the Name field and produced a unique system ID. Save Click this button to accept all changes. -
Page 32: System Page
Master Version The master version of firmware. Always make sure to check the AT-UHD-SW-510W product page, on the Atlona web site, for the latest version of firmware. Firmware Version The version of (MCU) firmware that the AT-UHD-SW- 510W is running. Always make sure to check the AT- UHD-SW-510W product page, on the Atlona web site, for the latest version of firmware. -
Page 33: Splash Screen Page
The Web GUI Splash Screen page Show Meta Data Click this checkbox to display metadata on the splash screen. Show Panel Welcome Check this box to display the overlay panel, containing SW510-E753 connection instructions. Uncheck this box to hide the panel. -
Page 34: Display Page
The Web GUI Display page Power When a display is connected to the AT-UHD-SW-510W, power-on and power-off control of the display using the CEC protocol. The power-on and power-off command can also be sent over HDBaseT or HDMI. System Settings Display Auto Power Click this checkbox to allow the AT-UHD-SW-510W to send the power-on command to the display when an A/V signal is detected. - Page 35 The Web GUI Control Type Click this drop-down list to select the control method for sending commands. Setting Description RS-232 RS-232 is used to send commands. Commands are sent over IP. Uses CEC to send commands. Volume / Mute This feature not yet implemented. Setting Description Audio Out...
-
Page 36: Edid Page
The Web GUI EDID page EDID (Extended Display Identification Data) Displays the EDID assigned that is being used by each output. Press the Save button to save the EDID to a file. Inputs The Input column displays each of the inputs on the AT-UHD-SW-510W. Click the drop-down list, under the Selection column, to select the desired EDID to be used. -
Page 37: Administration
The Web GUI Administration Telnet page The Telnet page provides an emulated terminal for entering commands. Shell page The Shell page is provided for use only by Atlona Technical Support Engineers. AT-UHD-SW-510W... -
Page 38: Networking Page
The Web GUI Networking page This page contains a Wifi and Ethernet tab. Use the settings, under these tabs, to connect the AT-UHD-SW-510W to a network or Wireless Access Point (WAP). Refer to the IT Network Deployment Guide for detailed information on configuring the AT-UHD-SW-510W in various network environments. - Page 39 The Web GUI Access Point Mode Select this mode to use the AT-UHD-SW-510W as an Wireless Access Point (WAP). Firewall Mode This option is unique to Access Point Mode. Refer to the Firewall Mode option, below, for more information on each setting. SSID The SSID assigned to the AT-UHD-SW-510W.
- Page 40 The Web GUI Connect Mode Select this option to allow the AT-UHD-SW-510W to connect to an available wireless network. SSID The name of the wireless network to which the AT-UHD-SW-510W is connected. Click the Pick button to select the desired wireless network. Password Enter the password, required to connect to the AT-UHD-SW-510W.
- Page 41 The Web GUI Mode Click this drop-down to select the desired network mode: DHCP, Static, or Factory Static. Setting Description DHCP Select this option to have a DHCP server (if available) assign an IP address to the AT-UHD- SW-510W. Static Select this option to enter a specific IP address.
-
Page 42: Debug Page
Click this button to set the wired network settings of the AT-UHD-SW-510W to factory-default. Debug page Debug Click the Download link to view the latest debug log. This log is used by Atlona Technical Support Engineers to identify functionality issues. AT-UHD-SW-510W... -
Page 43: Advanced Page
The Web GUI The Web GUI Advanced page AutoSwitch Click this box to enable or disable auto-switching. When this box is checked, the AT-UHD-SW-510W will auto- switch, to the desired input. To disable auto-switching, uncheck this box. Input buttons (USBC, DP, HDMI3, HDMI1, BYOD) Click the desired button to set the auto-switch input. -
Page 44: Images Page
The Web GUI The Web GUI Images page The default loading and splash screen can be replaced with a custom image. Click the drop-down list and select the target image. Once the file is selected, it will automatically be pushed to the AT-UHD-SW-510W. Preferred image size is either 1920 x 1080 or 3840 x 2160. -
Page 45: Audio Page
The Web GUI The Web GUI Audio page Audio Source Click this drop-down list to select the desired audio source. Setting Description HDMI HDMI audio source Analog Analog audio will be used, from the 3.5mm mini-stereo port. AT-UHD-SW-510W... -
Page 46: Event Viewer Page
The Web GUI The Web GUI Event Viewer page This feature not yet implemented. AT-UHD-SW-510W... -
Page 47: Appendix
Appendix Default Settings The following tables list the factory-default settings, as defined in the web GUI, for the AT-UHD-SW-510W. Web GUI Page Settings Login Username admin Password Atlona General Name SW510-E753 Derived sw510-e753 Splash Screen Show Metadata Disabled Show Panel... -
Page 48: Mounting Instructions
The AT-UHD-SW-510W can be mounted in different ways, based on the number of units that are being installed. The AT-UHD-SW-510W can be mounted in a rack or on/under any flat surface. NOTE: AT-UHD-510W-RM rack ears are sold separately. Contact Atlona for more information. Single-unit Rack Installation 1. -
Page 49: Dual-Unit Rack Installation
Appendix Dual-unit Rack Installation 1. Turn both units upside-down on a flat surface, next to each other, as shown. 2. Position the included mounting plates over the holes on the bottom of the enclosure. When attaching mounting plates, the countersink bevels on the mounting plate should face upward. Countersink bevel 3. -
Page 50: Flat Surface
Appendix Flat Surface 1. Turn the unit upside down, on a flat surface. 2. Position the included mounting plates over the pre-drilled holes on the bottom of the enclosure. When attaching mounting plates, the countersink bevels on the mounting plates should face upward. Countersink bevel 3. -
Page 51: Specifications
Appendix Specifications Video UHD/HD/SD 4096x2160@60/30/25/24Hz*, 3840×2160@60/30/25/24Hz*, 1080p@60/59.9/50/30/29.97/25/24/23 .98Hz, 1080i@60/59.94/50Hz, 720p@60/59.94/50Hz, 576p@50Hz, 576i@50Hz, 480p@60/59.96Hz, 480i@60Hz VESA 2560×1600, 2048×1536, 1920×1200, 1680×1050, 1600×1200, 1440×900, 1400×1050, 1280×1024, 1280×800, 1366×768, 1360×768, 1152×864, 1024×768, 800×600, 640×480 USB-C Up to 4K/UHD @ 60Hz for devices supporting USB-C Alternate Mode video output Wireless Up to 1080p @ 30Hz 4:2:0 (up to 1080p @ 60Hz with Miracast™);... - Page 52 Appendix Ethernet Ports RJ-45 Protocols DHCP, HTTP, HTTPS, SFTP, SMTP, SNMP, Telnet, SSH, TCP/IP, UDP Ethernet Speed 10/100/1000 Mbps Addressing DHCP, static Wi-Fi IEEE 802.11n/ac 2.5 GHz / 5 GHz Wi-Fi Protocols WEP, WPA, PSK, WPA2 PSK, WPA Enterprise, WPA2 Enterprise Antenna 2 included Control Ports...
- Page 53 • 408.962.0515 • 877.536.3976 © 2018 Atlona Inc. All rights reserved. “Atlona” and the Atlona logo are registered trademarks of Atlona Inc. All other brand names and trademarks or registered trademarks are the property of their respective owners. Pricing, specifications and availability...
Need help?
Do you have a question about the AT-UHD-SW-510W-KIT and is the answer not in the manual?
Questions and answers