Atlona AT-UHD-SW-510W User Manual
4k/uhd five-input universal switcher with wireless presentation link
Hide thumbs
Also See for AT-UHD-SW-510W:
- Manual (100 pages) ,
- Deployment manual (21 pages) ,
- Installation manual (13 pages)

Subscribe to Our Youtube Channel
Related Manuals for Atlona AT-UHD-SW-510W


Summary of Contents for Atlona AT-UHD-SW-510W
- Page 1 4K/UHD Five-Input Universal Switcher with Wireless Presentation Link Atlona Manuals AT-UHD-SW-510W Switchers...
-
Page 2: Version Information
Version Information Version Release Date Notes 12/17 Initial release 01/18 Full API now found under the Resources tab at http://www.atlona.com/product/at- uhd-sw-510w 02/18 Manual updated to reflect latest release of firmware 1.0.1 02/18 Wireless AV system requirements 03/18 Manual updated to reflect latest release of firmware 1.0.2... - Page 3 Welcome to Atlona! Thank you for purchasing this Atlona product. We hope you enjoy it and will take a extra few moments to register your new purchase. Registration only takes a few minutes and protects this product against theft or loss. In addition, you will receive notifications of product updates and firmware.
- Page 4 Atlona requires that products returned are properly packed, preferably in the original carton, for shipping. Cartons not bearing a return authorization or case number will be refused. Atlona, at its sole discretion, reserves the right to reject any products received without advanced authorization. Authorizations can be requested by calling 1-877-536-3976 (US toll free) or 1-408- 962-0515 (US/international) or via Atlona’s website at www.atlona.com.
- Page 5 Damage, deterioration or malfunction resulting from the installation or removal of this product from any installation, any unauthorized tampering with this product, any repairs attempted by anyone unauthorized by Atlona to make such repairs, or any other cause which does not relate directly to a defect in materials and/or workmanship of this product.
-
Page 6: Important Safety Information
Where shielded interface cables have been provided with the product or specified additional components or accessories elsewhere defined to be used with the installation of the product, they must be used in order to ensure compliance with FCC regulations. AT-UHD-SW-510W... -
Page 7: Table Of Contents
Setting the System Date and Time Splash Screen page Display page System Settings EDID page Administration page Telnet page Shell page Networking page Debug page User Accounts page Advanced page Beta page Images page Audio page Event Viewer page AT-UHD-SW-510W... - Page 8 Table of Contents Appendix Updating the Firmware Default Settings Mounting Instructions Single-unit Rack Installation Dual-unit Rack Installation Flat Surface Specifications Index AT-UHD-SW-510W...
-
Page 9: Introduction
Introduction The Atlona AT-UHD-SW-510W is a 5x1 multi-format switcher with wireless presentation capability. It provides universal BYOD (bring your own device) compatibility with HDMI, DisplayPort, and USB-C inputs, plus wireless connectivity for mobile devices. The SW-510W is HDCP 2.2 compliant, and features an HDMI output and a mirrored HDBaseT™... -
Page 10: Operating Notes
The AT-UHD-SW-510W wirelessly receives Miracast directly from the device. • Miracast over Infrastructure The AT-UHD-SW-510W receives Miracast from the device over a network via Ethernet or Wi-Fi. The Wi-Fi connection must be secured with WPA2-PSK or WPA-Enterprise. • The following requirements are necessary for a mobile device to deliver a Miracast presentation to the AT-UHD- SW-510W: Windows PC or tablet certified for Miracast and running Windows 8.1 or Windows 10 version 1703. -
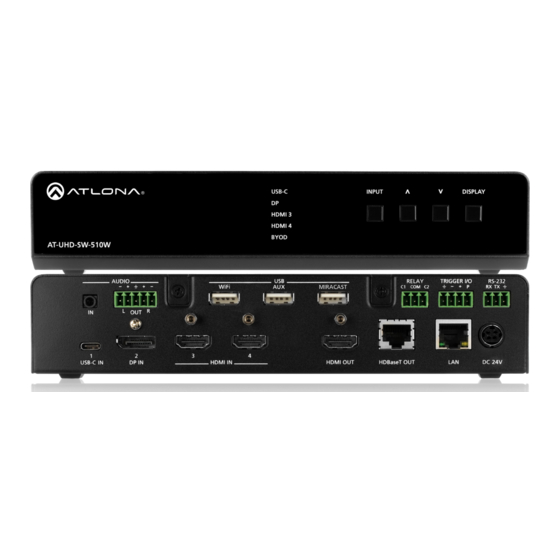
Page 11: Panel Description
Panel Description USB-C INPUT DISPLAY USB-C INPUT DISPLAY HDMI 3 HDMI 4 HDMI 3 BYOD HDMI 4 AT-UHD-SW-510W BYOD AT-UHD-SW-510W Front AUDIO RELAY TRIGGER I/O RS-232 WiFi MIRACAST C1 COM C2 AUDIO RELAY TRIGGER I/O RS-232 WiFi MIRACAST C1 COM C2... -
Page 12: Installation
The AT-UHD-SW-510W provides a RELAY port, allowing the control of screens, curtains, and other devices. Use a 48 V DC relay with no more than 1 A current draw. When the AT-UHD-SW-510W is powered-on or rebooted, C1 and C2 are set to the Normally Open (NO) state. AT-UHD-SW-510W... -
Page 13: Connection Instructions
Miracast™. The AUX port is reserved for obtaining the IP address of the unit. Refer to Getting the IP BYOD Address (page 15) for more information. AT-UHD-SW-510W IMPORTANT: Only use Atlona Wi-Fi USB modules. Other Wi-Fi modules may not be supported by this product. TRIGGER I/O AUDIO RELAY RS-232... -
Page 14: Connection Diagram
Installation Connection Diagram Miracast™ over Infrastructure AT-UHD-SW-510W Laptop USB Wireless Antennas Wireless Access Point (WAP) (included) RS -2 R I/O IG GE M IR 24 V W iFi se T DI O B- C AT-UHD-EX-100CE-RX-PSE AT-ANC-108D Network Control Panel Tablet (BYOD) Miracast™... -
Page 15: Ip Configuration
IP address on the network. If the AT-UHD-SW-510W is unable to detect a DHCP server within 15 seconds, then the unit will use a self-assigned IP address within the range of 169.254.xxx.xxx. If this occurs, refer to Auto IP Mode (page 17). -
Page 16: Setting The Ip Address Using The Web Gui
GUI, allows the AT-UHD-SW-510W to use either DHCP or static IP mode. In order to access the web GUI, the IP address of the AT-UHD-SW-510W must be known. 1. Open the desired web browser and enter the IP address of the AT-UHD-SW-510W. -
Page 17: Auto Ip Mode
Auto IP Mode If the AT-UHD-SW-510W is unable to detect a DHCP server within 15 seconds, then the unit will use a self-assigned IP address within the range of 169.254.xxx.xxx. If this occurs, connect the AT-UHD-SW-510W to a computer running Microsoft Windows®... -
Page 18: Basic Operation
Basic Operation Boot Sequence 1. After the power supply has been connected to the AT-UHD-SW-510W, the input indicators on the front panel will begin to flash, in an up-and-down pattern, as shown by the arrows. Input indicators USB-C INPUT DISPLAY... -
Page 19: The Splash Screen
• Panel Displays information on how to connect to the AT-UHD-SW-510W, the name of the unit, the current version of firmware, and the IP address of the unit. Each text field is indentified below, and can be changed in the... -
Page 20: Selecting The Input
This text displays the name and wireless password of the AT-UHD-SW-510W. The Name field represents the SSID of the AT-UHD-SW-510W and is used to identify the unit when used as an Access Point. When configured as an Access Point, the SSID password will automatically be displayed. The password can be hidden (masked) if desired. -
Page 21: Wireless Configuration
Access Point Mode When configured as an Access Point (AP), users will be able to connect wireless devices to the AT-UHD-SW-510W. 1. Make sure the AT-UHD-SW-510W is configured properly for use on a wired network. Refer to... - Page 22 Firewall Mode (optional) This feature allows control of incoming and outgoing network traffic. The AT-UHD-SW-510W provides the following firewall modes: Block Private Network, Block Internet, Block All, and None. If this feature is not desired, then skip to Step 12. The firewall can be configured or disabled at any time. The default setting is None.
-
Page 23: Connect Mode
Connect Mode To connect the AT-UHD-SW-510W to another wireless network, select the Connect Mode. 1. Launch a web browser and enter the IP address of the AT-UHD-SW-510W in the address bar. 2. Login to the web GUI. Refer to Introduction to the Web GUI (page 31) for more information. - Page 24 7. Click the OK button to accept the selection and dismiss the dialog box. Click the Cancel button to return to close the dialog and return the Wifi tab. Enter the password for the wireless network in the Password field. 9. Click the Save button to attempt to connect to the wireless network. AT-UHD-SW-510W...
- Page 25 The following table provides a list of possible status messages. State Description Connected The AT-UHD-SW-510W is connected to the wireless network. Not Connected Unsuccessful connection. Check to make sure the password was entered correctly. This state will also occur if the wireless network, to which the AT- UHD-SW-510W is connected, is taken offline.
-
Page 26: Casting
1. Select the BYOD input on the AT-UHD-SW-510W. 2. On the iOS device, go to Settings > Wi-Fi. 3. Under Wi-Fi, select the SSID of the AT-UHD-SW-510W in the list of available devices. The SSID is displayed on the splash screen. See Boot Sequence (page 18) for more information on locating the SSID. - Page 27 AirPlay is not supported. 1. Click the Wi-Fi icon in the menu bar and select the SSID of the AT-UHD-SW-510W. If the Wi-Fi icon is not displayed, then refer to the Macintosh documentation for information on setting up a Wi-Fi connection.
- Page 28 Click the AirPlay icon and select “Turn AirPlay Off”. AirPlay can also be turned off by clicking System Preferences > Displays. Click the AirPlay Display drop- down list and select “Off”. To re-enable AirPlay, select the device from the drop-down list. AT-UHD-SW-510W...
-
Page 29: Android
NOTE: Casting from the Chrome™ desktop browser is currently not supported. 1. Select the BYOD input on the AT-UHD-SW-510W. 2. Connect the Android device to the SSID of the AT-UHD-SW-510W. See Boot Sequence (page 18) for more information on locating the SSID of the AT-UHD-SW-510W.. -
Page 30: Microsoft Miracast
2. Click the Connect to a display device, on the PROJECT menu. 3. The Connect menu will be displayed, providing a list of Miracast-capable devices. 4. Select the AT-UHD-SW-510W from the list. Method 2 1. Right -click on the Windows Desktop and select Display Settings from the pop-up menu. -
Page 31: The Web Gui
Introduction to the Web GUI The AT-UHD-SW-510W includes a built-in web GUI. Atlona recommends that the web GUI be used to set up the AT-UHD-SW-510W, as it provides intuitive management of all features. Follow the instructions below to access the web GUI. -
Page 32: Menu Bar
The window on the left side of the screen is the is the menu bar and lists all available menus. Click on the desired menu item to open that page. In this example, clicking Display, in the menu bar, will display the Display page. AT-UHD-SW-510W... -
Page 33: Info Page
The current time and date, in Universal Coordinated Time (UTC). Master Version The version of firmware. Firmware Version The version of firmware that the AT-UHD-SW-510W is running. Always make sure to check the AT-UHD-SW-510W product page, on the Atlona web site, for the latest version of firmware. AT-UHD-SW-510W... -
Page 34: General Page
Name Enter the desired name of the AT-UHD-SW-510W in this text field. Include the {id} tag to use the last four digits of the hardware MAC address. The {id} tag is optional and can be placed anywhere within the Name field. -
Page 35: System Page
Click this button to restart the AT-UHD-SW-510W. when updating the unit. Shutdown Download Click this button to shut down the AT-UHD-SW-510W. Click this button to save the current configuration to a file This should always be performed before disconnecting on the connected computer. -
Page 36: Setting The System Date And Time
Setting the System Date and Time The AT-UHD-SW-510W uses the internal clock to store the current date and time. When setting the time and date, Universal Coordinated Time (UTC) must be used. Converting local time to UTC 1. Convert the local time to 24-hour time. -
Page 37: Splash Screen Page
Column #1 Save The text positioned in the left column. The default Click this button to commit all changes on this page. text is “Connect wired: Connect the HDMI, USB-C, or DisplayPort cable at the table to your device”. AT-UHD-SW-510W... -
Page 38: Display Page
The power-on and power-off command can also be sent over HDBaseT or HDMI. These buttons will only be enabled if a device is connected to the AT-UHD-SW-510W, using the correct cable. For example, the HDMI ON / OFF buttons will only be enabled when an HDMI cable is connected from the AT-UHD-SW-510W to a display. - Page 39 Stop bit Sets the stop bit. Stop bits are sent at the end of each character, allowing the client to detect the end of a character stream. The following options are available: 1 or 2. The default setting is 1. AT-UHD-SW-510W...
- Page 40 Some arbitrary examples are shown in the illustration below. If using hexadecimal codes, precede the value is \x. 3. Click the Save button to commit changes or click the Revert button to undo changes. AT-UHD-SW-510W...
- Page 41 Atlona only supports displays that use the CEC command structure defined in HDMI 1.2a. It is recommended that dealers request an evaluation product from Atlona, before designing a system using the CEC protocol. If this is not possible, then other control methods will need to be considered in order to control displays using Atlona products.
- Page 42 Enable Momentary Relay Click this check box to enable the RELAY port on the AT-UHD-SW-510W. This port allows the control of screens, curtains, and other devices. This feature is enabled by default. Use a 48 V DC relay with no more than 1 A current draw.
-
Page 43: Edid Page
Displays the EDID assigned that is being used by each output. Press the Save button to save the EDID to a file. Inputs The Input column displays each of the inputs on the AT-UHD-SW-510W. Click the drop-down list, under the Selection column, to select the desired EDID to be used. When selecting an EDID, make sure that the display/sink device is capable of supporting the resolution/timing. -
Page 44: Administration Page
The Web GUI Administration page Telnet page The Telnet page provides an emulated terminal for entering commands. Shell page The Shell page is provided for use only by Atlona Technical Support Engineers. AT-UHD-SW-510W... -
Page 45: Networking Page
The Web GUI Networking page This page contains a Wifi and Ethernet tab. Use the settings, under these tabs, to connect the AT-UHD-SW-510W to a network or Wireless Access Point (WAP). Refer to the IT Network Deployment Guide for detailed information on configuring the AT-UHD-SW-510W in various network environments. - Page 46 Firewall Mode This option is unique to Access Point Mode. Refer to the Firewall Mode option, below, for more information. SSID The SSID assigned to the AT-UHD-SW-510W. The SSID name can be changed under the General page (page 34). Password Enter the password, required to connect to the AT-UHD-SW-510W.
- Page 47 The Web GUI Connect Mode Select this option to allow the AT-UHD-SW-510W to connect to an available wireless network. SSID The name of the wireless network to which the AT-UHD-SW-510W is connected. Click the Pick button to select the desired wireless network.
- Page 48 Enter the gateway (router) address in this field. DNS Server Enter the DNS server addresses in the DNS Server #1 and DNS Server #2 fields. If the AT-UHD-SW-510W will be used within an internal LAN, this information is not required. Save Click this button to accept all changes to the Ethernet tab.
- Page 49 Connecting to a Wifi Network 1. Select Connect from the Mode drop-down list. 2. Click the Pick button to open the Pick a Wifi Network dialog box. 3. Select the desired wireless network from the list. 4. Click the OK button. AT-UHD-SW-510W...
-
Page 50: Debug Page
The Web GUI Debug page Click the Download link to view the latest debug log. This log is used by Atlona Technical Support Engineers to identify functionality issues. 1. Click Debug on the side menu bar. 2. Click the Download link. -
Page 51: User Accounts Page
1. Click the Change button to display the Change Password dialog box. 2. Enter the new password in the Password field. 3. Re-enter the same password in the Repeat Password field. 4. Click the Save button to commit changes or click Cancel to abort the process. AT-UHD-SW-510W... -
Page 52: Advanced Page
Advanced page AutoSwitch Click this box to enable or disable auto-switching. When this box is checked, the AT-UHD-SW-510W will automatically switch inputs when the new device is connected. To disable auto-switching, uncheck this box. Input buttons (USBC, DP, HDMI3, HDMI1, BYOD) Click the desired button to set the auto-switch input. - Page 53 The Web GUI Kick User Click this button to disconnect (“kick”) the current BYOD device from the AT-UHD-SW-510W. Miracast EDID Click this drop-down list to select the EDID used by Miracast. Setting Description none Uses the downstream EDID 1080p60 1920x1080p @ 60 Hz...
-
Page 54: Beta Page
Uncheck this box to disable the Avahi feature. API Method Watcher This feature will be available in a future release of firmware. API Events This feature will be available in a future release of firmware. AT-UHD-SW-510W... -
Page 55: Images Page
The default loading and splash screen can be replaced with a custom image. Click the drop-down list and select the target image. Once the file is selected, it will automatically be pushed to the AT-UHD-SW-510W. Preferred image size is either 1920x1080 or 3840x2160. All common image types, such as JPG, BMP, PNG, TIF, GIF, are supported. -
Page 56: Audio Page
The Web GUI The Web GUI Audio page Sets the audio input source. Click the drop-down list and select the desired input source. Setting Description HDMI HDMI audio source Analog Analog audio will be used, from the 3.5mm mini-stereo port. AT-UHD-SW-510W... -
Page 57: Event Viewer Page
The Web GUI The Web GUI Event Viewer page Displays a dynamic list of events, returned in JSON format. The image below, shows a list of sample events. AT-UHD-SW-510W... -
Page 58: Appendix
2. Connect the computer, containing the firmware files, to the same network as the AT-UHD-SW-510W. 3. Launch a web browser and enter the IP address of the AT-UHD-SW-510W in the address bar. a. If the IP address is unknown, then insert a USB drive into the AUX port on the back of the unit. - Page 59 15. Repeat steps 8 through 13, making sure to reboot the unit after the Master firmware has been updated. IMPORTANT: The next and final step requires that the AT-UHD-SW-510W be reset to factory- default settings. Before proceeding, make sure to record all settings by taking screen shots, or writing down all pertinent information.
- Page 60 WARNING: Performing a factory reset will erase all settings and configuration information. Make sure that all current settings and values are recorded before proceeding. Performing a factory reset will also set the AT-UHD-SW-510W to DHCP mode. If a static IP is being used, make sure to record these IP settings.
- Page 61 IMPORTANT: Setting the correct UTC time and date must be performed as a final step. When setting a time or date that is ahead of the default settings, the web session will automatically time out. This is normal behavior. Set Date / Time 23. The firmware process is now complete. AT-UHD-SW-510W...
-
Page 62: Default Settings
Appendix Default Settings The following tables list the factory-default settings, as defined in the web GUI, for the AT-UHD-SW-510W. Web GUI Page Setting Default Value Login Username admin Password Atlona General Name SW510-{id} Splash Screen Show Metadata Disabled Show Panel... -
Page 63: Mounting Instructions
Appendix Mounting Instructions The AT-UHD-SW-510W can be mounted in different ways, based on the number of units that are being installed. The AT-UHD-SW-510W can be mounted in a rack or on/under any flat surface. NOTE: AT-UHD-510W-RM rack ears are sold separately. Contact Atlona for more information. -
Page 64: Dual-Unit Rack Installation
IN P B -C N -4 -R O P L A 5 1 0 D IS D - S - U H IN P B -C N -4 -R O 5 1 0 D - S - U H AT-UHD-SW-510W... -
Page 65: Flat Surface
P L A D IS IN P B - C 5 1 0 D - S - U H NOTE: The unit can also be mounted under a flat surface, such as a table, by turning the unit upside down. AT-UHD-SW-510W... -
Page 66: Specifications
DTS-HD Master Audio™, and DTS:X® Sample Rate 32 kHz, 44.1 kHz, 48 kHz, 88.2 kHz, 96 kHz, 176.4 kHz, 192 kHz Bit Rate 24-bit (max.) Resolution / Distance 4K/UHD - Feet / Meters 1080p - Feet / Meters HDMI IN/OUT CAT5e/6 CAT6a/7 AT-UHD-SW-510W... - Page 67 H x W x D (w/ feet) 1.77 x 8.46 x 10.19 48 x 215 x 259 H x W x D (w/o feet) 1.73 x 8.46 x 10.00 44 x 215 x 254 Weight Pounds Kilograms Device 3.70 1.68 Certification Device CE, FCC, UL AT-UHD-SW-510W...
- Page 68 H x W x D (w/ feet) 1.77 x 8.46 x 10.19 48 x 215 x 259 H x W x D (w/o feet) 1.73 x 8.46 x 10.00 44 x 215 x 254 Weight Pounds Kilograms Device 3.70 1.68 Certification Device CE, FCC, UL AT-UHD-SW-510W...
-
Page 69: Index
Date default setting Specifications Default settings Splash screen Description layout front / rear panel metadata DHCP 47, 48 panel Standby screen Static IP Factory-defaults resetting to Factory Static IP mode FCC statement Time Features setting Universal Coordinated Time. See UTC AT-UHD-SW-510W... - Page 70 Appendix converting to time zones Warranty Web GUI Advanced page Audio page Debug page Display page EDID page Event page General page Images page Info page introduction to Networking page Shell page Splash Screen page System page Telnet page AT-UHD-SW-510W...
- Page 71 • 408.962.0515 • 877.536.3976 © 2018 Atlona Inc. All rights reserved. “Atlona” and the Atlona logo are registered trademarks of Atlona Inc. All other brand names and trademarks or registered trademarks are the property of their respective owners. Pricing, specifications and availability...
Need help?
Do you have a question about the AT-UHD-SW-510W and is the answer not in the manual?
Questions and answers