
Related Manuals for SWIT S-1073F


Summary of Contents for SWIT S-1073F
- Page 1 Model:S-1073F 7’’ Full HD Waveform LCD Monitor User Manual Ver:C Please read this User Manual throughout before using.
-
Page 2: Preface
2. All brands and trademarks of SWIT Electronics Co., Ltd. are protected and other relative trademarks in this user manual are the property of their respective owners. 3. Due to constant effort of product development, SWIT reserves the right to make changes and improvements to the product described in this manual without prior notice 4. -
Page 3: Table Of Contents
Maintenance Warning 1. In order to reduce the risk of fire and electrical shock, do not lay this product in rain or damp places. 2. Please keep away from the strong magnetic field; it may cause the noise of the video and audio signals. -
Page 4: Packing List
6. S-7006(U/F/D)/ S-7000(A/S) 6. HDMI cable Introduction The LCD panel and tempered glass of S-1073F adopts optical bonding process, small and thin, preventing the ash into the screen, meanwhile eliminated the air between the screens so as to display more transparent. -
Page 5: Accessories Introduction
Accessories introduction 1. Sun hood Take out the sun hood from the flannel bag, see pic1; ⑴ Push out the sun hood as pic2, unfold as pic3; ⑵ ⑶ Fold the two bottom parts inward as pic3, with the internal magnets attached and fixed as pic4; Install the sun hood on the monitor, see as pic5. - Page 6 2. Battery plate Take off the rubber cover in the rear panel of S-1073F; connect the power pins on the tail of the battery plate to the power socket of S-1073F, fix with four screws. Mounting the battery to the plate can power the monitor.
-
Page 7: Operation Instructions
Operation Instructions Rubber buttons ⑴ SOURCE: Signal selection button User definable function keys ( ~ ) User can set F1 ~ F 4 keys to corresponding function for quick operation according to their needs. For example U ser can set F1 to “Focus Assistant”, and press F1 to directly switch the focus :... -
Page 8: Screen Display
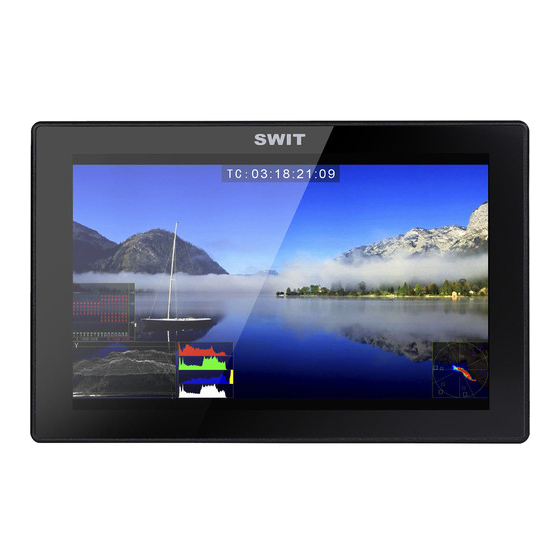
⑸ DC 12V: Round head DC power supply interface (Outer: Negative, Inner: Positive) Battery mount connector ⑹ : GPI control socket ⑺ ⑻ Video Signal Interface SDI-IN1: 3G/HD/SD SDI input (BNC connector) SDI-IN2: 3G/HD/SD SDI input (BNC connector) SDI-OUT: SDI output (BNC connector) When the input is SDI, loop output the signal connected to SDI-IN When the input is HDMI, output HDMI converted to SDI signal Note: when the input is HDMI, SDI-OUT does not support SD-SDI signal... - Page 9 ⑹ . Histogram User can set function Keys F1 ~ F 4 as “Histogram” to turn on or off this function. . Vector ⑺ User can set function Keys F1 F 4 or GPI pins as “Vector” to turn on or off this function. ~...
-
Page 10: Main Menu
Horizontal, vertical, horizontal and vertical two-way image flip function. Main menu S-1073F has OSD to adjust the parameters and settings, for example: Picture, color temp., function keys, etc. 1. Press “MENU” button, the main menu will popup from the left top of the screen. The selected main menu highlights in yellow. - Page 11 4. Revolve “MENU” to change the selected item’s parameter, press “MENU” to apply and save the settings. 5. Revolve “MENU” to select “Exit”, press “MENU” to quit submenu. Select “Exit & Status” under the Main Menu and press to quit Main Menu. Notice: The items in gray can not be set up.
- Page 12 Color Temp To select different color temperature or setup user-defined color parameters * Only “Color Temp” is set to “User”, the Red/Blue/Green Gain or Red/Blue/Green Bias can be adjusted. 4. Function key To define the F1 F 4 function keys ~...
- Page 13 When connecting the GPI pin with ground, the setted function will be turned on, and goes out when disconnecting. Example 1: Under “GPI ” submenu, set “GPI control” to “On”, set “2 Pin” to “Red Tally”, when the pin 2 of the extenal GPI control unit is connected with ground, the Tally light will display on the front panel which will flashes in red around every second.
- Page 14 Aspect ratio: 4:3 Aspect ratio: 4:3 Safety Area: 85% Safety Area: 85% Center Marker: On Center Marker: Off Fit Marker: Off Fit Marker: On 8. Audio *1 When “Bar Frame” is set to “Off”, only the audio meter will be displayed. When “Bar Frame”...
- Page 15 Channel1 Channel1 Channel1 ~ ~ ~ 9. Vector 10. Waveform *1: Only the “WFM Single Line” is set to “ON”, the “WFM Line Count” can be adjusted. “WFM Single Line” is to display the selected line waveform of “WFM Line Count” WFM Single Line O ff WFM Single Line...
- Page 16 When set to “No”, update model will not be supported. *2 Logo When powered on, the screen will display SWIT logo. *3.*4 Update Driver/ Kernel Open the power supply, plug the U disk with upgrading programma into the USB port on the ⑴...
- Page 17 when upgrading ) ; ⑸ After upgraded, the monitor will automatically reboot. 13. OSD 14. Key Inhibit When the “Key inhibit” is set to “on”, there is no response when all the buttons except ” MENU” is pressed, the sreen will be displayed as ” Key Inhibit”. User can set “Key inhibit”...
-
Page 18: Specification
Specification LCD Performance Size 7 inch Display area 151.2×94.5 mm Resolution 1920×RGB×1200 Color 8 bit Aspect ratio 16:9⁄4:3 Brightness 400 cd⁄ ㎡ Contrast 1000:1 Viewing angle Horizontal / Vertical: 160°⁄160° Input/Output HDMI×1 HDMI input BNC×2 3G/HD/SD-SDI input Input BNC×1 CVBS input USB×1 3G/HD/SD-SDI loop through output/ HDMI converted to SDI BNC×1... -
Page 19: Trouble-Shooting
Trouble-shooting symptom Possible causes Solution Please check if the power is connected, and then The power is not turned on press ”POWER” button to turn on the monitor Unstable power voltage Reconnect to power supply BNC or HDMI cable loose No display Check and correctly connect the contact or not correctly...
Need help?
Do you have a question about the S-1073F and is the answer not in the manual?
Questions and answers