Table of Contents
Advertisement
Quick Links
Advertisement
Table of Contents

Related Manuals for Gfp 663TH


Summary of Contents for Gfp 663TH
- Page 1 Gfp 663TH April 2021 OPERATING MANUAL Gfp 663TH Please read this manual carefully before operating! Unpacking, assembly, and operating videos are available at www.gfpartnersllc.com Do NOT make changes to or reproduce this manual without express written consent from Gfp...
-
Page 2: Table Of Contents
Gfp 663TH April 2021 Table of Contents Page Introduction……………………………………………………….. Important Safety Instructions……………………………………... Installation Safeguards…………………………………………… Regulatory Compliant Statements………………………………… General Safeguards………………………………………………... Operating Conditions……………………………………………… Packing List……………………………………………………… Installation………………………………………………………… A. Remove crate top and stand components…………………… B. Remove the Crate Sides…………………………………….. C. Remove the Packaging and Accessories……………………... - Page 3 Gfp 663TH April 2021 iii. Pressure Adjustment………………………………………. iv. Top Tension Adjustment………………………………….. v. Bottom Tension Adjustment……………………………… vi. Temperature Adjustment………………………………….. vii. Speed Adjustment………………………………………… viii. Factory Settings Reset Request…………………………… ix. Confirming the Reset…………………………………….. x. Factory Reset Confirmation……………………………… Operation…………………………………………………………. Loading Film……………………………………………………... Threading Film……………………………………………………… Brake Tension Adjustment…………………………………………...
-
Page 4: Introduction
April 2021 1. Introduction Thank you for choosing the Gfp 663TH laminator. It has been designed and manufactured to provide years of continuous service. Please read this manual thoroughly before operating. Please inspect the box and the laminator for shipping damage. Damage should be brought to the attention of the delivering carrier immediately. -
Page 5: Regulatory Compliant Statements
Gfp 663TH April 2021 Contact an electrician should the attachment plug provided with the laminator not match the receptacles at your location. Ensure that the voltages of the power supply you are using match the rated working voltages before operations. Do not use incorrect power supply. -
Page 6: General Safeguards
This Class B digital apparatus complies with Canadian, CAN ICES-3(B)/NMB-3(B), interference-causing equipment regulation. Changes or modifications made to this device that are not expressly approved by Gfp, may void the user's authority granted by the FCC and/or by Industry Canada to operate the equipment. -
Page 7: Operating Conditions
Gfp 663TH April 2021 Disconnect from the power supply when the machine is not in use for a long time. When the machine lies idle for a long period of time, raise the top rubber roller to avoid flat spots on the rubber surface. -
Page 8: Packing List
Gfp 663TH April 2021 7. Packing List Remove all parts from shipping create and boxes. Inspect parts and the machine carefully. Any missing parts should be reported to the shipper upon receipt of shipment. Main Machine Crate Part Quantity Main Machine... -
Page 9: Installation
Gfp 663TH April 2021 8. Installation Corner Protectors Retainer Board End Cap Remove the corner protectors and Remove the retainer board and end cap. screws from the top and sides of the crate and swing the ramp down. Rotate the castors so they Roll the laminator out of the crate are facing out. -
Page 10: Additional Installation Items
Gfp 663TH April 2021 8B. Remove the Accessories 1. Remove plastic cover, accessory boxes, toolbox and Operator’s Manual. 9. Additional Installation Items Remove the shipping blocks and wire ties from the ends of the rollers before attempting to raise the top roller! 2. -
Page 11: System Components
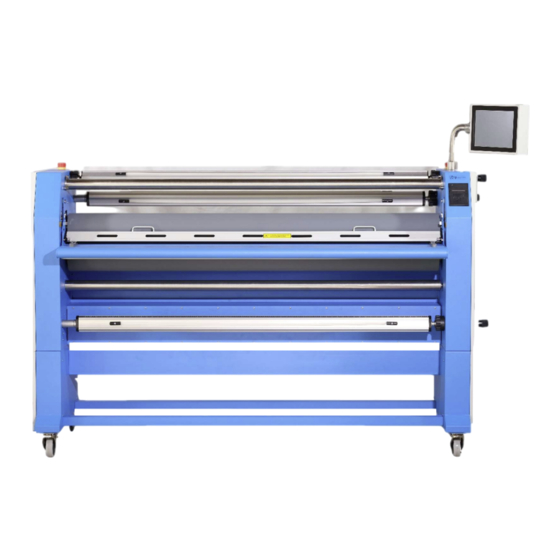
Gfp 663TH April 2021 10. System Components 1 Top Main Roller 2 Control Panel 3 Power Cord 4 Foot Pedal 5 Printer 6 Feed Table w/Print Roller 7 Bottom Main Roller (under the Feed Table) 8 Lower Front Unwind 9 Lower Front Idler Bar... - Page 12 Gfp 663TH April 2021 (3 & 4) 10 Upper Release Liner Rewind 11 E-Stop 12 Upper Rear Unwind 13 Side Slitter Guide Bar 14 Side Slitters 15 Lower Rear Rewind 16 Castor 17 Castor w/Brake 18 Lower Rear Rewind Clutch...
-
Page 13: Home
Gfp 663TH April 2021 11A. Control Panel Main Screen, (HOME) The Main Screen consist of all the keys used to perform normal operations and adjustments. These keys are: RUN: Starts the main drive motor STOP: Stops the main drive motor HELP: Takes you to the TUTORIAL Screens. -
Page 14: Speed
Gfp 663TH April 2021 : When pressed, raises the top roller all the way to the top opening. : When pressed, raises the top roller incrementally. PRESS: Takes you to the Operational Pressure screen where you can select preset pressures or input any desired pressure by using the +/- keys or using the Finger Slide. - Page 15 Gfp 663TH April 2021 11B. HELP Screens (TUTORIAL) 11Bi. Webbing This screen shows the path for running a PSA overlaminate on the top and a printed media on the bottom. It identifies all the rollers and idler bars. 11Bii. Brakes and Clutches...
- Page 16 Gfp 663TH April 2021 11Biii. Gap 1 This screen identifies the auto-up/auto-down keys as well as the incremental keys. 11Biv. Gap 2 This screen explains how you can use the +/- keys or the finger slide keys to adjust the position...
- Page 17 Gfp 663TH April 2021 11Bv. Counter 1 This screen explains the different fields for the total film usage as well as daily and current job usage. 11Bvi. Counter 2 This screen is a continuation of Counter 1 and explains the Start Length input for each new...
- Page 18 Gfp 663TH April 2021 11C. Operational 11Ci. Speed When SPEED is pressed on the HOME screen, it takes you to this screen. You may select any of the presets by pressing that key, then pressing OK. You may also change the speed by using the +/- keys or the finger slide then pressing OK.
- Page 19 Gfp 663TH April 2021 11Ciii. Gap When GAP is pressed on the HOME screen, it takes you to this screen. You may select any of the presets by pressing that key, then pressing OK. You may also change the gap by using the +/- keys or the finger slide then pressing OK.
- Page 20 Gfp 663TH April 2021 11Cv. Top Tension If the alarm is set and either of the parameters are exceeded, the TOP TENSION key will start flashing. To correct, pressing TOP TENSION on the HOME screen, will take you to this screen.
-
Page 21: Warning
Gfp 663TH April 2021 11Cvii. WARNING The flashing WARNING alerts the operator to an unwanted condition. Pressing the WARNING key will take you to this screen. If an E-Stop is depressed, the corresponding E- Stop on the screen will flash telling you which one it is. If the safety photo-eye was blocked, you will see a red flashing triangle on the screen. -
Page 22: Printer
Gfp 663TH April 2021 current job if the prior job is cleared first. Failure to do so will only add the previous job to the current one. To input the starting length press, Start Length and use the Finger Slide starting at the bottom and sliding up. -
Page 23: Service
Gfp 663TH April 2021 11D. Service 11Di. Main Service Screen This screen allows the operator to make changes to various functions, calibrate settings and reset to factory settings. Factory settings will be supplied in a separate supplement. 11Dii. Gap Adjustment This screen allows the operator to change the factory gap settings should the unit every become out of calibration. -
Page 24: Pressure Adjustment
Gfp 663TH April 2021 11Diii. Pressure Adjustment This screen allows the operator to change the factory pressure settings should the unit every become out of calibration. 11Div. Top tension Adjustment This screen allows the operator to set the top tension ranges for the products they run daily. -
Page 25: Bottom Tension Adjustment
Gfp 663TH April 2021 11Dv. Bottom Tension Adjustment This screen allows the operator to set the bottom tension ranges for the products they run daily. 11Dvi. Temperature Adjustment This screen allows the operator to calibrate the heat settings should the sensor ever become... -
Page 26: Speed Adjustment
Gfp 663TH April 2021 11Dvii. Speed Adjustment This screen allows the operator to set the maximum speed the laminator will be allowed to run, up to 30 fpm. 11Dviii. Factory Settings This screen as well as the next two allow the operator to reset all the settings back to the factory settings. - Page 27 Gfp 663TH April 2021 11Dix. Confirming the Request 11Dx. Reset Request Confirmed NOTE: Once the reset is confirmed, you must turn the unit off then back on for it to be effective.
-
Page 28: Operation
Gfp 663TH April 2021 12. Operation 1. Plug power cord into a proper receptacle. Connect the attachment plug provided with the laminator to a suitably grounded outlet only. This machine must have reliable earth wire to ensure the safety of the machine during operations. -
Page 29: Threading Film
Gfp 663TH April 2021 5. Adjust the brake tension by turning the adjusting knob on top of the supply roll assembly, Fig 12b (see Brake tension adjustment section #15) Fig. 12a Fig. 12b 6. Repeat process with bottom supply shaft using Mounting adhesive or printed media roll. - Page 30 Gfp 663TH April 2021 6. Use foot pedal to advance the film web until the adhesive is exposed on the front of the heat roller. 7. Raise the feed tray assembly. 8. Bring the mounting adhesive up to the nip area of the rollers or the media up and behind the idler bar then tack to the exposed film web adhesive.
-
Page 31: Brake Tension Adjustment
Gfp 663TH April 2021 15. Brake Tension Adjustment 1. Adjust brake tension by turning the Tension Adjustment Knobs on top of each supply shaft assembly, Fig 15a. 2. Apply only enough brake tension to remove wrinkles from the vinyl web before it enters the nip rollers. -
Page 32: Inserting Rewind Shafts
Gfp 663TH April 2021 17. Inserting Rewind Shafts 1. Slide a cardboard core onto the rewind shaft, Fig. 17a. 2. Set one end of the rewind shaft into the open side support bracket. 3. Align the arrow and shaft tongue with the slot in the opposite side support bracket Fig. 17b. - Page 33 Gfp 663TH April 2021 20. Rewind Assembly The unit comes with two rewinds: one upper and one lower rear rewind. 1. The rewind shaft described in Sect 17 above, is a drop-in shaft and is used to take up the release liner of the overlaminate.
-
Page 34: Troubleshooting
Gfp 663TH April 2021 21. Troubleshooting Problems Causes Solutions 1. No power supply 1. Plug in power cord 2. Main power switch is OFF 2. Place power switch to ON Machine does not turn on 3. Circuit breaker has tripped 3. -
Page 35: Specifications
Gfp 663TH April 2021 22. Specifications Description 663TH Laminating Width 63” Roller Diameter 5” Roller Gap 1.1” Max Temperature 140⁰ F Film core size 3” Laminating Speed 0-20 Ft/min Pressure Adjustment Servo Motor Heat Method Metal alloy tube Power Supply... -
Page 36: Warranty
Warranty repair or replacement by Gfp or its authorized reseller(s) does not extend the warranty beyond the initial period from the date of installation.
Need help?
Do you have a question about the 663TH and is the answer not in the manual?
Questions and answers