
Related Manuals for HOMCOM A91-175


Summary of Contents for HOMCOM A91-175
- Page 1 INamc005_UK A91-175 IMPORTANT, RETAIN FOR FUTURE REFERENCE: READ CAREFULLY ASSEMBLY & INSTRUCTION MANUAL...
- Page 2 IMPORTANT MESSAGE WARNING - PLEASE READ ADULT ASSEMBLY REQUIRED CHOKING HAZARD Small Parts. NOT for children under 3 years of age. WARNING: While every attempt is made to ensure the highest degree of protection in all equipment, we cannot guarantee freedom from injury. The user assumes all risks of injury due to use.
-
Page 3: Safety Information
SAFETY INFORMATION IMPORTANT – Please read fully before assembly or use. This exercise equipment is built for optimum safety. However, certain precautions apply whenever you operate a piece of exercise equipment. Be sure to read the entire manual before you assemble, operate, or use this equipment, note the following safety precautions. - Page 4 ●Any damage must be reported to the seller immediately after delivery, and before use or installation. Later complaints will not be considered. ●Use only suitable tools for assembly. ●The installation must ONLY be carried out by adults. Children should not be present in the immediate environment where the assembly is taking place.
- Page 5 CLEANING AND MAINTENANCE 1. Regularly examine the equipment to detect any damage to wear which may have occurred. The safety level of the equipment can be maintained only if it is examined regularly for damage and wear and tear on ropes, pulleys, and connection points.
-
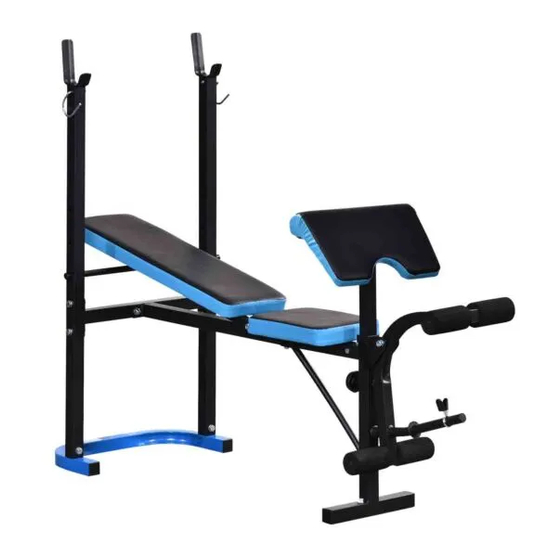
Page 6: Parts List
PARTS LIST Description Rear stabilizer Weight plate Support tube Connect tube Base frame Front post Support tube Leg curl tube Back rest support tube Foam tube Hex head bolt M10 x 50L Hex head bolt M10 x 55L Adjustment Rod Nylon nut M10 Flat washer OD20 x ID10.5 Square end cap □38... -
Page 7: Exploded Diagram
EXPLODED DIAGRAM... -
Page 8: Assembly Steps
ASSEMBLY STEPS STEP 1 1) Attach one side of Weight Support Tube (02) onto Rear Stabilizer (01), fastened with x 1 Hex head(14), x 2 Washer(18) and x 1 Nylon nut(17). Use the same way to assembly another Weight Support Tube (02). 2) Attach the Connect tube (03) onto Weight Support Tube (02), fastened with x 2 Hex Head Bolt (15), x 4 Washer (18) and x 2 Nylon nut (17). - Page 9 ASSEMBLY STEPS STEP 2 1) Attach Base Frame (04) onto Connect tube (03), fastened with x 2 Hex Head Bolt (15), x 4 Washer (18) and x 2 Nylon Lock Nut (17). 2) Insert Front post (05) into Base frame (04), fastened with x 3 Hex head bolt (31) and x 3 Washer (28).
- Page 10 ASSEMBLY STEPS STEP 3 1) Insert the Foam tube (10) into Leg curl(08) and insert the Foam Grip(37) into Foam tube(10), and then attach Leg curl (08) onto Front post(05), tightened with x 1 Hex head bolt(34), x 2 washer(18) and x 1 nylon nut(17). STEP 4 1) Attached Seat (30) onto Base Frame (04), tightened with x 4 Hex head bolt (26) and x 4 Washer (21).
- Page 11 ASSEMBLY STEPS STEP 5 1) Attached Elbow cushion (53) onto the Elbow Support tube (52), tightened with x 2 Hex head bolt (26) and x 2 Washer (21). 2) Insert the Elbow Support tube (52) into Front Post (05), tightened with Knob (55).
Need help?
Do you have a question about the A91-175 and is the answer not in the manual?
Questions and answers