Advertisement
Quick Links
Daily Operation
Function
Keypad
Keychain
Command
Transmitter
Disarm
000#
Button #3
Chime
000A#
Away
000BC
Button #1
Sequence
Home
000C
Button #2
Sequence
Night
000AB
Sequence
CUSTOMER SERVICE
17 Sheard Avenue, Brampton, Ontario, Canada L6Y 1J3
+800-304-1187 EST 9:00 to 17:00 (from Monday to Friday)
Fax: +800-286-1320
Email:support@skylinkhome.com (Reply within 24 hrs)
http://www.skylinkhome.com
US Patent D410633, 6243000B1
©2004 SKYLINK GROUP
Remark
Set the system to DISARM from ARM
CHIME
1
2
3
4
DELAY
INSTANT
AC PWR LO BA TT. ARM
Set the system to Chime Mode for testing
CHIME
1
2
3
4
DELAY
INSTANT
AC PWR LO BA TT. ARM
Arm your system when you are the last person leaving
CHIME
1
2
3
4
DELAY
INSTANT
AC PWR LO BA TT . ARM
After 45 seconds:
CHIME
1
2
3
4
DELAY
INSTANT
AC PWR LO BA TT . ARM
Arm your system when someone remains
CHIME
1
2
3
4
DELAY
INSTANT
AC PWR LO BA TT. ARM
After 45 seconds:
CHIME
1
2
3
4
DELAY
INSTANT
AC PWR LO BA TT. ARM
Arm your system when there are people in your house
but no one is expected to enter or exit
CHIME
1
2
3
4
DELAY
INSTANT
AC PWR LO BA TT . ARM
The Complete Alarm System
Congratulations!
You have just purchased one of the most reliable and up-to-date wireless security systems on the market today.
We recommended you go through the User's Instructions to fully understand the system and plan your installation. If you
wish to set up the system immediately, please read this guide first.
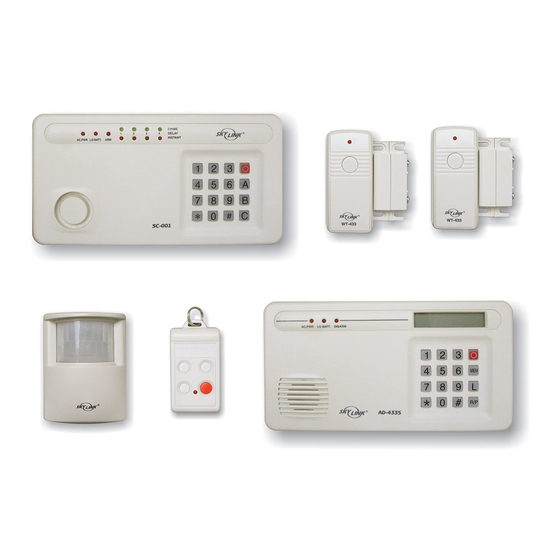
This quick guide describes the basic steps to install your SC-100 Total Protection Alarm System (control panel, two door/
window sensors, motion sensor and keychain transmitter).
STEP 1
TEST THE COMPONENTS
It is advisable to test the function of each component and the system before they are
mounted to the desired position.
Control Panel
1. Remove the Control Panel from the box.
2. Open the Control Panel by pressing the two tabs on top with the front facing you.
(Diagram 1)
3. Pull open the front.
4. Thread the AC adapter cord through the hole in the back of the unit and plug into
the circuit board as shown. (Diagram 2)
5. Insert the 9 volt alkaline battery. (Diagram 3)
6. Rotate the antenna from the inside position to a vertical position.
7. Close the cover carefully so that the cord and antenna are not cut.
8. Plug in the AC adapter into the power outlet.
The red {ACPWR}light and keypad backlight will go on.
9. Press [0][0][0][A][#] to set the Control Panel to Chime
Mode for testing. The red {ARM} light and all 4 green
lights above the numbers will go on.
Door/Window Sensors
1. Remove the transmitter from the box. Pull out the battery protective strap.
2. Put the magnetic switch and magnet next to each other.
3. Separate the magnetic switch and magnet by more
than 1cm (3/8 inch), you should hear a two-tone chime
from the Control Panel. The green light 1 will flash.
4. The door/window sensor is working. Put the magnetic switch and magnet together.
Motion Sensor
1. Remove the motion sensor from the box.
2. Undo the screw on the back of the motion sensor and remove the cover
102A110
of the battery compartment. Connect a 9V alkaline battery to the connector
wire. Then close the battery cover and re-insert the screw. (Diagram 4)
QUICK SETUP GUIDE
AC Power is
connected.
AC PWR LO BA TT . ARM
Press 000# to
test your system.
AC PWR LO BA TT . ARM
Separate the
magnetic contact.
AC PWR LO BA TT. ARM
Model SC-100
Diagram 1
Diagram 2
Diagram 3
CHIME
1
2
3
4
DELAY
INSTANT
CHIME
1
2
3
4
DELAY
INSTANT
CHIME
1
2
3
4
DELAY
INSTANT
Diagram 4
Advertisement

Related Manuals for SkyLink SC-1000


Summary of Contents for SkyLink SC-1000
- Page 1 2. Undo the screw on the back of the motion sensor and remove the cover http://www.skylinkhome.com 102A110 of the battery compartment. Connect a 9V alkaline battery to the connector US Patent D410633, 6243000B1 ©2004 SKYLINK GROUP wire. Then close the battery cover and re-insert the screw. (Diagram 4) Diagram 4...
- Page 2 Motion Sensor (Cont) Door/Window Sensors (CONT) 1. Mount the transmitter using double sided tape or screws provided. (see User's Instructions 3. Entry the CHIME mode by pressing [0][0][0][A][#] on SC-001. Move your hand in front of the motion sensor. If the for details on mounting options) motion is detected, the SC-001 will beep and the corresponding zone LED will flash.
Need help?
Do you have a question about the SC-1000 and is the answer not in the manual?
Questions and answers