Advertisement
Quick Links
Wireless Alarm System
Congratulations on purchasing the Skylink Wireless Alarm System MA Series. The
MA Series provide you with powerful features yet easy to use. You will find the installation
to be simple and be able to get the system up and running with little effort.
MA Series Wireless Alarm System consists of the following major features:
- Audio and Visual Alert when the monitored events occur
- Alarm with siren when intruder is detected
- Main unit will check each sensor's functionality periodically to ensure
they are working properly
- Different arm modes for different occasions (Arm Home, Arm Away)
- Backup battery provides power during power failure
- Works with up to 16 wireless sensors and external siren
The user's instructions explain the detailed functions of the MA Series. If you have any
questions regarding this system, please visit our website at www.skylinkhome.com or
contact us at support@skylinkhome.com.
* Note: Batteries for the Control Panel are not included. Please refer to "Control Panel Backup Batteries" in the instructions for more detail information.
Zone Indications - The LEDs represent the status of the sensors in that zone, and the status during programming.
Armed Indicator - Indicates the Arm Mode, such as Arm Home, Arm Away.
Power Indicator - Indicates the system status.
Keypad - For Arming, Disarming and Programming.
Input 12V DC - AC adapter input jack
Mute Button - To disable alert beeping temporary
Learn Button - To program and erase sensors
Alert Notification Switch - Select the type of audio alert signal
You must first determine where the Control Panel will be located. Please follow the criteria below to select the ideal location for the Control Panel.
- Place it near an electrical outlet
- Place it where it is easily accessible by all users
- Place it away from any doors or windows which could be accessed by non-intended users
- Place it away from extreme temperature sources such as oven, stove and away from large
metal objects which could affect the wireless performance
After you have selected a location for the Control Panel, you are now ready to connect the
adapter and batteries to the Control Panel.
1) Plug in the AC adapter to an electrical outlet and the other end into the "Input DC 12V"
jack on the Control Panel. The green Power LED indication will stay on steadily.
2) Rotate the antenna to the upright position for best signal reception.
3) It is recommended to install 4 AAA alkaline batteries to the Control Panel so it can continue to
operate during power failure. To install the batteries, remove the battery cover and insert 4 AAA
alkaline batteries based on the polarity specified in the battery compartment.
You may now being to install the sensors. Refer to the instructions of the sensor that you will be installing.
After installing the sensors, there are 2 critical steps before you can operate the system:
1) Program the Sensors to the Control Panel
2) Test the communication between the sensors and Control Panel
Programming the Sensors to the Control Panel
There are 4 zones on the Control Panel. Zones 1 to 3 are alarm
and alert zones, sensors in these zones will alert when the system
is disarmed, and will alarm when the system is armed.
Zone 4 is dedicated alert zone, meaning it will not cause an alarm even if the system is armed. It provides alert indication ONLY .
Please note when planning on programming sensors to the Control Panel:
- Each zone can have up to 4 sensors, programming the 5 sensor will erase the 1 programmed
sensor automatically.
- Do not program one sensor to two different zones.
- You may program the sensor to the Control Panel before mounting them, or you may mount
them before programming.
Follow the steps below to program a sensor to a specific zone.
Step 1: Press and hold the Learn Button on the Control Panel for 3 seconds. Control Panel
beeps once and you may release the Learn Button.
Step 2: Press the zone button (1, 2, 3, or 4) once, for which you want to program the sensor to. Zone LED will flash for
the zone you have selected.
Step 3: Activate the sensor that you would like to program to the Control Panel. Example: Activates the Motion Sensor
by pressing the test button on the back of the Motion Sensor; or Activates the Door Window Sensor by separating
the magnet from the sensor unit.
Step 4: You will hear a long beep and the zone LED stops flashing. The sensor is now programmed to the Control Panel.
Repeat the above steps to program additional sensors.
After programming the sensors, it is important to test them to ensure there is proper communication between the sensors
and the Control Panel. You can set the Control Panel in T est Mode.
1. INTRODUCTION - INTRODUCTION
1. INTRODUCTION - USER'S INTERFACE (Buttons / LEDs)
1. INTRODUCTION - INSTALLATION
2. SET UP - LEARN SENSORS
Example of some typical installations:
Example 1
(Small apartment with 4 sensors)
Zone 1 Door Sensor (Front Door)
Zone 2 Window Sensor (Bedroom)
Zone 3 Motion Sensor (Kitchen)
Zone 4 Water Sensor (Bathroom)
th
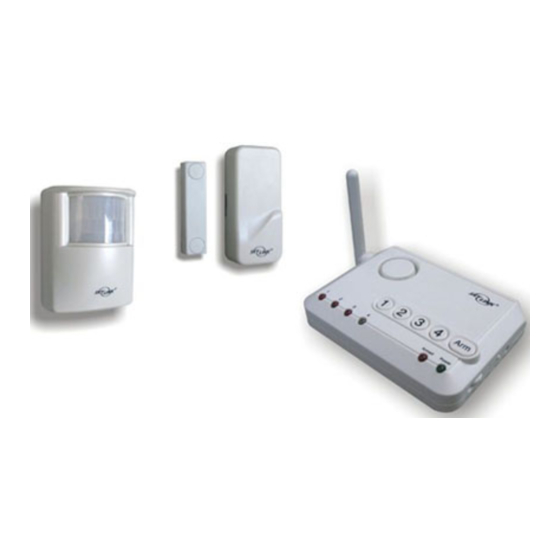
In this package, you will find the following items:
AC Adapter
Control Panel
- *Depends on the exact configuration, sensors may/ may not be
included in this kit.
Antenna
Zone Indications
2
Example 2
(House with 8 sensors)
Zone 1 2 Door Sensors (Front Door and Patio Door)
Zone 2 2 Window Sensors (Bedroom 1 and Bedroom 2)
Zone 3 3 Motion Sensors (Entrance Area, Kitchen, Living Room)
Zone 4 Water Sensor (Washing Machine)
st
Sensors* (optional)
Door / Window
Sensor
Built-in Siren
Battery Compartment
Input 12V DC
Mute Button
Learn Button
Alert Notification
Switch
Keypad
Power Indicator
Armed Indicator
1
1
+
-
3
Magnet
Sensor
Model MA-103
Motion
Sensor
-
-
+
3
-
+
+
1
Hold 3 sec.
Beep once
2
Press zone button
Zone LED
flashing
4
Long beep
and zone
LED off
Advertisement

Related Manuals for SkyLink MA-103


Summary of Contents for SkyLink MA-103
- Page 1 Model MA-103 1. INTRODUCTION - INTRODUCTION Congratulations on purchasing the Skylink Wireless Alarm System MA Series. The In this package, you will find the following items: MA Series provide you with powerful features yet easy to use. You will find the installation to be simple and be able to get the system up and running with little effort.
- Page 2 2. SET UP - TEST MODE To set the Control Panel in T est Mode: Start with removing Start with removing all power Step 1: Remove the adapter and all batteries from the Control Panel. from Control Panel. Hold “Mute”, don’t release Step 2: Press and hold the "Mute"...
- Page 3 4. ALARM - ARM HOME (CONT) Example: If you would like to arm the system at night, where all the doors / windows are not expected to be opened. You can arm the system in Home mode and even walking within the house (activates Motion Sensor), it will not activate the alarm, unless the monitored doors or windows are opened.
- Page 4 Proof of purchase and a Return Authorization are required. 10. CUSTOMER SERVICE If you would like to order Skylink’s products or have difficulty getting them to work or download latest information and user manual, please : 1. visit our FAQ section at www.skylinkhome.com, or 2.
Need help?
Do you have a question about the MA-103 and is the answer not in the manual?
Questions and answers