Table of Contents
Advertisement
Quick Links
Advertisement
Table of Contents

Subscribe to Our Youtube Channel
Related Manuals for Tohnichi CTA2-G


Summary of Contents for Tohnichi CTA2-G
- Page 1 DIGITAL ANGLE WRENCH CTA2-G MODEL INSTRUCTION MANUAL...
- Page 2 To the user In order to use the torque wrench properly and safely, please read this instructions before operation. If any question, please contact a Tohnichi authorized distributor or Tohnichi office. Keep this operating instruction for future use. ! Warning Use only a dedicated charger and storage battery.
- Page 3 ! Cautions (1) Keep the working place clean and tidy. Working in a messy condition may cause accidents. (2) Keep children away from the product or the work place. As a basic rule, do not let any other person than the user himself should touch the product.
- Page 4 Doing otherwise may cause injuries. Conduct periodic check on the cord of the charger, and request repair or replacement to the authorized distributor or Tohnichi if damaged. If you keep using the damaged cord, it may cause electric shock, or fire.
- Page 5 (10) Hold the handle on the effective length line and apply force at right angle to the torque wrench. If you should find any irregular performance of the product, stop using the product immediately and keep it in a safe place. Contact Tohnichi immediately.
- Page 6 Explanation of words Please refer to the below explanation of words which are used in this operation manuals. - Tightening mode: Tightening mode includes single-spindle tightening mode and production tightening mode. Tightening modes should be selected according to the user conditions. Single-spindle tightening mode is selected at default setting (delivery setting).
- Page 7 - Tightening torque (setting): This is the tightening torque value to set at the torque tightening stage in the production tightening mode. After passing this torque, the operator will be informed by the blue LED and the buzzer. When it goes over the upper limit, the red LED lights up and another buzzer goes off to alarm the operator.
-
Page 8: Table Of Contents
(3) Tightening operation: Example 1 (4) Tightening operation: Example 2 (5) Reading the measured data (6) Output/Delete the measured data Various settings (using the key operation on CTA2-G) ○ Single-spindle tightening mode ○ Production tightening mode Various settings (using the application software) 10. -
Page 9: Outline
1. Outline CTA2-G is a digital torque & angle wrench designed for use in the angle tightening method. 2 tightening modes are available as Single Spindle Tightening mode, and Production Tightening Mode. In Single Spindle tightening mode, snug torque, tightening angle and tightening angle upper limit are to be set, and the operator is informed upon reaching the set angle (after passing the snug torque) by the blue LED and the buzzer. -
Page 10: Composition
CTA2-G (sockets are for separate sale). Install the packaged application software CD and the USB driver to PC. Connect CTA2-G to PC by the communication cable #584 (enclosed) and make settings to your preference (setting by manual key operation is also available). -
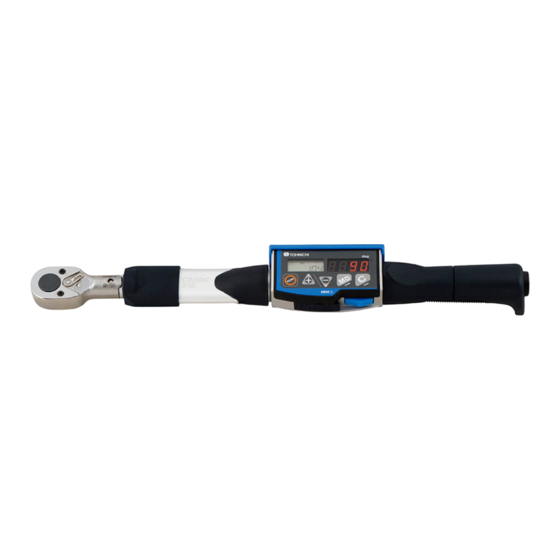
Page 11: Name And Explanation Of Each Part
(SH, SH-N, RH, QH, RQH, DH, HH, FH). * PH head cannot be used. 2. Protection cover: it is to protect from physical damage to CTA2-G against work applications. 3. LCD display: To display memory counter, torque value, torque unit, remaining battery indication. -
Page 12: Various Functions
When turning on the power, angle speed check will be automatically conducted to make zero adjustment. During zero adjustment, CTA2-G should be put still (do not move) otherwise the display may show “Err0”. The angle speed check will also be automatically processed when it is in still kept still for more than 2 seconds. - Page 13 Error in the circuit board or the torque sensor. ◎ At no load condition, press Clear key. - If Err9 disappears, it operates normally. - If Err message remains on the display, contact to TOHNICHI or the nearest distributor to ask for repair. 4. Auto memory/Reset function After angle tightening, tightened value is automatically saved and forward to the counter to the next.
- Page 14 When it exceeds 105% of the maximum measurable torque, the value on the display and ”----” blinks alternatively and the buzzer goes off. 10. Over-torque alarm/Peak torque hold starting value for each CTA2-G models. (N・m case) From 105% of MAX From 3.3% of MAX...
-
Page 15: How To Use
7. How to use Single-spindle tightening mode(MODE-S, original CTA function) (1) Basic operation and display Counter Send Key: Sends a counter one by one or continuously to read out measured data. Keep it pressed to send it by 10 (fast-forward). Counter Return Key: Reverses one counter or continuously to read out measured data. - Page 16 (3) Tightening operation (example) Below instructions show an operation flow for tightening at the following values. Snug torque 30 N・m Tightening angle setting 90 deg Tightening angle upper limit 95 deg Counter Torque Angle N・m Tighten up to the snug torque. N・m 30.0 Upon reaching the snug torque, the buzzer...
- Page 17 MEM key to transfer. ● Data output (a set range of data at one time) Use the dedicated communication cable to connect CTA2-G to PC or printer and set the memory counter to the upper limit of the output data range to transfer.
- Page 18 Press MEM key to output the set range of data all at the same time (Press C to cancel). (6) Deleting the measured data ● Deleting 1 data key to show the data to delete and press C key to delete. ●...
-
Page 19: Production Tightening Mode
Production tightening mode (MODE-P) (1) Basic operation and display ● RUN mode (memory counter: 000) Press the reset switch or unplug the discharge plug to reset and it starts in RUN mode. ● PEAK mode(memory counter: 001~999) key: Use this key to change setting digit in setting. key: Use this key to lower the value in setting. -
Page 20: Tightening Operation: Example
(3) Tightening operation: Example 1 (Torque tightening stage + 1 angle tightening stage, NG_RES) Below instructions shows an operation flow for tightening at the following values. Tightening torque 30 N・m 2 tightening angle upper limit 95 deg Tightening torque upper limit 35 N・m... - Page 21 Operation and display ● Torque tightening stage Tighten the 1 spindle. Upon reaching the set torque, the buzzer goes Blue off for about 1sec and the blue LED turns on. When the tightened torque exceeds the upper limit, another buzzer goes off and the Blink red LED turns on.
- Page 22 After releasing loading, press MEM to make judgment whether the tightened value is within the set range. (When auto memory/reset is effective, the judgment will be made automatically). ・In case of OK: It saves the measured data and proceed to the next counter. ・In case of NG: It informs by the buzzer alarming and the red LED.
-
Page 23: Tightening Operation: Example
(4) Tightening operation: Example 2 (no torque tightening stage, NG setting: ALLRES) Below instructions show an operation flow for tightening at the following values. Tightening torque 0 N・m 2 tightening angle upper limit 95 deg Tightening torque upper limit 0 N・m 3 tightening angle Snug torque 30 deg 3... - Page 24 Operation and display ● 1 angle tightening stage Tighten 1 angle tightening of the 1 spindle. When it passes the snug torque, the display changes to the angle counting. Blue Upon reaching the set angle, the buzzer goes off and the blue LED turns on. Buzzer starts on and off upon reaching 20 Blink degrees from the set angle).
- Page 25 N・m tightening. (5) Reading the measured data Measured data cannot be read out on the display of CTA2-G itself. Transfer the data to PC or printer to see the data. (6) Output/Delete measured data In PEAK mode, press MD key, then it turns to 1 work data output display (below).
- Page 26 Press MD key and C key at the same time to process all data deleting. After deletion, press MD key or C key to return to the measuring condition.
-
Page 27: Various Settings (Using The Key Operation On Cta2-G)
* For setting though the application software (PC), refer to the instruction manual enclosed inside the application CD. 2. Setting by the key operation on CTA2-G (Single-spindle tightening mode). ● RUN mode Press MD key for more than 2 sec. After the display changes to tightening mode setting, release the key. - Page 28 recharging terminal to set it to RUN measuring mode. * In single-spindle tightening mode, use key to set the counter to 000 for RUN mode. ● Tightening mode setting (Default: MODE-S) Select the tightening mode. MODE-S: Single-spindle tightening, MODE-P: Production tightening Single-spindle tightening: Set the snug torque and tightening angle to conduct the angle method tightening from the snug torque to the set angle.
- Page 29 ● Data clear Press MEM to save the tightening mode and proceed to next. (Press C key to return to tightening mode setting.) * If you change the tightening mode, tightened data will be deleted. Transfer the necessary data to PC or Printer in advance.
- Page 30 key to select the digit, and change values with key. Press MEM key to confirm and proceed to the next (Press MD key to proceed without saving. Press C key to return to RUN measuring mode). ● Tightening direction setting (Default: CW) Set the tightening direction (clockwise/counterclockwise).
- Page 31 Select from 3MIN, 10MIN, 30MIN, NONE for auto power off timer. CTA2-G automatically turns off when there is no key operation or loading for the selected time. If you select NONE, CTA2-G stays on until the battery runs out or power off.
- Page 32 Set the baud rate for external output ( 2400bps/ 4800bps/ 9600bps/ 19200bps) * When connected to EPP16M2 (Tohnichi printer), set the baud rate to 2400 bps). * When connected to PC, set the baud rate to match the baud rate on PC.
- Page 33 Select the communication data length (7bit / 8bit)) * Select 8bit when using the included USB cable (#584). * Select 7bit when outputting data to EPP16M2 Tohnichi printer. key to select and MEM key to confirm and proceed to the next.
- Page 34 ● Reset to the default setting You can reset all the setting (except tightening mode and time setting) to the default setting. key to select DFT-Y to reset to the default setting. If you would not like to reset, select DFT-N and press MEM key. (Press MD key to proceed without saving.
- Page 35 For second setting, press MEM key to reset second counting to 00.. (Press MD key to proceed without saving. Press C key to return to RUN measuring mode.) ● Time display (Press MD key to proceed without saving. Press C key to return to RUN measuring mode.) ●...
-
Page 36: Production Tightening Mode
Production tightening mode 1. Setting items Setting items Display Default Alternative selection 1 Tightening mode MODE-S、MODE-P SEL kgf・cm/kgf・m/lbf・ 2 Measurement Unit USEL N・m in/lbf・ft 3 Tightening torque Below max torque Tightening torque upper SE_H Below max torque limit 5 Snug torque Below max torque Sng... - Page 37 2. Setting by key operation on CTA2-G. ● RUN mode N・m 0.0 Press MD key for more than 2 sec. After the display changes to tightening mode setting, release the key. * If it is in production tightening mode, you must press the reset switch or unplug/plug the recharging terminal to set it to RUN measuring mode.
- Page 38 ●Setting measurement unit (Default: N・m) Select the torque unit (N・m/kgf・cm/kgf・m/lbf・in/lbf・ft) The measured torque and the set torque will be converted into the selected torque unit. Select the torque unit (N・m / kgf・cm / kgf・m / lbf・in / lbf・ft) Use ▲▼key to select the torque unit and press MEM key to save and proceed to the next. (If you press MD key, it proceeds without saving.
- Page 39 ● Snug torque setting (Default: 0) Set the snug torque. This is the torque from which the angle tightening count starts. (It is recommended that snug torque should be set at the same as the tightening torque or lower.) key to select the digit, and key to change the value.
- Page 40 *If there is no 2 angle tightening stage, set the value to 000, then it proceeds to number of spindles setting. ● 2 angle upper limit setting (Default: 0) Set the 2 tightening angle upper limit. key to select the digit, and key to change the value.
- Page 41 key to select the digit, and press MEM key to confirm and proceed to the next. (Press MD to proceed without saving. Press C key to return to RUN measuring mode). ● Data Clear Check Press MEM key to save the number and proceed to the next. Press C key to return to tightening mode setting.
-
Page 42: Various Settings (Using The Application Software)
③Check the current settings ・ Select "Single Mode" or "Production Mode" and click Setting (no registration) ・ Turn on CTA2-G. Click “Check” on the PC and the current settings will be transferred to PC for checking. Measurement ready (Single spindle tightening mode) - Page 43 Measurement ready (Production tightening mode) ④Registration of the parameter settings ・ To change the parameter settings, fill in values in the corresponding box. ・ Type a group name and click “Registration” to register the new settings. This will save all parameter setting for the group. Settings...
- Page 44 Turn on CTA2-G and make sure it is connected. ○Setting all at one time ・To make all the settings at one time. ・Click “SEND ALL” to transfer all the setting values to CTA2-G to overwrite the settings on CTA2-G. ○Setting one by one ・To set each value of the setting requirements on one by one basis.
-
Page 45: Transferring The Tightening Data To Pc
Install the enclosed application software and the USB driver to PC (Refer to the instruction manual on the CD for installing method). Connect CTA2-G and PC with the dedicated communication cable (No.584). Make the same communication settings (baud rate, data length, parity) on CTA2-G and the PC at parameter setting. - Page 46 ⑤Transferring data ・Press MEM key on CTA2-G to transfer the data, then the display turns to “Data receiving (receiving)” . ⑥Checking the received data ・Click “Data Inquiry” on the main menu and select the data file you want to check.
- Page 47 (No.584). Make the same communication settings (baud rate, data length, parity) on CTA2-G and the PC at parameter setting. ②Set CTA2-G ready for data output CTA2-G by pressing the "MD" key in PEAK Mode〈any count 001-999〉. Press MD key at PEAK mode, then it will be set ready for 1 set data output.
- Page 48 ④Transferring data Press MEM key on CTA2-G to transfer data ⑤Checking the received data ・Select “Data Inquiry” section and move to “data file selection”. ・Click “Data selection” and open the data. Data file selection Data inquiry...
-
Page 49: External Output
Parity EVEN / ODD / NONE (Default: EVEN) (2) Output to PC Connect CTA2-G to PC with the dedicated communication cable (No.584). Set the PC communication settings (baud rate, data length, parity) to correspond to the CTA2-G communication settings. * If you are using the communication cable (No.584), set the data length to 8bit. - Page 50 RET,001,01,065.0CRLF RET,001,02,064.0CRLF RET,001,03,063.0CRLF Final torque data RET,001,04,066.0CRLF RET,001,05,065.0CRLF (3) Printer output When connected to EPP16M3 Tohnichi printer, use the dedicated cable (No.575). CTA2-G communication setting should be changed as follows: External output format Baud rate 2400bps Data length 7bit Parity...
-
Page 51: Battery
The battery is not charged when delivered. 13. Charging Connect the connector of the charger (BC-3-G) to the charging jack of CTA2-G. When recharging, the green lamp on the charger turns on. If the battery is empty, it takes about 3.5 hours for full charging. - Page 52 6. If you should find anything abnormal on the product, stop using immediately and place it in a safe place. Seek further support to Tohnichi. 7. If you are not using the product in a long time, take out the battery to store in...
-
Page 53: Options
(4) Communication cable (No. 575) ・CEM3-EPP16M3 ・CEM3-PC(D-SUB9pin Female) (No. 575) ・CEM3-PC(USB A) (No. 584) (5) Tohnichi printer EPP16M3 * The battery pack, charger, communication cable dedicated for CTA are not compatible with for CTA2/-G. Only the interchangeable head is compatible. -
Page 54: Specifications
15. Specifications The value ( ) is the minimum snug torque value. The accuracy of the snug torque value which is set below the minimum torque range cannot be guaranteed. Single-spindle Production tightening mode tightening mode Torque accuracy ±1% Angle accuracy ±2°+1digit (rotating 90 degree at speed of 30-180°/sec)... - Page 55 Torque Range Model kgf.cm kgf.m lbf.in lbf.ft snug 1digit sung 1digit sung 1digit sung 1digit sung 1digit CTA50N2X12D-G 0.05 0.25 0.005 22.5 1.85 36.5 0.05 CTA100N2X15D-G 1000 0.01 CTA200N2X19D-G 2000 0.02 1750 CTA360N2X22D-G 3600 0.05 3150 CTA500N2X22D-G 1000 5000 0.05 4400 CTA850N2X32D-G Angle Measuring...
- Page 56 TEL:+1 847 947 8560 FAX:+1 847 947 8572 E-mail : inquiry@tohnichi.com URL : http://www.tohnichi.com TOHNICHI SALES SHANGHAI CO., LTD. Rm. 5 No. 99 Nong 1919 Du Hui Road Minhang. Shanghai. P. R. China TEL:+86 21 3407 4008 FAX:+86 21 3407 4135 E-mail : sales@tohnichi-sh.com...
Need help?
Do you have a question about the CTA2-G and is the answer not in the manual?
Questions and answers