Table of Contents
Advertisement
Quick Links
G1-s Video Encoder
SDI wireless video encoder
Contents
◼
Packing List
◼
Device interfaces and functions
◼
Device connection, login and applications
◼
Device upgrade and restore the factory settings
Before using this product, it is recommended that you read the guide carefully. To ensure your personal safety and avoid physical or electrical damage to the
device, please strictly follow the instructions of this guide to install and use it under the guidance of professionals. Incorrect electrical connections or physical
installation may cause permanent damage to the device and even threaten personal safety.
Leading solution provider of IP-based video transmission
Quick Start Guide
Advertisement
Table of Contents

Related Manuals for Kiloview G1-s


Summary of Contents for Kiloview G1-s
- Page 1 Leading solution provider of IP-based video transmission Quick Start Guide G1-s Video Encoder SDI wireless video encoder Contents ◼ Packing List ◼ Device interfaces and functions ◼ Device connection, login and applications ◼ Device upgrade and restore the factory settings Before using this product, it is recommended that you read the guide carefully.
-
Page 2: Packing List
1 Packing List (1) Device ×1 (2) Power Supply×1 (3) Warranty Card×1 (4) Quick Start Guide×1 (5) WiFi Antennas 2 Device Interfaces... -
Page 3: Device Indicators
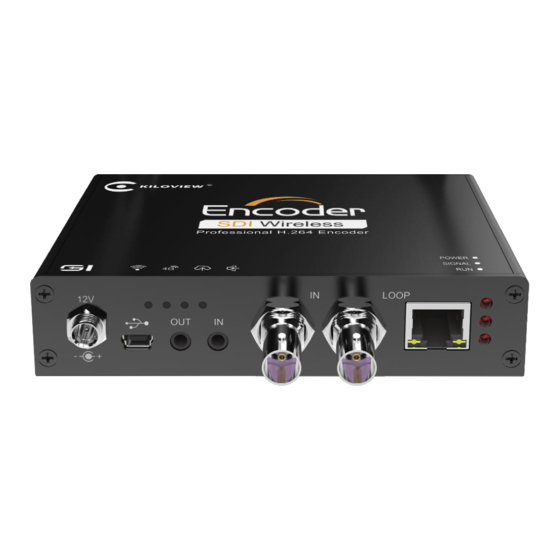
Power Port USB expansion port Mini USB Micro SD/TF slot 3.5mm line in/out (10) Power on/off SDI Input (11) Reset SDI Loop (12) Antenna port 100M Ethernet port Working Indicator 3 Device Indicators Name Color Status Description Power connected Power Power off or failure SDI signal connected LED Indicators... -
Page 4: Device Discovery
Note ⚫ Please use the equipped power adapter to power the device. Other unqualified power supplies may damage the device. ⚫ Under encoding mode, please make sure the camera is connected to the SDI IN port. ⚫ Loop is not a must, you can connect to the SDI OUT port when loop out is needed. ⚫... - Page 5 ⚫ Access method: Open a web browser and enter in the address bar: http://device IP address/ (the device IP address is the IP address of the G1-s displayed in the device list). ⚫ The working network that the device is connected needs to support automatic acquisition of IP (DHCP). After the device automatically acquires the IP, it can be discovered by the software through Onvif.
- Page 6 Note If the video source connected, there is still a blue screen or video displayed abnormality. Please check the input video source, the video resolution format or cables, etc. 7.2 Audio Source Selection Introduction ⚫ Audio input supports SDI embedded audio or 3.5mm analog audio input (Line in). It doesn’t support Mic in. ⚫...
- Page 7 3. Open "Media" ----“Network Streaming" of VLC; 4. Enter the URL address of RTSP in the network, and click the [Play] button in the lower right corner; 5. VLC will play the input video of device. 7.4 RTMP live streaming First, add an RTMP push point on the device side.
-
Page 8: Firmware Upgrading
Website for more information about the G1-s streaming service: https://www.kiloview.com/en/support/docs/G1-s/ 8 Firmware Upgrading 8.1 Download upgrade firmware Kiloview will continue to provide the firmware of updating functions and fixing bug for G1-s, please visit: https://www.kiloview.com/en/support/download/ Select “video encoders” > “G1-s”, find and download the latest firmware. -
Page 9: Restore Factory Settings
8.2 Upgrade device firmware Login to the web page of G1-s, click "Settings"-- "Firmware Upgrade" to check whether the latest firmware version downloaded is higher than your current version. If yes, select the downloaded firmware and click "Firmware Upgrade". After uploaded the firmware successfully, it needs to reboot the device. After clicking “ok”, the device will restart, please be patient. - Page 10 To prolong the device life,please unplug the power and keep it properly if you do not use it for a long time. For more questions, please contact us via: https://www.kiloview.com/en/support KILOVIEW Electronics CO., LTD. Tel:86-18573192787 Email:support@kiloview.com Web:www.kiloview.com/en Address: B4-106/109, Jiahua Intelligence Valley Industrial Park, 877 Huijin Road, Yuhua District,...
Need help?
Do you have a question about the G1-s and is the answer not in the manual?
Questions and answers