Table of Contents
Advertisement
Quick Links
Advertisement
Table of Contents

Subscribe to Our Youtube Channel
Related Manuals for Kiloview E1-s


Summary of Contents for Kiloview E1-s
- Page 1 E1-s Wired Video Encoder USER MANUAL KILOVIEW Electronics CO., LTD.
- Page 2 Legal Notices Subject to the receiving of this document from Changsha Kiloview Electronics Co., Ltd., (Hereinafter referred to “Kiloview”), the following terms are understood and agreed. Or else, please stop using this document. This document is copyright of Kiloview, all rights reserved. The document covers the proprietary information of the company.
-
Page 3: Table Of Contents
CONTENTS PRODUCT INTRODUCTION ........................ 1 ......................1 S WIRED VIDEO ENCODER 1.1.1 Advantages ..........................1 1.1.2 Parameters ..........................2 OPERATION GUIDANCE........................3 PACKING LIST AND INTERFACE DESCRIPTION ................4 ............................ 4 ACKING LIST ........................... 4 EVICE INTERFACES ........................... 5 IGNAL INDICATOR INSTALLATION AND CONNECTION .................... - Page 4 PARAMETERS CONFIGURATION ..................... 13 ........................... 13 ASHBOARD ..........................15 ASIC SETTINGS 6.2.1 Change WEB login password ..................... 15 6.2.2 Location and time ....................... 16 6.2.3 Restore factory settings ..................... 17 6.2.4 Firmware upgrading ......................17 & A ....................... 18 IDEO UDIO ADJUSTMENTS 6.3.1 Video source choice and adjustments ................
- Page 5 ......................39 MAGE IME OVERLAY 6.7.1 Graphic overlay management ................... 39 6.7.2 Overlay..........................40 ........................ 42 ERVICE CONFIGURATION 6.8.1 Web service configuration ....................42 6.8.2 Onvif service configuration ....................42 6.8.3 Telnet service configuration ....................43 PTZ ........................44 ERIAL PORT AND 6.9.1 USB serial port ........................
-
Page 6: Product Introduction
E1-s Video Encoder User Manual PRODUCT INTRODUCTION 1.1 E1-s wired video encoder E1-s wired video encoder can encode SDI video source and compress into IP stream, to realize long- distance HD transmission/live broadcast over WAN or LAN network. 1.1.1 Advantages ➢... -
Page 7: Parameters
Analog audio ports 2*3.5mm USB interface 2*USB 2.0 Type-A Network Support Ethernet Media transmission RTMP/HLS/TS over UDP/RTSP /Onvif/SRT protocols Up to 1080P60Hz, resolutions supported: Video resolution 1080p23.98/24/25/29.97/30Hz;1080p50/59.94/60Hz; 1080i50/59.94/60Hz;720p23.98/24/25/29.97/30Hz;720p50/59.94/60Hz Video coding H264/AVC and Motion-JPEG Copyright KILOVIEW Electronics CO., LTD. All rights reserved. -
Page 8: Operation Guidance
RTSP pull flow ⚫ Using a decoder or a PC-based player (such as VLC) to get RTSP stream from the encoder, and the RTSP stream service is continuously enabled. Other streaming service ⚫ Copyright KILOVIEW Electronics CO., LTD. All rights reserved. -
Page 9: Packing List And Interface Description
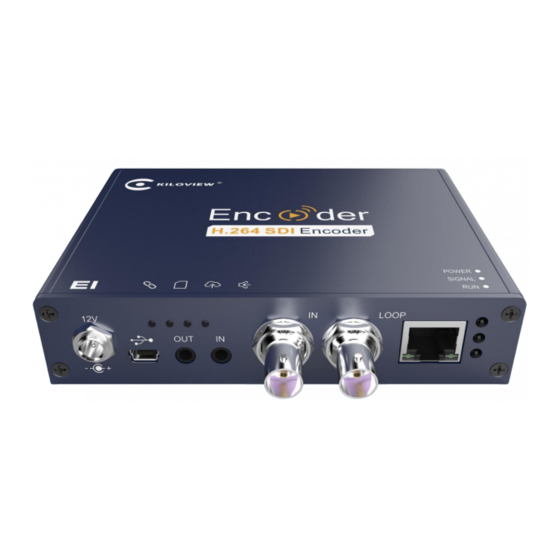
3 Audio Output 4 Audio Line In 5 SDI IN 6 SDI LOOP 7 100M Ethernet Interface 8 Working Indicator 9 USB Expansion Port 10 Micro SD/TF Card 11 Power Switch 12 Reset Copyright KILOVIEW Electronics CO., LTD. All rights reserved. -
Page 10: Signal Indicator
(while the RUN light also will flash) Signal is not connected Always Device working normal Green Restore device to factory settings (while the RUN light also Flashing will flash) Device working abnormal/ not started Copyright KILOVIEW Electronics CO., LTD. All rights reserved. -
Page 11: Installation And Connection
Using the power adapter (DC 12v) connect to the main product, after the power is turned on, then the product starts working immediately. Note: Please use the equipped power adapter. Using other unqualified power supplies may damage the device. Copyright KILOVIEW Electronics CO., LTD. All rights reserved. -
Page 12: Connect Video Signal
Enter to open the login interface. After opening the page, an authentication dialog will pop up, please fill in the username and password, the default username is admin, the default password is admin, and then click "Login". Copyright KILOVIEW Electronics CO., LTD. All rights reserved. -
Page 13: Network Configuration
IP address) and default setting is DHCP. It will automatically get a complete IP address, gateway and DNS according to this LAN. Click "Network & Service Settings", click "Network Manager" to enter the following interface, you can see the IP address with Ethernet. Copyright KILOVIEW Electronics CO., LTD. All rights reserved. - Page 14 IP to the encoder, and this IP address is fixed as long as the encoder does not restore the factory settings, and this method is more stable. Therefore, the two methods have their own advantages, and can be selected accordingly. Copyright KILOVIEW Electronics CO., LTD. All rights reserved.
-
Page 15: Convenient Management Functions
192.168.1.168. Note: When accessing the device through a convenient managed IP address, your computer must have an IP address on the same network segment. Copyright KILOVIEW Electronics CO., LTD. All rights reserved. -
Page 16: Android App
Open the APP and search the connected devices under the same network segment automatically in the device list. The device information shown in the list ⚫ includes device interface information, device serial number, device IP address, etc. Copyright KILOVIEW Electronics CO., LTD. All rights reserved. - Page 17 ⚫ Click “Signal Source” for audio and video source choice page (Please refer to 6.3). ⚫ “Advanced setting” is used for quick reset, device reboot, restoring factory settings and device name modifications. Click and enter into device information page. Copyright KILOVIEW Electronics CO., LTD. All rights reserved.
-
Page 18: Parameters Configuration
The “Ping” provides a simple function to test whether the network is reachable. Open the “Ping” button, enter the test address, click “Ping”, wait for 3s, and “Connectivity” is displayed as Copyright KILOVIEW Electronics CO., LTD. All rights reserved. - Page 19 “reachable, packet loss rate 0%" which means the network is good and streams can be pushed to the Internet normally. Note: If Ping public IP address is reachable, but Ping domain name is unreachable, generally, it is because the DNS server configuration is incorrect. Copyright KILOVIEW Electronics CO., LTD. All rights reserved.
-
Page 20: Basic Settings
Users can go for some basic function settings here. 6.2.1 Change WEB login password Click “Change Password”, an option box will pop up, users can modify the WEB login password, the default password is admin. Copyright KILOVIEW Electronics CO., LTD. All rights reserved. -
Page 21: Location And Time
E1-s Video Encoder User Manual 6.2.2 Location and time Click “location and time”, then users can modify system time of the encoder, or just select “Synchronize from this PC”. Copyright KILOVIEW Electronics CO., LTD. All rights reserved. -
Page 22: Restore Factory Settings
It is best to contact technical support to assist in completing the upgrade operation. Copyright KILOVIEW Electronics CO., LTD. All rights reserved. -
Page 23: Video & Audio Adjustments
“Auto Selection” means the device will check each video source and automatically select the one which has signal. You can also manually select the specified video source. The value range of Brightness, Contrast, Saturation and Hue is 0~255, default is 128. Based on the Copyright KILOVIEW Electronics CO., LTD. All rights reserved. -
Page 24: Audio Signal Source
6.4.1 Audio encoding parameter setting Click “Encoding &stream”, Select “Audio Encoding Engine”, then entering into audio parameters setting. Audio encoding channel is forced to enable. Audio encoding modes include AAC and G.711, Copyright KILOVIEW Electronics CO., LTD. All rights reserved. - Page 25 Audio sampling is chosen according to actual situation. Channels consist of “Stereo” and “Mono”. Encoding bitrate is adjustable between16K-256K, default is 64Kbps. Note: Please do "Quick Reset" to take affect if you changed the 'Resample policy' or 'Sampling' parameter. Copyright KILOVIEW Electronics CO., LTD. All rights reserved.
-
Page 26: Encoding And Stream Setting
We generally set parameters of “H.264 main stream”, click “Setting”. Note: It is H.264 Main stream, the second setting, not Motion JPEG setting. Click SET, entering into below interface for main streaming encoding parameters setting, as follows: Copyright KILOVIEW Electronics CO., LTD. All rights reserved. - Page 27 Generally, network transmission adopts CBR to guarantee transmission quality, while file storage uses VBR to guarantee file quality. Default setting is CBR-Constant bitrate. “Encoding Bitrate” supports adjustable 64K-40M. Users could choose default setting, or ⚫ Copyright KILOVIEW Electronics CO., LTD. All rights reserved.
-
Page 28: Steaming Media Service
6.4.3 Steaming media service E1-s NDI currently supports streaming services include: RTSP, RTMP, RTMPS, HLS, RTP, TS-UDP, SRT and Onvif2.0. One code stream can run up to 8 stream services at the same time for the encoder, which means it can push the video stream to 8 different live platforms. There are two code streams... -
Page 29: Motion Jpeg Stream
6.4.3.1 Motion JPEG stream E1-s NDI has a Motion JPEG stream, which keeps running without stop. It is blank with blue color if without video access. If with a video signal access, Motion JPEG stream will display the content of current flow, “the video signal lock”... - Page 30 LAN computer. Install and open VLC media player, select the "media", and "open network stream", then enter the RTSP service URL address, you can play the video. Note: URL should be copied completely and the punctuation marks should be included. Copyright KILOVIEW Electronics CO., LTD. All rights reserved.
-
Page 31: Rtmp Pushing (Live Streaming)
H.264, there is a stream service option to be added. By adding a RTMP push, you can get a RTMP push option. Click the settings button on the right side of the RTMP push, and you will Copyright KILOVIEW Electronics CO., LTD. All rights reserved. -
Page 32: Ts-Udp Pushing (Unicast And Multicast)
Note: In the case of RTMPS push mode, fill in RTMPS URL at Push point and set ‘Use old RTMP version’ to yes, so that it can be supported. 6.4.3.4 TS-UDP Pushing (unicast and multicast) Click to select TS-UDP Pushing, then entering into TS-UDP setting interface. Copyright KILOVIEW Electronics CO., LTD. All rights reserved. - Page 33 Multicast push can only be decoded and played within the same network segment. Both the encoder and the player need to be configured with a gateway to decode and play the multicast source normally. Copyright KILOVIEW Electronics CO., LTD. All rights reserved.
-
Page 34: Hls Service
Using HLS service, to “add a stream service” firstly, then click right-side SET icon of “HLS service” for setting. Below is setting interface of HLS service. Very simple, if no special requirements, no need setting, only enable service. Copyright KILOVIEW Electronics CO., LTD. All rights reserved. -
Page 35: Srt-Ts Pushing
6.4.3.6 SRT-TS pushing 1) Click “Encoding & Stream”—“Encoding and Stream Settings” –“H.264 main stream” –“Add a stream”. Choose “SRT-TS pushing”, click “OK” and add a SRT service. 2)Click the icon for SRT configuration. Copyright KILOVIEW Electronics CO., LTD. All rights reserved. - Page 36 Address: Set IP address of the receiving port; ➢ Port: Set the listening port corresponding to the receiving port; ➢ Transport delay: Set it based on the performance of the current network, the delay value can be ➢ Copyright KILOVIEW Electronics CO., LTD. All rights reserved.
- Page 37 The default size is 1316, the optimal packet for the codec. Network highest RTT Multiplier BW Overhead The lowest SRT delay packet loss rate (%) (when RTT≤20ms) ≤1 ≤3 ≤7 ≤10 Copyright KILOVIEW Electronics CO., LTD. All rights reserved.
-
Page 38: Local Recording
6.5 Local recording E1-s NDI supports local recording via TF card and USB expansion. The recording operation is as follows: 1) Click “Record” below “H.264 Main Stream” under “Dashboard” or “Encoding and stream setting”. - Page 39 If recording is performed in a non-TS format, when the recording is completed, stop the recording manually, and then remove the storage device to ensure the recording can be played normally. 3) By default, it automatically starts recording when storage disks inserted, regardless its storage type. Copyright KILOVIEW Electronics CO., LTD. All rights reserved.
- Page 40 When no disks inserted or NAS network storage not set, the status will be as follows, dashboard ⚫ will show “Stopped”. Record status shows “No valid disks” and “No records”. After inserted disks, the device will start recording automatically and the dashboard shows ⚫ “Recording”. Copyright KILOVIEW Electronics CO., LTD. All rights reserved.
- Page 41 E1-s Video Encoder User Manual The "Video Status" is shown below, where you can view the usage of the memory or download the video files that have been stored in the memory to the computer. Copyright KILOVIEW Electronics CO., LTD. All rights reserved.
- Page 42 TF card unrecognizable. Sometimes, due to the influence of some files or programs in the TF card, the TF card cannot be recognized. You need to format the TF card once. Copyright KILOVIEW Electronics CO., LTD. All rights reserved.
-
Page 43: Network Storage (Nas)
NAS manager will show “Mounted” if NAS connection has been established, and there is a RECORD file under the Mount point. If the connection is abnormal, it will be displayed as “Mounting”. Copyright KILOVIEW Electronics CO., LTD. All rights reserved. -
Page 44: Text/ Image/Time Overlay
Enter “Image Management”---fill in “Image ID-- Choose the image that you want—click “Add”, then image is uploaded to the device. You can check the image and information listed under the Image list. Copyright KILOVIEW Electronics CO., LTD. All rights reserved. -
Page 45: Overlay
“Don't rotate follow picture”, please choose yes or no. Then choose “Add overlay item” to set overlay functions for “Text”, “Time” and “Image” respectively. You can set multiple overlays at the same time. Add overlay item (text) as below: Copyright KILOVIEW Electronics CO., LTD. All rights reserved. - Page 46 1920*1080, and the uploaded image is 3840*2160, then the image overlay will fail to display. Please pay attention to the overlay position, if you add image, text and time in the same ⚫ Copyright KILOVIEW Electronics CO., LTD. All rights reserved.
-
Page 47: Service Configuration
Onvif is a 'Web Service' based protocol, you can even write your program to control this device by Onvif web service API. You can also use the WEB Service API of the Onvif. (It is compatible with Onvif 1.1/2.0 specifications). Copyright KILOVIEW Electronics CO., LTD. All rights reserved. -
Page 48: Telnet Service Configuration
E1-s Video Encoder User Manual 6.8.3 Telnet service configuration Telnet service listens on port 23 for remote connection and debugging of devices. For security reasons, you can choose to close Telnet service. Copyright KILOVIEW Electronics CO., LTD. All rights reserved. -
Page 49: Serial Port And Ptz
Serial/FDTI chip/PL2303 chip. If the USB to RS232/RS422/RS485 adapter (cable) you inserted cannot be recognized, it means the converter chip in the adapter or cable is not supported by default, please contact Kiloview support team for assistance. 6.9.2 PTZ setting The encoder can control the PTZ camera via Sony Visca, Pelco-D, Pelco-P protocols;... -
Page 50: Control Panel
"Quick Reset" is used to quickly reset the video encoding service of the encoder, normally it’s used to parameters come into force after modification or encoding abnormal, the current encoding service will be stopped and it will take about 3 seconds. Copyright KILOVIEW Electronics CO., LTD. All rights reserved. -
Page 51: Reboot
After the device is restarted, the preset saved parameters will take effect. "Preset configuration" - "Save current configuration", you can choose to save the required parameters and download, and the configuration name is customized Copyright KILOVIEW Electronics CO., LTD. All rights reserved. - Page 52 You can upload the saved configuration file in "manage or load preset configuration", restart the device after loading, and the parameter configuration will take effect. Copyright KILOVIEW Electronics CO., LTD. All rights reserved.
- Page 53 E1-s Video Encoder User Manual Thank you for reading KILOVIEW Electronics Co., Ltd Website:www.kiloview.com/en E-mail:support@kiloview.com Skype: support_72698 Tel:+86 18573195156/18573195256 Address:B4-106/109, Jiahua Intelligence Valley Industrial Park, 877 Huijin Road, Yuhua District, Changsha City, Hunan Province, China Copyright KILOVIEW Electronics CO., LTD. All rights reserved.
Need help?
Do you have a question about the E1-s and is the answer not in the manual?
Questions and answers