Table of Contents
Advertisement
Quick Links
Advertisement
Table of Contents

Subscribe to Our Youtube Channel
Related Manuals for Kiloview P3


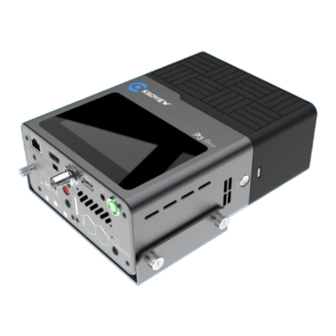
Summary of Contents for Kiloview P3
- Page 1 P3 5G Wireless Bonding Encoder USER MANUAL Changsha KILOVIEW Electronics Co.,Ltd...
-
Page 2: Legal Notices
Legal Notices Subject to the receiving of this document from Changsha Kiloview Electronics Co., Ltd.,(Hereinafter referred to “Kiloview”), the following terms are understood and agreed. Or else, please stop using this document. Kiloview who owns the copyright of this document reserves all rights not expressly granted in this document. -
Page 3: Table Of Contents
CONTENTS 1 PRODUCT INTRODUCTION ................................1 1.1 Product Features ................................1 2 PRODUCT PARAMETERS ................................2 3 PACKING LIST AND DEVICE INTERFACE ............................3 3.1 P ....................................3 ACKING 3.2 D ..................................4 EVICE NTERFACE 4 DEVICE INSTALLATION ..................................5 4.1 I 4G/5G/WIFI M ............................5 NSTALLATION OF ODULES... - Page 4 7.3.1 Ethernet ..................................22 7.3.2 Wi-Fi Network ................................22 7.3.3 AP Settings ...................................24 7.3.4 4G/5G Network ................................24 7.3.5 Advanced Settings ............................... 25 8 WEB-BASED INFORMATION VIEWING AND ENCODING SETTINGS ................... 26 8.1 D ...................................26 ASHBOARD 8.2 T ................................27 AVIGATION 8.2.1 Modify WEB Login Password ............................27 8.2.2 Restart Device ................................
-
Page 5: Product Introduction
P3 is equipped with 3G-SDI and HDMI video input interfaces. The HDMI interface supports video input up to 4Kp30, while the 3G-SDI supports 1080p60 video input. It supports H.264 (AVC) and H.265 (HEVC) video encoding. When paired with the free KiloLink Server Pro software, it enables aggregation services. -
Page 6: Product Parameters
H.264(AVC): Baseline/Main/High profile, Level 5.1 H.265(HEVC): Main profile, Level 5.0 Streaming Protocol NDI HX/RTMP/SRT/RTSP/HLS/TS over UDP and other media protocols (with Kiloview KiloLink Server Pro Support aggregation platform) 4 channels of 5G (or 4 channels of 4G) cellular networks, WIFI (2.4G/5G dual-band), wired Ethernet port,... -
Page 7: Packing List And Device Interface
P3 5G Wireless Bonding Encoder.USER MANUAL Storage SD card / expandable USB Storage coexisting with Wi-Fi 5 communication module Display and Indication 4.3-inch LCD touch screen display Network Interface 1×10M/100M/1000M RJ45 Ethernet port Management Method LCD operation/Web operation/KiloLink Server Pro remote management Dual battery module design, built-in battery capacity: 3500mAh @ 7.2V 25.2W, external battery capacity... -
Page 8: Device Interface
P3 5G Wireless Bonding Encoder.USER MANUAL (7) HDMI Cable Straps x1 (8) Warranty Card ×1 (9) Quick Start Guide ×1 3.2 Device Interface 1000M Ethernet Power Switch HDMI Input Battery(removable) SDI Input Battery Charging Port USB TYPE-A PowerPort(supporting internal battery charging) 3.5mm LINE IN... -
Page 9: Device Installation
4.1 Installation of 4G/5G/WIFI Modules P3 supports a Wi-Fi module and up to four 4G/5G modules for flexible configuration based on user needs.In the default configuration of the P3 product,the Wi-Fi and 4G/5G communication modules are housed internally.To install these... -
Page 10: Battery Installation
Installing the 4G/5G module: Connect the 4G/5G module to the device via the internal horizontal gold finger of P3 (P3 supports up to 4 4G/5G modules). Align the gold fingers of the 4G/5G module downwards into the gold finger interface slot as shown in the left diagram. -
Page 11: Installation Of Hdmi Cable Strap
Insert the new battery and tighten the screw. In addition to the external battery on P3, the device also has an internal battery. The internal battery can power the device during the process of replacing the external battery on P3, ensuring uninterrupted operation. - Page 12 P3 5G Wireless Bonding Encoder.USER MANUAL Insert the HDMI cable and fasten it with the buckle on the HDMI cable strap. If it is necessary to remove the bound HDMI cable, unlock the two buckles as shown in the illustration, and then take out the HDMI cable.
-
Page 13: Battery Indicator Light
First Boot Guide When the new device is powered on for the first time, the P3 display screen will show the system startup process and guide users through the device initialization. Device initialization consists of three steps: language selection, confirmation of user license agreement, and network configuration, guiding users to complete the initial device setup. -
Page 14: Select Default Language
5.3 Network Configuration The P3 device needs to be used in a connected environment, so during the initial setup process, users need to configure the network. For detailed instructions on network configuration, please refer to section 6.6.3. If you prefer not to configure the network at this time, you can skip the relevant options and later configure the network connection through the device's LCD screen. -
Page 15: Boot Guide Completion
5.4 Boot Guide Completion After the initial startup guide of P3 is completed, the system will prompt the device's WEB management address and a QR code for quick login. Users can use a computer to log in or scan the QR code with a mobile phone to perform more detailed settings on the device, or click 'Configuration Completed' to start using the device. -
Page 16: Video Sources
HDMI/SDI input resolution. You can also specify scaling to a specific resolution (choose from the list). Note: Currently, P3 does not support video magnification, so scaling will not work if the selected scaling resolution is larger than the actual input resolution. -
Page 17: Bonding
To achieve P3 bonding transmission, you need a KiloLink Server Pro server and configure the registration information of the P3 device on the server side (please refer to the KiloLink Server Pro operation manual for the configuration and detailed use of the KiloLink Server Pro server); before performing bonding transmission on the P3 device side, you also need to configure the corresponding parameters for the connection between the P3 device and KiloLink Server Pro on the device side. -
Page 18: Record And Stream
Authorization Code: Enter the authorization code specific to this device for connecting to KiloLink Server Pro. Encryption: Enable or disable data encryption for P3 aggregation transmission. Bonding Connections: Select the network links participating in the aggregation transmission. -
Page 19: Settings
NTP servers. Manual time setting allows users to input date/time manually. Note: After manual time setting, the time will be maintained by P3's internal battery and RTC clock system. Due to RTC system accuracy errors, significant time discrepancies may occur over time. -
Page 20: Firmware Upgrade And Factory Reset
Insert a USB flash drive containing the P3 firmware update (firmware must be placed in the root directory of the USB flash drive), click "Firmware Upgrade", and the system will automatically search for the latest valid firmware version in the root directory of the USB flash drive and proceed with the upgrade automatically. -
Page 21: Wireless Lan Settings
P3 5G Wireless Bonding Encoder·User Manual Figure 13 Network settings Ethernet settings interface 6.6.3.2 Wireless LAN Settings To configure P3 to connect to a Wi-Fi hotspot, click ‘Wi-Fi’ in the network interface to enter Wi-Fi settings (see Figure 14). Figure 14 Wi-Fi settings interface Select the desired Wi-Fi hotspot, input the Wi-Fi connection password in the popup window, and click "Apply"... -
Page 22: Wireless Hotspot Settings
6.6.3.3 Wireless Hotspot Settings If you need P3 to serve as a Wi-Fi hotspot to provide internet access to other devices, select Wi-Fi hotspot in the main network configuration interface for configuration (as shown in Figure 16). Wi-Fi hotspot settings can specify the shared Wi-Fi hotspot name, password, default IP network segment, and Wi-Fi channel. -
Page 23: Record
SIM card will be permanently locked, requiring a replacement SIM card. 6.6.4 Record The P3 supports local recording, allowing users to simply insert a SD card or USB storage drive for recording. For additional recording settings, users can configure them in the recording interface under system settings (refer to Figure 18). -
Page 24: Web Management System
P3 5G Wireless Bonding Encoder·User Manual File Split: Supports three recording file splitting methods: no splitting, splitting by duration, and splitting by size. No Splitting: The recorded content is saved in a single file without any splitting. by Duration: The recorded content is divided into multiple files based on user-selected time intervals(1 ... -
Page 25: Accessing The Device Via Wi-Fi Hotspot
After enabling the Wi-Fi hotspot on the device and setting the Wi-Fi hotspot name and password, you can use a smartphone or laptop as a Wi-Fi terminal to connect to and manage the encoder device. Once connected to the P3 hotspot, you can enter the device's IP address in the browser on your smartphone or laptop to access the encoder's WEB management interface. -
Page 26: Network Setting
In the network settings, click on the "Ethernet" -> "Configure" button to set up automatic or manual network configuration. Selecting "Automatic" will allow P3's Ethernet interface to obtain and configure information using the DHCP protocol. If manual configuration is preferred, you can set parameters such as IP address, Net Mask, Gateway, DNS, etc. - Page 27 To ensure reliable and efficient wireless transmission, maintain an optimal distance between the Wi-Fi router (AP) and the P3, avoiding obstacles and interference. Using the 5GHz frequency band (channels 36-165) can provide faster connection speeds and reduce wireless channel interference.
-
Page 28: Ap Settings
Note: P3's Wi-Fi shared hotspot defaults to supporting a 24-bit subnet mask, so the IP address subnet needs the first three IP address segments. Upon connection, the device's DHCP service will allocate an IP address from this subnet to the connected terminal. -
Page 29: Advanced Settings
P3 5G Wireless Bonding Encoder·User Manual Figure 24 4G/5G Module Parameters Configuration Note: Before use, ensure the 4G/5G card is correctly connected and the SIM card has sufficient balance to prevent network unavailability. 7.3.5 Advanced Settings HTTP/HTTPS Settings The standard web service port defaults to 80 (HTTPS port is 443) and supports modification within the range of 1-65535. -
Page 30: Web-Based Information Viewing And Encoding Settings
P3 5G Wireless Bonding Encoder·User Manual multiple interfaces. Configure routing policies with parameters including: Interface: Specifies which network interface processes the data packets for this routing policy. Target: Specifies the target network address to which the datagram will be sent. -
Page 31: Top Navigation Bar
P3 5G Wireless Bonding Encoder·User Manual CPU Load: Displays device CPU load status. Temperature: Current device temperature. Battery: Usage status of internal and external batteries of the device. Figure 26: Web Management Backend Homepage 8.2 Top Navigation Bar In the top navigation bar menu, the left functional area consists of menu items for configuring various functions of the encoder;... -
Page 32: Restart Device
It enables multi-party voice calls across the internet, allowing participation from multiple devices regardless of location. P3 can support voice intercom functionality by connecting to KIS. The voice intercom feature on P3 operates over HTTPS protocol. Therefore, before enabling voice intercom, the network must be switched to HTTPS protocol (for... -
Page 33: Device Information
HTTPS protocol, refer to section 7.3.5). The voice intercom function of P3 allows users to log in to the webpage via HTTPS mode using web browsers (Chrome, Edge, Safari), or directly connect a headset to the device for voice intercom. -
Page 34: Video Encoding Parameters
P3 5G Wireless Bonding Encoder·User Manual Figure 32 Example of Video Source Signal Selection Switch between HDMI/SDI video sources. Figure 33: Pop-up window for selecting HDMI/SDI video source signals. 8.3.2 Video Encoding Parameters The video encoding parameters are mainly used to configure the device's encoding format (CODEC), video scaling, encoding frame rate, bitrate control mode, encoding bitrate, GOP value, color, and other settings. -
Page 35: Audio Source
"Automatically halve when original video frame rate >= 50," or specify another frame rate (choose from list). Note: P3 does not currently support frame interpolation, so the selected frame rate higher than actual input frame rate will automatically match the actual frame rate. -
Page 36: Audio Encoding Settings
P3 5G Wireless Bonding Encoder·User Manual Figure 36: Entry for selecting audio sources. The available audio sources for switching include: HDMI/SDI/Line-IN. If using Line IN for audio input, connect the audio source to the device's 3.5mm audio input port. Figure 37: Audio Source Selection Popup... -
Page 37: Video Preview And Video Processing
P3 5G Wireless Bonding Encoder·User Manual Figure 38: Audio Encoding Parameter Configuration Entry Audio encoding supports two formats: AAC and G.711. The audio sampling rate can be selected according to actual needs, with stereo and mono audio channel options available. The encoding bitrate can be adjusted within the range of 16 Kbps to 512 Kbps, with a default setting of 64 Kbps. -
Page 38: Local Recording
1) Ensure that the P3 is equipped with a USB flash drive or SD card. In the WEB interface, navigate to "Record" -> " Devices" in the top navigation bar to verify that the storage device is recognized. Refer to the following figure:... -
Page 39: View And Download Record
P3 5G Wireless Bonding Encoder·User Manual Figure 42 Recording Settings Parameters 3) Click “ ” to start recording. When recording starts successfully, the recording button turns red. To stop recording, click the recording button again. Figure 43 Start/Stop Recording View and Download Record To view recorded video files, navigate to "Record"... -
Page 40: Uses Bonding Function
To achieve bonding transmission with P3, you need a KiloLink Server Pro server. Here's how to configure it: Install a KiloLink Server Pro server and configure the registration information for P3 devices on the server side (For detailed configuration and usage instructions, refer to the KiloLink Server Pro operation manual). -
Page 41: Bonding Status Explanation
P3 5G Wireless Bonding Encoder·User Manual links. Figure 45 Bonding Service Configuration 9.1 Bonding Status Explanation You can view the real-time status of devices in the bonding network through the management system, such as real-time rates of each channel, packet loss rates, data transmission and reception statistics, and latency, as shown... -
Page 42: System Settings Menu
Authorization Code: Enter the authorization code specific to this device for connecting to KiloLink Server Pro. Bitrate auto Adjust: Enable or disable dynamic bitrate adjustment. Encryption: Enable or disable data encryption for P3 aggregation transmission. Figure 47 Bonding Status Configuration Note Configuring the parameters of the bonding connection does not mean that the bonding function is enabled immediately;... -
Page 43: Network Settings
P3 5G Wireless Bonding Encoder·User Manual Figure 48 Settings - Basic Settings Section 10.2 Network Settings Click on the top navigation bar "Settings" -> "Network Settings" page. For detailed network settings, refer to section 7.3. 10.3 User Management To manage your account, click on the top navigation bar "Settings" -> "User Management" page for user management tasks such as adding and deleting users, and modifying user passwords etc. -
Page 44: Ptz Settings
P3 5G Wireless Bonding Encoder·User Manual Figure 50 Settings - Time and Zone Section Note The selection of location and region is solely for time zone configuration convenience and does not imply any political stance. 10.5 PTZ Settings 10.5.1 Enable PTZ Control Function Equipment supports PTZ camera control via serial port or IP network. -
Page 45: Ptz Function Settings
P3 5G Wireless Bonding Encoder·User Manual Figure 51 Settings - PTZ Settings Section 10.5.2 PTZ Function Settings The device supports control of PTZ cameras using Sony Visca, Pelco-D, and Pelco-P protocols. For serial-based PTZ control, connect the USB to RS232/RS422/RS485 converter (cable) to the encoder's USB port. After the device recognizes the serial port correctly, select "Serial"... -
Page 46: Edid Settings
P3 5G Wireless Bonding Encoder·User Manual Figure 54 Settings - PTZ PTZ Control Test After successful testing, you can use the PTZ function in real-time on the device's management system homepage. 10.6 EDID Settings The encoder supports importing EDID (Extended Display Identification Data) configuration information to meet compatibility requirements between different display devices.You can click "Settings"... -
Page 47: System Settings
Click the "Restore" button and confirm to reset the device to its initial state settings. 10.7.2 Firmware Upgrade When there are new features, performance optimizations, or bug fixes for P3, new firmware will be released for updates. Before upgrading, please visit the company's official website download page to obtain the upgrade package. - Page 48 Step 1: Prepare a USB drive and copy the downloaded firmware file from the official website to the USB drive. Step 2: Insert the USB drive into P3. After the device boots (approximately 2 seconds), hold the screen until the Kiloview logo appears, then hold it for another 5 seconds until the device enters Recovery Mode.
-
Page 49: Others
P3 5G Wireless Bonding Encoder·User Manual At this time, any operation of the touch button will help you return to the Recovery menu. Please select Reboot to restart the device. Note During the upgrade process, do not power off the device, as it may prevent it from starting up. - Page 50 P3 5G Wireless Bonding Encoder·User Manual Thanks for your reading! KILOVIEW Electronics CO., LTD Tel:86-731-88315979 Website: www.kiloview.com Support Email: support@kiloview.com WhatsApp : +86-18573195156/18573195256 Address: B4-106/109, Jiahua Intelligence Valley Industrial Park, 877 Huijin Road, Yuhua District, Changsha City, Hunan Province, China...
Need help?
Do you have a question about the P3 and is the answer not in the manual?
Questions and answers