Table of Contents
Advertisement
Quick Links
RE-3 Dual-Channel Video Encoding
Card
3G-SDI + 4K HDMI H.265 video encoding card
(V1.4)
The RE-3, designed as a performance-tuned configuration based on the E3ncoder, takes on a card form factor and is specifically
designed to match the Cradle series chassis. It aims to meet the demands of users seeking professional installations. The RE-3
provides a more convenient and flexible installation solution and offers outstanding video quality and stability through
performance optimization. Whether in professional broadcasting, video conferencing, or other fields, the RE-3 delivers an
exceptional video encoding experience to users.
The RE-3, designed as a performance-tuned configuration based on the RE-3 encoder, takes on a card form factor and is specifically designed
to match the Cradle series chassis. It aims to meet the demands of users seeking professional installations. The RE-3 provides a more
convenient and flexible installation solution and offers outstanding video quality and stability through performance optimization. Whether in
professional broadcasting, video conferencing, or other fields, the RE-3 delivers an exceptional video encoding experience to users.
Contents
Packing List
Device interfaces and functions
Device connection, login and use guide
Device upgrade and restore to factory settings
Before using this product, it is recommended that you read the guide carefully. To ensure your personal safety and avoid physical or electrical
damage to the device, please strictly follow the instructions of this guide to install and use it under the guidance of professionals. Incorrect
electrical connections or physical installation may cause permanent damage to the device and even threaten personal safety.
Due to continuous product upgrades and updates, the product you purchased may have changes from the contents of this manual. Please
refer to the actual product in the packaging box.
Leading solution provider of IP-based video transmission
Quick Start Guide
Advertisement
Table of Contents

Related Manuals for Kiloview RE-3


Summary of Contents for Kiloview RE-3
- Page 1 The RE-3, designed as a performance-tuned configuration based on the RE-3 encoder, takes on a card form factor and is specifically designed to match the Cradle series chassis. It aims to meet the demands of users seeking professional installations. The RE-3 provides a more convenient and flexible installation solution and offers outstanding video quality and stability through performance optimization.
-
Page 2: Packing List
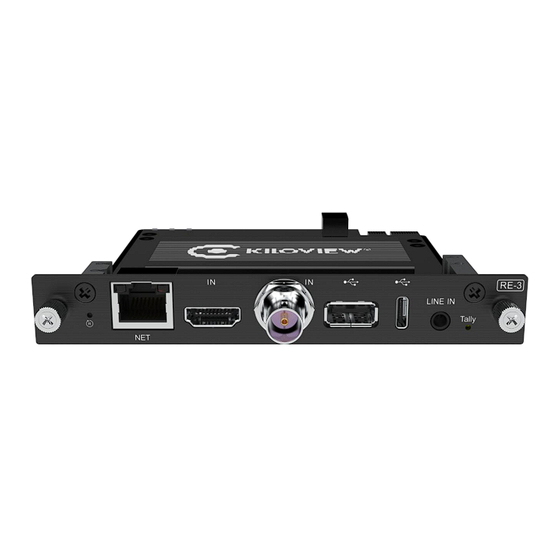
1 Packing List (1) Device ×1 (2) Warranty Card ×1 (3) Quick Start Guide ×1 2 Device Interface Reset USB TYPE-A 1000M Ethernet USB TYPE-C HDMI input 3.5mm Line in 3G-SDI input Tally Singal Ligh 3 RE-3 Card Installation... - Page 3 2. Tighten the left and right screws By designing the RE-3 in a card form factor, you can easily install and adjust its integration with the Cradle series chassis. This design takes into account users' professional needs, allowing for a more flexible deployment and management of the equipment.
- Page 4 4 Application HDMI Source Back power Power cable Network AC100~240V Power supply Switch Note Please use the device's included power adapter to provide power to the device. Other unqualified power sources may damage the equipment. The device supports simultaneous HDMI and SDI inputs for separate or mixed encoding. Here, we will take the ...
-
Page 5: Device Discovery
5 Device Discovery 5.1 Use the free tool ---NDI Tools If your network supports DHCP, the device will automatically obtain an IP address through DHCP after connecting to the network, and other tools that support NDI protocol on the PC in the same broadcast domain can automatically discover the NDI stream in the network. - Page 6 After opening the Monitor tool to play the video of RE-3, click the gear button at the bottom right corner of the player to open the WEB management page of RE-3 device directly.
- Page 8 5.2 Use the default address If your network doesn't support DHCP, you can manually obtain the default IP address by toggling the dip switch on the cardboard. There is a dip switch located on the upper left part of the cardboard under a yellow protective film. Peel off the yellow protective film to reveal a white dip switch.
- Page 9 7.1 Video source checking After connecting the video source, you can use a browser to preview the video in real-time on the RE-3. The video preview window is set to "Picture" mode by default, the screen refreshes one frame every 3 seconds.
- Page 10 7.2 Stream service After logging into the RE-3's web page, you can see that the device mainly includes three functions: HDMI Encoding, SDI Encoding, and Mix Encoding. RE-3 also supports simultaneous SDI and HDMI encoding. Clicking on the leftmost navigation bar "HDMI/SDI/Mix" allows you to configure different video source encoding parameters.
- Page 11 On the WEB UI, click” Add” at the right side to add stream service. Here let’s take add RTSP as an example: Select "RTSP" as the type, fill in the name, service port, and session ID. You can keep the other parameters at their default configurations.
- Page 12 Click to copy this address, you can check the encoded video stream by pulling the stream through VLC. Download the VLC Download and install the VLC through the official address https://www.videolan.org/vlc/. Please follow the official guidelines of VLC for the download /installation. VLC is a free, open source, cross-platform multimedia player and framework that can play most multimedia files, as well as DVD, CD, VCD and various streaming protocols.
- Page 13 7.3 Mix encoding RE-3 supports both 3G-SDI and HDMI encoding, as well as mix encoding. Enter the Web UI, click Mix to enter the mix encoding mode, which can combine HDMI and SDI input video into picture-in-picture, and then encode and output to achieve the effect of multi view display. Click "Video Sources Switching"...
- Page 14 3) Record Settings: Click "Settings" in the WEB UI, click Record Management, you can see the record parameters and configurations. Note If the power supply is cut down in the process of recording, for the recording file format selected as.avi/.mp4 and other formats, the video file may be permanent damaged, but .TS format video files would be saved.
-
Page 15: Firmware Update
Click stop recording, you can view the recording status and memory usage, as well as download the files to the computer. 8 Firmware update 8.1 Download firmware Kiloview will provide the firmware of updating functions for RE-3, please visit. https://www.Kiloview.com/en/support/download/ Select “Rackmount Codec” > “RE-3”, find and download the latest firmware. -
Page 16: Upgrade Device Firmware
8.2 Upgrade device firmware Login to the web page of RE-3, click "Settings">” System setting”>"Firmware Upgrade" to check if there is any latest firmware available to download. If yes, select the downloaded firmware and click “Firmware update”. After uploaded the firmware successfully, it needs to reboot the device. After clicking “ok”, the device will restart, please be patient. - Page 17 10 Others To prolong the device life, please unplug the power and keep it properly if you do not use it for a long time.
Need help?
Do you have a question about the RE-3 and is the answer not in the manual?
Questions and answers