Table of Contents
Advertisement
1
GSM/GPRS/GPS Tracker User Manual
Preface
Thank you for purchasing the tracker. This manual shows how to operate the device smoothly
and correctly. Make sure to read this manual carefully before using this product. Please note
that specification and information are subject to changes without prior notice in this manual.
Any change will be integrated in the latest release. The manufacturer assumes no
responsibility for any errors or omissions in this document.
Advertisement
Table of Contents

Related Manuals for Coban BN-311


Summary of Contents for Coban BN-311
- Page 1 GSM/GPRS/GPS Tracker User Manual Preface Thank you for purchasing the tracker. This manual shows how to operate the device smoothly and correctly. Make sure to read this manual carefully before using this product. Please note that specification and information are subject to changes without prior notice in this manual. Any change will be integrated in the latest release.
-
Page 2: Table Of Contents
Contents SUMMARY ..............................4 2. APPLICATIONS ............................... 4 3. HARDWARE DESCRIPTION ........................4 4. SPECIFICATIONS ............................4 5 START TO USE ..............................5 ........................6 ERMINAL INSTALLATION ........................6 CARD INSTALLATION ..........................7 URN ON THE DEVICE GSM/GPS LED I ........................ - Page 3 6.17 ............................ 24 ILENT RMING 6.18 ............................25 ISARMING 6.19 ..................... 25 LARM FUNCTION IN ARMING S TATE 6.20 ............................26 LEEP 6.21 ............................27 HECK TATUS 6.22 IMEI ............................27 HECK 6.23 ..........................27 OCAL TIME SETTING 6.24 ..........................28 ESET ARDWARE 6.25...
-
Page 4: Summary
1. Summary This product is based on the GSM / GPRS network and GPS satellite positioning system. It integrates anti-theft alarm, positioning, first aid and tracking functions in a brand new product which can locate and manage remote targets through SMS text messages, mobile app and web platform. -
Page 5: Start To Use
Weight Network GSM 850: 824-849MHz(TX); 869-894MHz(RX) Band frequency PCS 1900: 1850-1910MHz(TX); 1930-1990MHz(RX) -159dBm GPS sensitivity GPS accuracy Cold status 45s Warm status 35s GPS start time Hot status 1s Voltage of power 12V - 24V Chargeable 3.7V 180mAh Li-ion battery Back up battery -40°C to +85°C Storage Temp... -
Page 6: Terminal Installation
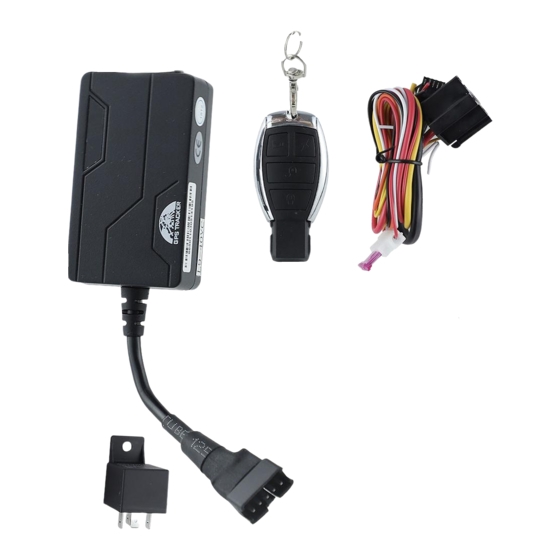
5.1 Terminal installation Please ask a qualified engineer to install it. The installation environment should not exceed the GSM performance index. Please do not install it in a dusty and humid environment. Find the wiring harness provided with the product, insert it into the corresponding wiring hole of the product, and connect to the original car circuit as shown in the following figure: ... -
Page 7: Turn On The Device
① Open sealed buckle ②Insert the SIM card, the device will turn on automatically. ③Put sealed buckle back. 5.3 Turn on the device When use the device at first time, take the device at outdoor, the device will find GSM and GPS signal and work normally after 10-40 seconds. Under normal conditions, the indicator light of the device flashes once every 3 seconds. -
Page 8: Mobile App
check with your local wireless carrier. SMS command: APN+password+space+local APN Tracker response: APN OK Example: APN123456 CMNET Note: 123456 is the default password, please change password on APP or refers to 6.1. CMNET is the APN of China mobile. 5.5.2 Configure user name and password of GPRS In t he most countries, the user name and password of GPRS a re not necessary;... - Page 9 Choose BAANOOL IOV to enter it 3 Click “Me” “Device Management” “Add”, scan the QR CODE on the device or enter the IMEI manually to bind the device.
- Page 10 Scan QR CODE or enter the IMEI number Click to a dd th e 5.6.3 Position 1.Check the device: Click “Position” to enter the position page to see all the devices on the map, click the icon of the device to see the details including latitude & longtitude, speed, altitude, time, ACC status and alarm status, etc.
- Page 11 Select the device 5.6.4 Control After selected the device, then click “Control” to enter control page to use function of single track, continuously track, Arm / Disarm and Geo-fence, etc. Select a device Geo fence...
-
Page 12: Baanool Iot's Web Version
Create a n ew Geo-fence Click to check the Geo-fence 5.6.5 Device management After s elected the d evice, click “Me” t o management pa ge t o add device, change de vice’s information, delete settings, group management and sub-account management. 5.7 BAANOOL IOT’s Web Version Account name and password are the same on mobile App and web version... - Page 13 5.7.1 Register Open http://www.baanool.net to register a new account. Click register Enter IMEI, account, password, mobile phone No. (For forget password purpose) to finish the registration. 5.7.2 Login...
- Page 14 Entery our account and password to login 5.7.3 Add device Device management Add device...
-
Page 15: Function Details
Enter IMEI Device name Choose an icon for device Click to save it This device you just added is still offline If t he device i s always offline ( Grey color), pl ease m ake sure t he SIM card subscribes t he GPRS service, and have credit to surf the Internet, you can put the SIM card in the phone to test if it can surf the Internet. -
Page 16: Authorization
Authorization The authorized numbers are used to receive the various alerts, such as SOS, Geo-fence and movement alert, etc. Up to 5 numbers can be authorized. If you call the tracker 10 times in succession, the number will be authorized automatically as the first number and tracker response “add master ok”. -
Page 17: Continuous Interval Tracking
When it lost fix to satellites, the message will include the last known GPS position and a LAC code of the updated position as well. 6.4 Continuous interval tracking 6.4.1 Limited times tracking at a time interval SMS command: fix030s600s005n+password Tracker response: It will update positions at 30 seconds interval when ACC ON and 600 seconds when ACC OFF for 5 times. -
Page 18: Cancel Interval Tracking
Example: fix030s600s***n123456 0200 6.4.5 Cancel interval tracking SMS command: nofix+password Tracker response: nofix ok Example: nofix123456 6.5 Smart angle updating It will update positions automatically to web platform when the vehicle changes driving direction over a pre set angle value to make its trace following the actual road and seem better on the map. -
Page 19: Location Based Service (Lbs) / Cell-Id Tracking
After APN ha s be en s et up , s end " address+password" , it w ill r eply i n exact addr ess including s treet na me. For e xample: N o.113, G uankou 2nd R d, N antou, N anshan di strict, Shenzhen, Guangdong, china. -
Page 20: Acc On/Off Alert
6.11 ACC ON/OFF Alert This function is OFF by default. SMS command to activate: ACC+password Tracker Response: ACC ok Example: ACC123456 If tracker detect “ignition on” signal from ACC wire (white wire), tracker will send “ACC on+latitude & longitude” to authorize number to tell you the vehicle has been started. When detect “ignition off”... -
Page 21: Configure Times Of Alarm Sms
SMS command: stop+password Tracker response: Stop engine succeed Example: stop123456 Once the immobilize function has been executed, it will remain immobile until you send command to resume the fuel supply Remote fuel resume SMS command: resume+password Tracker response: Resume engine Succeed This means tracker will now resume the fuel &... - Page 22 SMS command to deactivate: extpower +password+space+off Tracker response: extpower off ok Example: expower123456 off SMS command to activate: extpower +password+space+on Tracker response: extpower on ok Example: expower123456 on 6.14.3 Blind area alarm This feature is deactivated by default, tracker will send SMS notification “No gps+latitude & longtitude of the last know position.”...
- Page 23 Note: The first latitude & longitude is coordinate of the top left corner of the Geo-fence, and the second latitude & longitude is the coordinate of the bottom right corner. To configure the Geo-fence the tracker must fix to satellites and be stationery for about 3-10 minutes.
-
Page 24: Remote Control Function (For Cmodel )
6.15 Remote control function (For C model) Function Descriptions Arming Press for 0.5 second, the siren will beep one time. Disarming Press for 0.5 second, the siren will beep two times. Press for 0.5 second when it is in disarm state, the siren Silent will beep one time. -
Page 25: Disarming
After tracker enters into the silent arming state, the siren doesn’t sound even if an alarm is triggered, but tracker will send alarm notification to authorized numbers. 6.17.2 Silent arming with remote control (For C model) Press key in disarm state for 0.5 second, the siren will beep one time, tracker will enter into silent arming state, the siren doesn’t sound even if an alarm is triggered, but tracker will send alarm notification to authorized numbers. -
Page 26: Sleep Mode
There is a built-in three axis acceleration sensor in the tracker to detect the movement, tilt and shock when in arming state and tracker will send “Sensor alarm + latitude / longitude” to authorized numbers, and only one message in 3 minutes when tracker works in SMS mode. -
Page 27: Check Status
6.20.2 Sleep mode SMS command: sleep+password+space+on Tracker response: sleep on ok! Example: sleep123456 on When stop operating the tracker for 3 minutes, it will sleep if there aren’t any alarm has been set up. Power for GPS module will be cut off, and vibration, a call or SMS can wake up. -
Page 28: Reset Hardware
Note: 8 is the time zone of China, If your country time zone is minus, write the time zone value with a “-“ symbol, for example, time zone123456 -8. 6.24 Reset Hardware This command will reboot the GSM and GPS modules of the tracker. Please note this will not restore factory settings. - Page 29 section 6.1. 6.26.1.2 Configure user name and password In the most countries, the user name and password of GPRS are not necessary; therefore, you can ignore this step if it is not necessary for your local network. For those countries requiring user name and password, please configure as following: SMS command: up+password+space+user+space+password Tracker response: user, password ok!
-
Page 30: Configure Sms Management Center Number
GPRS123456,1,1 6.26.3.2 SMS mode Switch to SMS mode will disconnect the GPRS connection for live tracking. SMS command: SMS+password Tracker response: SMS OK! ( It means it has been switched to SMS mode.) Example: SMS123456 6.27 Configure SMS management center number SMS command: centernum+password+space+phone number Tracker response: centernum ok Example: centernum123456 13322221111... -
Page 31: Cautions
Tracker response: begin ok Example: begin123456 7. CAUTIONS Please be sure to follow when using: 1. Keep the tracker used in a dry environment. The humid environment can easily damage internal circuits. 2. Please do not put it in a dusty environment. 3. - Page 32 This tracker drives the speaker output voltage DC12V/24V/1A, if it is Siren doesn’t work a negative trigger speaker, it will not be driven. Manufacture: Shenzhen Coban Electronics Co.,LTD Address:602 &702, Bldg. C2, Xinqiao Industrial Park, Tongfuyu Industrial Area, Xinhe Avenue, Gonghe Community, Shajing Sub-District, Bao'an District, Shenzhen, Guangdong, Chin...
- Page 33 —Increase the separation between the equipment and receiver. —Connect the equipment into an outlet on a circuit different from that to which the receiver is connected. —Consult the dealer or an experienced radio/TV technician for help. FCC Radiation Exposure Statement: This equipment complies with FCC radiation exposure limits set forth for an uncontrolled environment .
Need help?
Do you have a question about the BN-311 and is the answer not in the manual?
Questions and answers
How to get imei number of tk 311b
To find the IMEI number of the Coban BN-311, you can either use the "CODE" function or manually enter the IMEI number as described in the manual.
This answer is automatically generated