
Related Manuals for ZKTeco Green Label ProCapture-T


![IP Access Controllers ZKTeco G4[QR] Instructions Manual](https://static-data2.manualslib.com/product-images/c08/2132294/60x60/zkteco-g4-qr-ip-access-controllers.jpg)


Summary of Contents for ZKTeco Green Label ProCapture-T
- Page 1 INSTALLATION GUIDE ProCapture-T Version: 1.1 Date: September 2021 ProCapture-T Installation Guide 1...
-
Page 2: Safety Precautions
Safety Precautions Before installation, please read the following safety precautions for user safety and to prevent product damage. Do not install the device in a place subject to direct sun light, humidity, dust or soot. Do not place a magnet near the product. Magnetic objects such as magnet, CRT, TV, monitor or speaker may damage the device. -
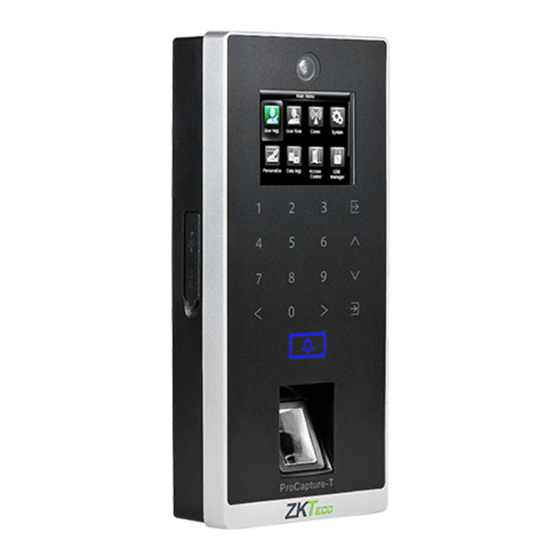
Page 3: Device Overview
Device Overview Not all products have ngerprint or card function, the real product shall prevail. ProCapture-T Left Side Front Camera 2.4-Inch Color Screen USB Slot Touch Keypad Reset Button Doorbell & LED Indicator Fingerprint Sensor & Card Reader Area 2 ProCapture-T Installation Guide... - Page 4 Device Overview RS485 8 Pin Cable Connectors RS232 Wiegand Out 4 Pin Cable Connectors Ethernet 2 Pin Cable Connectors Power In 7 Pin Cable Connectors Beep, LED Wiegand In Power Out 12 Pin Cable Connectors Alarm Lock Exit Button Door Sensor Doorbell Tamper Alarm Button Auxiliary In...
-
Page 5: Product Dimensions & Installation
Product Dimensions & Installation Product Dimensions 7.70 in 7.34 in (195.5 mm) (186.5 mm) 0.51 in 3.0 in 3.43 in (13 mm) 1.38 in (76.1 mm) (87 mm) (35mm) Mounting the Device on Wall Fix the back plate onto the wall using wall mounting screws. Note: We recommend drilling the mounting plate screws into solid wood (i.e. -
Page 6: Power Connection
Power Connection Without UPS +12V 12V DC Adaptor With UPS (Optional) +12V 12V DC Adaptor Recommended Power Supply 12V±10%, at least 500MA. To share the power with other devices, use a power supply with higher current ratings. -
Page 7: Ethernet Connection
Ethernet Connection LAN Connection Network Cable Adaptor Ethernet Cable 6 ProCapture-T Installation Guide... - Page 8 Ethernet Connection Direct Connection Network Cable Adaptor Ethernet Cable ProCapture-T Installation Guide 7...
- Page 9 RS485 Connection RS485 Fingerprint Reader Connection RS485 Fingerprint Reader DIP Settings 1. There are six DIP switches on the back of RS485 ngerprint reader, switches 1-4 are for RS485 address, switch 5 is reserved, switch 6 is for reducing noise on long RS485 cable.
-
Page 10: Lock Relay Connection
Lock Relay Connection Device Not Sharing Power with the Lock COM1 +12V 12V DC Adaptor Sensor FR107 Diode Normally Closed Lock Notes: 1. The system supports NO LOCK and NC LOCK. For example the NO LOCK (normally opened at power on) is connected with 'NO1' and 'COM1' terminals, and the NC LOCK (normally closed at power on) is connected with 'NC1'and 'COM1' terminals. - Page 11 Lock Relay Connection Device Sharing Power with the Lock COM1 +12V Sensor 10 ProCapture-T Installation Guide...
-
Page 12: Wiegand Output Connection
Wiegand Output Connection ProCapture-T Installation Guide 11... -
Page 13: Standalone Installation
Standalone Installation Ethernet Door Sensor Exit Button Lock Doorbell RS485 Fingerprint Reader 12 ProCapture-T Installation Guide... - Page 14 Third Party Controller Wiegand Output Connection Ethernet Wiegand Wiegand Wiegand Wiegand Output Output Output Output Outside Inside Lock Lock Inside Outside ProCapture-T Installation Guide 13...
-
Page 15: How Does It Work
How Does It Work Fingerprint Database Identi cation Fingerprint Registration Event Log Stored Veri cation Fails Please try again! Veri cation Granted Thank You! Door Opens 14 ProCapture-T Installation Guide... - Page 16 How to Place a Finger on Scanner Note: ZKTeco’s ngerprint readers will give optimal results for ngerprint matching, if the following recommendations and suggestions are followed. Select a nger to enroll It is recommended to use an index nger or a middle nger.
- Page 17 Tips Tips for di erent ngerprint conditions ZKTeco’s ngerprint products are designed to verify ngerprints with the highest security irrespective of the skin conditions of nger. However, in case a ngerprint cannot be read on the sensor, please refer to the...
-
Page 18: Troubleshooting
Troubleshooting 1. Fingerprint cannot be read or it takes too long? Check whether the nger or ngerprint sensor is stained with sweat, water or dust. Retry after wiping o nger and ngerprint sensor with dry paper tissue or a mildly wet cloth. If the nger is too dry, exhale air onto it and retry. - Page 19 ZKTeco Industrial Park, No.32, Industrial Road, Tangxia Town, Dongguan, China Tel: +86 769-82109991 Fax: +86 755-89602394 www.zkteco.com Copyright©2021 ZKTECO CO., LTD. All rights reserved. ProCapture-T Installation Guide 1...
Need help?
Do you have a question about the Green Label ProCapture-T and is the answer not in the manual?
Questions and answers