Table of Contents
Advertisement
Quick Links
Advertisement
Table of Contents

Related Manuals for ZKTeco Green Label ProFaceX


![IP Access Controllers ZKTeco G4[QR] Instructions Manual](https://static-data2.manualslib.com/product-images/c08/2132294/60x60/zkteco-g4-qr-ip-access-controllers.jpg)


Summary of Contents for ZKTeco Green Label ProFaceX
- Page 1 User Manual ProFaceX Version: 1.0 Date: May 2019 ZM 系列桌面式考勤机用户手册 1...
- Page 2 Important Statement Thank you for choosing our product. Before using this product, please read this user manual carefully to avoid risks of danger to the users of this product or those nearby and damaging the device. Follow these instructions to ensure that your product functions properly and completes verifications in a timely manner.
-
Page 3: Table Of Contents
Contents 1 Notice for Use ............................................... 1 1.1 Standing Position, Facial Expression and Standing Posture ......................1 1.2 Face Registration ......................................... 2 1.3 Standby Interface ........................................3 1.4 Virtual Keyboard .......................................... 4 1.5 Verification Mode ........................................5 1.5.1 Password Verification ....................................5 1.5.2 Facial Verification ...................................... - Page 4 9.2 Time Rule Setting ........................................51 9.3 Holiday Settings .......................................... 54 9.4 Combined Verification Settings..................................56 9.5 Duress Options Settings ......................................57 10. Attendance Search ..........................................59 11. Autotest ............................................... 62 12. System Information..........................................63 13. Connect to ZKBioSecurity Software ..................................64 13.1 Set the Communication Address .................................
-
Page 5: Notice For Use
1 Notice for Use 1.1 Standing Position, Facial Expression and Standing Posture The recommended distance The distance between the device and a user whose height is within 1.55m-1.85m is recommended to be 1.5m. Users may slightly move forwards and backwards to improve the quality of facial images captured. -
Page 6: Face Registration
1.2 Face Registration Try to keep the face in the center of the screen during registration. Please face the camera and stay still during face registration. The page looks like this: 2 ProFaceX User Manual... -
Page 7: Standby Interface
1.3 Standby Interface After connecting the power supply, enter the following standby interface: Notes: Click to enter the User ID input interface. When there is no super administrator set in the device, click to enter the menu. After setting the super administrator, it requires the super administrator’s verification before entering the menu operation. -
Page 8: Virtual Keyboard
1.4 Virtual Keyboard Note: The device supports the input of Chinese, English, numbers and symbols. Click [En] to switch to English keyboard. Press [123] to switch to the numeric and symbolic keyboard, and click [ABC] to return to the alphabetic keyboard. -
Page 9: Verification Mode
1.5 Verification Mode 1.5.1 Password Verification Compare the entered password with the registered User ID and password. Click the button on the main screen to enter the 1:1 password verification mode. Input the user ID and press [OK]. If an employee registers face in addition to password, the following screen will appear. Select the icon to enter password verification mode. - Page 10 Input the password and press [OK]. 6 ProFaceX User Manual...
- Page 11 Verification is successful. ProFaceX User Manual 7...
- Page 12 Verification is failed. 8 ProFaceX User Manual...
-
Page 13: Facial Verification
1.5.2 Facial Verification 1:N face verification Compare the acquired facial images with all face data registered in the device. The following is the pop-up prompt box of comparison result. 1:1 face verification Compare the face captured by the camera with the facial template related to the entered user ID. Press on the main interface and enter the 1:1 facial verification mode. - Page 14 If an employee registers password in addition to face, the following screen will appear. Select the icon to enter face verification mode. 10 ProFaceX User Manual...
- Page 15 After successful verification, the prompt box "successfully verified" will appear. ProFaceX User Manual 11...
- Page 16 If the verification is failed, it will prompts “Please adjust your position!”. 12 ProFaceX User Manual...
-
Page 17: Combined Verification
1.5.3 Combined Verification To increase security, this device offers the option of using multiple forms of verification methods. A total of 5 different verification combinations can be used, as shown below: Notes: 1) "/" means “or”, and "+" means “and”. 2)... -
Page 18: Main Menu
2 Main Menu Press on the initial interface to enter the main menu, as shown below: Items Descriptions To add, edit, view, and delete basic information about a user. User Mgt. To set the permission scope of the custom role and enroller, that is, the rights to operate User Role the system. - Page 19 System Info To view data capacity, device and firmware information of the current device. ProFaceX User Manual 15...
-
Page 20: User Management
3 User Management 3.1 Adding Users Click User Mgt. on the main menu. Click New User. Register a User ID and Name Enter the user ID and name. Notes: 1) A user name may contain 17 characters. 2) The user ID may contain 1-9 digits by default. 3)... - Page 21 Click User Role to select Normal User or Super Admin. Note: If the selected user role is the Super Admin, the user must pass the identity authentication to access the main menu. The authentication is based on the authentication method(s) that the super administrator has registered.
- Page 22 Register password Click Password to enter the password registration page. Enter a password and re-enter it. Click Save. If the two entered passwords are different, the prompt "Password not match" will appear. Note: The password may contain one to eight digits by default. Register user photo ...
-
Page 23: Search For Users
3.2 Search for Users Click the search bar on the user list and enter the retrieval keyword (The keyword may be an ID, surname or full name.). The system will search for the users related to the information. ProFaceX User Manual 19... -
Page 24: Edit Users
3.3 Edit Users Choose a user from the list and click Edit to enter the edit user interface: 20 ProFaceX User Manual... -
Page 25: Deleting Users
Note: The operation of editing a user is the same as that of adding a user, except that the user ID cannot be modified when editing a user. Operation method refers to "3.1 new users". 3.4 Deleting Users Choose a user from the list and click Delete to enter the delete user interface. Select the user information to be deleted and click OK. -
Page 26: User Role
4 User Role If you need to assign some specific permissions to certain users, you may edit the “User Defined Role” under the User Role menu. You may set the permission scope of the custom role (up to 3 roles) and enroller, that is, the permission scope of the operation menu. - Page 27 2. Click Define User Role to assign the privileges to the role. The privilege assignment is completed. Click Return. ProFaceX User Manual 23...
- Page 28 Note: During privilege assignment, the main menu is on the left and its sub-menus are on the right. You only need to select the features in sub-menus. If the device has a role enabled, you may assign the roles you set to users by clicking User Mgt.
-
Page 29: Communication Settings
5 Communication Settings Set parameters of the network, serial communication, PC connection, WIFI, cloud server and Wiegand. Tap COMM. on the main menu. 5.1 Network Settings When the device needs to communicate with a PC over the Ethernet, you need to configure network settings and ensure that the device and the PC are connecting to the same network segment. - Page 30 Item Decriptions The factory default value is 192.168.1.201. Please adjust them according to the IP Address actual network situation. The factory default value is 255.255.255.0. Please adjust them according to the Subnet Mask actual network situation. The factory default address is 0.0.0.0. Please adjust them according to the actual Gateway network situation.
-
Page 31: Serial Port Settings
5.2 Serial Port Settings To establish communication with the device through a serial port (RS232/RS485), you need to configure Serial Comm.. Click Serial Comm. on the Comm. Settings interface. Item Descriptions Serial port Select whether to use RS232 or RS485 for communication. The rate of the communication with PC;... -
Page 32: Wifi Setting
5.4 WIFI Setting Click Wireless Network on the Comm. Settings interface. When WIFI is enabled, tap the searched network. Enter the password, and tap Connect to WIFI (OK). The connection succeeds, with icon displayed on the status bar. Adding WIFI Network ... -
Page 33: Cloud Server Setting
Advanced This is used to set Wi-Fi network parameters. Item Description Short for Dynamic Host Configuration Protocol, which involves allocating dynamic DHCP IP addresses to network clients. IP address of the Wi-Fi network. IP Address Subnet Mask Subnet mask of the Wi-Fi network. Gateway Gateway address of the Wi-Fi network. -
Page 34: Wiegand Setup
Item Description When this function is enabled, the domain name mode “http://... ” will be Enable Domain Server Address used, such as http://www.XYZ.com, while “XYZ” denotes the domain Name name when this mode is turned ON. Disable Domain Server Address IP address of the ADMS server. - Page 35 Wiegand input Item Descriptions Wiegand Format Values range from 26 bits, 34 bits, 36 bits, 37 bits, and 50 bits. Wiegand Bits Number of bits of Wiegand data. The value of the pulse width sent by Wiegand is 100 microseconds by default, which Pulse Width(us) can be adjusted within the range of 20 to 100 microseconds.
- Page 36 while the 26 bit is the odd parity bit of the 14 to 25 bits. The 2 to 9 bits are the site codes, while the 10 to 25 bits are the card numbers. ECCCCCCCCCCCCCCCCCCCCCCCCCCCCCCCCO Consists of 34 bits of binary code. The 1 bit is the even parity bit of the 2 to 17 bits,...
- Page 37 Wiegand output Item Descriptions Wiegand Format Values range from 26 bits, 34 bits, 36 bits, 37 bits, and 50 bits. After choosing the Wiegand format, you can select one of the corresponding output digits Wiegand output bits in the Wiegand format If the verification is failed, the system will send the failed ID to the device and replace the Failed ID card number or personnel ID with the new ones.
-
Page 38: System Settings
6 System Settings Set related system parameters to optimize the performance of the device. Click System on the main menu interface. 6.1 Date and Time Click Date Time on the System interface. 1. You can manually set date and time and click Confirm to save. 2. -
Page 39: Access Logs Setting
Note: For example, the user sets the time of the device (18:35 on March 15, 2019) to 18:30 on January 1, 2020. After restoring the factory settings, the time of the equipment will remain 18:30 on January 1, 2020. 6.2 Access Logs Setting Click Access Logs Setting on the System interface. - Page 40 When remaining record space reaches a set value, the device will automatically Access Logs Warning display a remaining record memory warning. Users may disable the function or set a valid value between 1 and 9999. When access records have reached full capacity, the device will automatically delete Cyclic Delete Access a set value of old access records.
-
Page 41: Face Parameters
6.3 Face Parameters Click Face on the System interface. Recommended matching thresholds High Medium Medium High Item Description Under 1:N verification mode, the verification will only be successful when the similarity between the acquired facial image and all registered facial templates is 1:N Match Threshold greater than the set value. -
Page 42: Factory Reset
Pitch angle threshold To limit the pitch angle of face in face recognition, the recommended threshold is 20. Rotation angle To limit the rotation angle of face in face recognition, the recommended threshold is threshold To get the quality threshold of facial images. When the value of image quality is Image Quality greater than the set value, the device will accept the facial images and start the algorithm processing, otherwise, the device will filter the facial images out. - Page 43 Click OK to reset. ProFaceX User Manual 39...
-
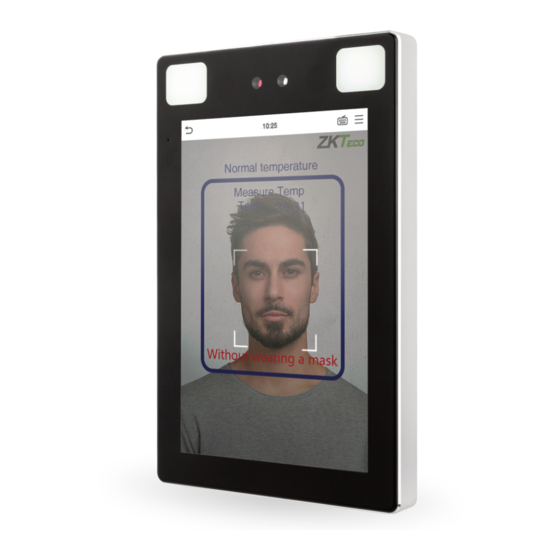
Page 44: Temperature Management
6.5 Temperature Management Terminal has built-in temperature sensor, when the temperature is too low or too high, it will trigger self-heating or shut down. Click Temperature Mgt. on the System interface. Item Description Real-time This column shows real time inner temperature of terminal. temperature Once terminal temperature is lower than set value, terminal will start self-heating, the Low temp. -
Page 45: Personalize Settings
7. Personalize Settings You may customize interface settings, audio and bell. Click Personalize on the main menu interface. 7.1 Interface Settings You can customize the display style of the main interface. Click User Interface on the Personalize interface. ProFaceX User Manual 41... - Page 46 Item Description Wallpaper To select the main screen wallpaper according to your personal preference. Language To select the language of the device. When there is no operation, and the time exceeds the set value, the device will Menu Screen Timeout automatically go back to the initial interface.
-
Page 47: Voice Settings
7.2 Voice Settings Click Voice on the Personalize interface. Item Description Voice Prompt Select whether to enable voice prompts during operating. Touch Prompt Select whether to enable keypad sounds. Volume Adjust the volume of the device; valid value: 0-100. 7.3 Bell Schedules Click Bell Schedules on the Personalize interface. - Page 48 Add a bell 1. Click New Bell Schedule to enter the adding interface: Item Description Bell Status Set whether to enable the bell status. Bell Time At this time of day, the device automatically rings the bell. Repeat Set the repetition cycle of the bell. Ring Tone Select a ring tone.
- Page 49 Delete a bell On the All Bell Schedules interface, tap the bell to be deleted. Tap Delete and select [Yes] to delete the bell. ProFaceX User Manual 45...
-
Page 50: Data Management
8. Data Management To delete the relevant data in the device. Click Data Mgt. on the main menu interface. 8.1 Delete Data Click Delete Data on the Data Mgt. interface. 46 ProFaceX User Manual... - Page 51 Item Description Delete access To delete access records conditionally. records Delete Attendance To delete attendance photos of designated personnel. Photo Delete Blacklist To delete the photos taken during verifications which are failed. Photo Delete All Data To delete information and access records of all registered users. Delete Admin Role To remove administrator privileges.
- Page 52 Note: When deleting the access records, attendance photos or blacklisted photos, you may select Delete All or Delete by Time Range. Selecting Delete by Time Range, you need to set a specific time range to delete all data with the period. Select Delete by Time Range.
-
Page 53: Access Control
9. Access Control Access Control is used to set the schedule of door opening, locks control and other parameters settings related to access control. Click Access Control on the main menu interface. ProFaceX User Manual 49... -
Page 54: Access Control Options
9.1 Access Control Options To set the parameters of the control lock of the terminal and related equipment. Click Access Control Options on the Access Control interface. Item Description Gate Mode Whether to turn on the gate control mode or not, when set to ON, on this interface will remove Door lock relay, Door sensor relay and Door sensor type function. -
Page 55: Time Rule Setting
time period Normal Open Time Scheduled time period for “Normal Open” mode, so that the door is always unlocked Period during this period. When setting up the master and slave, the status of the master can be set to exit on enter. - Page 56 52 ProFaceX User Manual...
- Page 57 2. Click the date on which time zone settings is required. Enter the starting and ending time, and then press OK. Notes: 1. When the ending time is earlier than the starting time, such as 23:57~23:56, it indicates that access is prohibited all day;...
-
Page 58: Holiday Settings
9.3 Holiday Settings Whenever there is a holiday, you may need a special access time; but changing everyone's access time one by one is extremely cumbersome, so you can set a holiday access time which is applicable to all employees, and the user will be able to open the door during the holidays. - Page 59 Add a New Holiday Click Add Holiday on the Holidays interface and set the holiday parameters. Edit a Holiday On the Holidays interface, select a holiday item to be modified. Click Edit to modify holiday parameters. Delete a Holiday ...
-
Page 60: Combined Verification Settings
9.4 Combined Verification Settings Access control groups are arranged into different door-unlocking combinations to achieve multiple verifications and strengthen the security. In a door-unlocking combination, the range of the combined number N is: 0 ≤ N ≤ 5, and the number of members N may all belong to one access control group or may belong to five different access control groups. -
Page 61: Duress Options Settings
The door-unlocking combination 3 is set as (09 09 09 09 09), indicating that there are 5 people in this combination; all of which are from AC group 9. The door-unlocking combination 4 is set as (03 05 08 00 00), indicating that the unlocking combination 4 consists of three people. - Page 62 Item Description Alarm on 1:1 When a user uses any fingerprint to perform the 1:1 verification, an alarm signal will be Match generated, otherwise there will be no alarm signal. Alarm on 1:N When a user uses any fingerprint to perform 1:N verification, an alarm signal will be Match generated, otherwise there will be no alarm signal.
-
Page 63: Attendance Search
10. Attendance Search When the identity of a user is verified, the record will be saved in the device. This function enables users to check their access records. Click Attendance Search on the main menu interface. The process of searching for attendance and blacklist photos is similar to that of searching for access records. The following is an example of searching for access records. - Page 64 1. Enter the user ID to be searched and click OK. If you 2. Select the time range in which the records you want want to search for records of all users, click OK without to search for. entering any user ID. 60 ProFaceX User Manual...
- Page 65 3. The record search succeeds. Click the record in 4. The below figure shows the details of the selected green to view its details. record. ProFaceX User Manual 61...
-
Page 66: Autotest
11. Autotest To automatically test whether all modules in the device function properly, which include the LCD, audio, camera and real-time clock (RTC). Click Autotest on the main menu interface. Item Description Test All To automatically test whether the LCD, audio, camera and RTC are normal. To automatically test the display effect of LCD screen by displaying full-color, pure white, Test LCD and pure black to check whether the screen displays colors normally. -
Page 67: System Information
12. System Information With the system information option, you can view the storage status, the version information of the device, and so Click System Info on the main menu interface. Item Description Displays the current device's user storage, password and face storage, administrators, access Device Capacity records, attendance and blacklist photos, and user photos. -
Page 68: Connect To Zkbiosecurity Software
13. Connect to ZKBioSecurity Software 13.1 Set the Communication Address Device side 1. Click COMM. > Ethernet in the main menu to set IP address and gateway of the device. (Note: The IP address should be able to communicate with the ZKBioSecurity server, preferably in the same network segment with the server address) 2. -
Page 69: Add Device On The Software
13.2 Add Device on the Software Add device by searching. The process is as follows: 1) Click Access Control > Device > Search Device, to open the Search interface. 2) Click Search, and it will prompt [Searching……]. 3) After searching, the list and total number of access controllers will be displayed. 4)... - Page 70 2. After setting all parameters, click OK. Note: For other specific operations, please refer to ZKBioSecurity User Manual. 66 ProFaceX User Manual...
-
Page 71: Statement On The Right To Privacy
Thank you for choosing this hybrid biometric recognition product, which was designed and manufactured by ZKTeco. As a world-renowned provider of core biometric recognition technologies, we are constantly developing and researching new products, and strive to follow the privacy laws of each country in which our products are sold. -
Page 72: Eco-Friendly Use
Eco-friendly Use This product's "eco-friendly use period" refers to the period during which this product will not leak toxic or hazardous substances, when used in accordance with the conditions in this manual. The eco-friendly use period indicated for this product does not include batteries or other components that are easily worn down and must be periodically replaced. - Page 73 Copyright©2019 ZKTECO CO., LTD. All rights reserved.
Need help?
Do you have a question about the Green Label ProFaceX and is the answer not in the manual?
Questions and answers