Table of Contents
Advertisement
Quick Links
Scan for full manual
Step 1: Check what's in the box
VSM-4x4X
4K 4x4 Seamless Matrix Switcher/Multi-Scaler
1 Set of rack ears
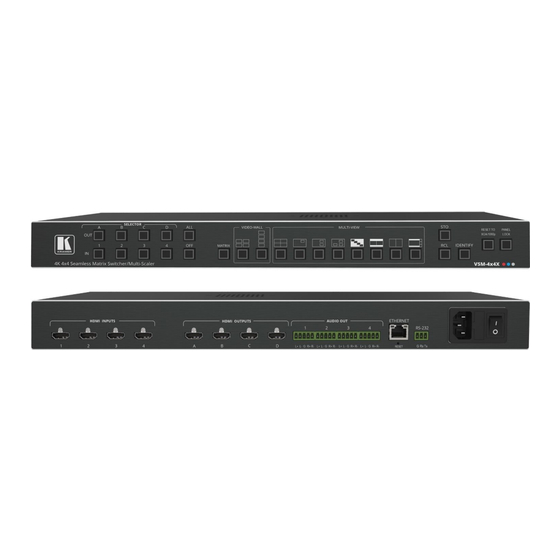
Step 2: Get to know your VSM-4x4X
#
Feature
1
IN SELECTOR Buttons
OUT SELECTOR
Buttons
2
3
ALL Button
4
OFF Button
5
MATRIX Mode
6
VIDEO-WALL Mode
7
MULTI-VIEW Mode
8
RCL Button
9
STO Button
10
IDENTIFY Button
11
RESET TO XGA/1080p
Button
12
PANEL LOCK Button
VSM-4x4X Quick Start
VSM-4x4X Quick Start Guide
This guide helps you install and use your
Go to
www.kramerav.com/downloads/VSM-4x4X
upgrades are available.
Function
Press to select an HDMI input (from 1 to 4) to switch to an output or a window.
In the MATRIX mode: select the output to which the input is switched (A, B, C or D).
In the VIDEO WALL mode: not used.
In the MULTI-VIEW mode: select the input for each window on the display.
Press ALL followed by an INPUT button to connect that input to all the outputs (not available
for the video wall mode).
Press after pressing an output button to disconnect the selected output from the inputs. To
disconnect all the outputs, press ALL followed by OFF.
Press to operate the system as a matrix switcher.
Press to operate as a video wall.
2x2
Configure a 2x2 video wall.
1x4
Configure a 1x4 video wall.
Press to operate in multi-view configurations:
Quad
4 windows filling the display.
PiP
1 window over a background image.
2 windows over a background image.
3 windows over a background image.
Stacked
4 images, overlapping (maintaining aspect ratio).
PoP
2 images, side-by-side (maintaining aspect ratio).
2 images, displayed as a split-screen (elongated images).
1 large window and 3 smaller images on the side (maintaining aspect ratio).
Press to recall a configuration.
Press to store a configuration.
Press to indicate which input is displayed on each output or window. The display time is set via
the OSD menu.
Press and hold for about 5 seconds to toggle resetting the video resolution to XGA or 1080p.
Press and hold for about 5 seconds to toggle locking the front panel buttons.
VSM-4x4X
for the first time.
to download the latest user manual and check if firmware
1 Power cord
4 Rubber feet
P/N: 2 9 0 0 - 3 0 1 5 1 2 QS
1 Quick start guide
Rev: 1
Advertisement
Table of Contents

Related Manuals for Kramer VSM-4x4X


Summary of Contents for Kramer VSM-4x4X
- Page 1 1 Power cord 1 Quick start guide 1 Set of rack ears 4 Rubber feet Step 2: Get to know your VSM-4x4X Feature Function IN SELECTOR Buttons Press to select an HDMI input (from 1 to 4) to switch to an output or a window.
- Page 2 • Reliable earthing of rack-mounted equipment should be maintained. Step 4: Connect inputs and outputs Always switch OFF the power on each device before connecting it to your VSM-4x4X. Connecting the audio output To a balanced stereo audio...
- Page 3 The following are connection examples for different layout configurations, as defined by the front panel buttons and the embedded web pages. Multi-View Mode – Split Screen Multi-View Mode – Side by Side Multi-View Mode – PiP 2...
- Page 4 • Do not open the unit. High voltages can cause electrical shock! Servicing by qualified personnel only. • To ensure continuous risk protection, replace fuses only according to the rating specified on the product label which located on the bottom of the unit. Step 6: Operate VSM-4x4X RS-232 Control / Protocol 3000 Operate Product via: •...
Need help?
Do you have a question about the VSM-4x4X and is the answer not in the manual?
Questions and answers