
Related Manuals for Kramer VS-88H2A


Summary of Contents for Kramer VS-88H2A
- Page 1 USER MANUAL MODEL: VS-88H2A 4K HDMI 8x8 Matrix Switcher P/N: 2900-301168 Rev 1 www.kramerAV.com...
-
Page 2: Table Of Contents
Kramer Electronics Ltd. Contents Introduction Getting Started Overview Typical Applications Defining VS-88H2A 4K HDMI 8x8 Matrix Switcher Mounting VS-88H2A Connecting VS-88H2A Connecting Output to a Balanced/Unbalanced Stereo Audio Acceptor Connecting to VS-88H2A via RS-232 Operating VS-88H2A via Front Panel Buttons... -
Page 3: Introduction
Kramer Electronics Ltd. Introduction Welcome to Kramer Electronics! Since 1981, Kramer Electronics has been providing a world of unique, creative, and affordable solutions to the vast range of problems that confront the video, audio, presentation, and broadcasting professional on a daily basis. In recent years, we... -
Page 4: Overview
European Advanced Recycling Network (EARN) and will cover any costs of treatment, recycling and recovery of waste Kramer Electronics branded equipment on arrival at the EARN facility. For details of Kramer’s recycling arrangements in your particular country go to our recycling pages at www.kramerav.com/support/recycling. - Page 5 Kramer Electronics Ltd. Advanced and User-friendly Operation • Easy Step-In Collaboration Function – When used with a Kramer Step-In enabled switcher, just plug in your device and press the Step-In button. Your device becomes the active signal on the main display.
-
Page 6: Typical Applications
▪ Presentation and multimedia applications. ▪ Systems that require automatic HDMI routing. Controlling your VS-88H2A Control your VS-88H2A directly via the front panel push buttons (with on-screen menus), or: • By RS-232 serial commands transmitted by a touch screen system, PC, or other serial controller. -
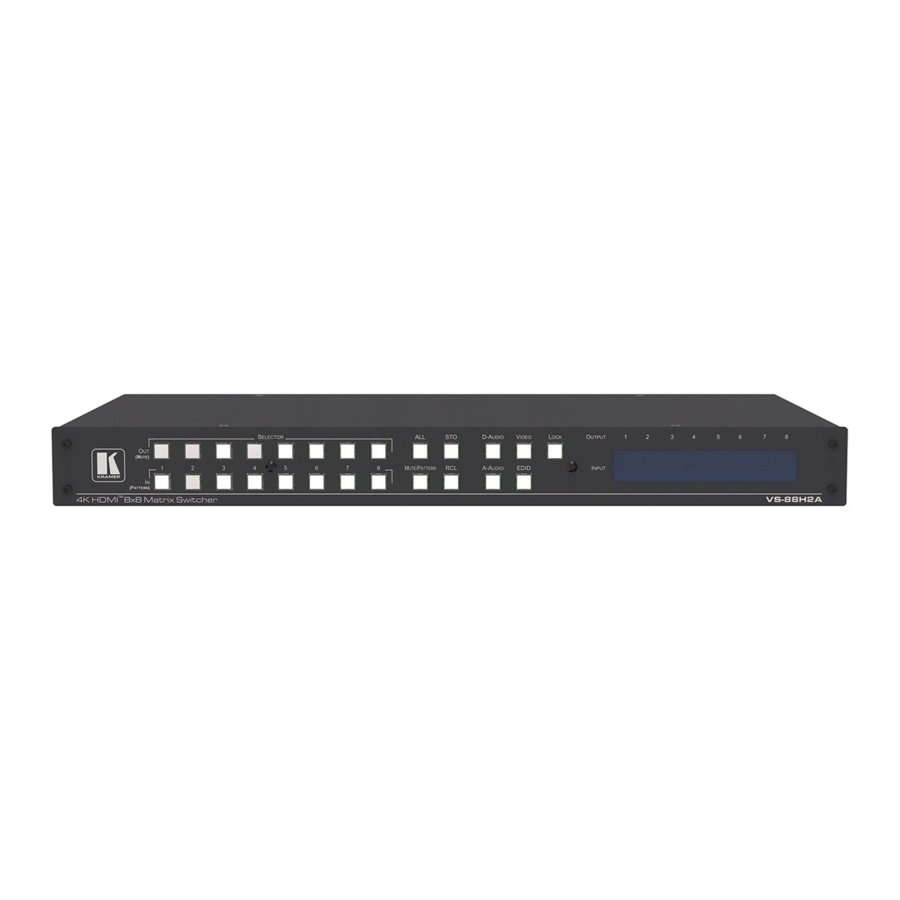
Page 7: Defining Vs-88H2A 4K Hdmi 8X8 Matrix Switcher
Kramer Electronics Ltd. Defining VS-88H2A 4K HDMI 8x8 Matrix Switcher This section defines VS-88H2A. Figure 1: VS-88H2A 4K HDMI 8x8 Matrix Switcher Front Panel Feature Function The behavior of the front panel buttons and the 7-segment display changes along with the operation modes. - Page 8 Kramer Electronics Ltd. Figure 2: VS-88H2A 4K HDMI 8x8 Matrix Switcher Rear Panel Feature Function AUDIO IN on 3.5 Mini Jack Connect to unbalanced stereo analog audio sources (from 1 to 8). Connectors INPUT HDMI Connectors Connect to HDMI sources (from 1 to 8).
-
Page 9: Mounting Vs-88H2A
Kramer Electronics Ltd. Mounting VS-88H2A This section provides instructions for mounting VS-88H2A. Before installing, verify that the environment is within the recommended range: • Operation temperature – 0 to 40C (32 to 104F). • Storage temperature – -40 to +70C (-40 to +158F). -
Page 10: Connecting Vs-88H2A
Kramer Electronics Ltd. Connecting VS-88H2A Always switch off the power to each device before connecting it to your VS-88H2A. After connecting your VS-88H2A, connect its power and then switch on the power to each device. Figure 3: Connecting to the VS-88H2A Rear Panel... -
Page 11: Connecting Output To A Balanced/Unbalanced Stereo Audio Acceptor
Figure 4: Connecting to a Balanced Stereo Audio Figure 5: Connecting to an Unbalanced Stereo Audio Acceptor Acceptor Connecting to VS-88H2A via RS-232 You can connect to VS-88H2A via an RS-232 connection using, for example, a PC. VS-88H2A features an RS-232 3-pin terminal block connector allowing the RS-232 to control VS-88H2A. -
Page 12: Operating Vs-88H2A Via Front Panel Buttons
HDMI output ARC audio is switched to analog audio output. A-AUDIO D-AUDIO Analog audio input is switched to HDMI input ARC audio. A-AUDIO Flashing D-AUDIO Flashing HDMI output ARC audio is switched to HDMI input ARC audio. A-AUDIO VS-88H2A – Operating VS-88H2A via Front Panel Buttons... -
Page 13: Routing Signals
A flashing output button means that a non-HDCP display is connected to that output. Note that in the case that an HDCP-encrypted input is routed through the matrix to a non-HDCP screen, the video will not be presented and the non-HDCP screen will turn black. VS-88H2A – Operating VS-88H2A via Front Panel Buttons... - Page 14 2. While A-AUDIO is on, select an output button (for example, 7) and then an input button (for example, 2). HDMI audio input 2 is routed to balanced stereo audio output 7 and on the 7-segment display, INPUT 2 appears under OUTPUT 7. VS-88H2A – Operating VS-88H2A via Front Panel Buttons...
- Page 15 ▪ (instead of an output button) and then an input button to route the selected input to all the outputs. All the 7-segment display LEDs flash and then display the selected input. VS-88H2A – Operating VS-88H2A via Front Panel Buttons...
- Page 16 ▪ (instead of an output button) and then an input button to route the selected input to all the outputs. All the 7-segment display LEDs flash and then display the selected input. VS-88H2A – Operating VS-88H2A via Front Panel Buttons...
- Page 17 (1 to 8). The 7-segment display LED, under the selected output, flashes. Press ALL (instead of an output button) to route the selected input to all the outputs. All the 7-segment display LEDs flash. VS-88H2A – Operating VS-88H2A via Front Panel Buttons...
-
Page 18: Muting/Unmuting An Output
(instead of an output button) to mute/unmute all the outputs. All the 7-segment display LEDs flash. 3. Press MUTE/PATTERN to mute/unmute the output. The muted output appears as “0” on the 7-segment display. VS-88H2A – Operating VS-88H2A via Front Panel Buttons... -
Page 19: Routing A Pattern To The Output
7-segment display LEDs flash. 3. Press an input button to select a pattern (see Figure The 7-segment display shows the new pattern status. Press VIDEO, D-AUDIO or A-AUDIO to exit pattern mode. VS-88H2A – Operating VS-88H2A via Front Panel Buttons... -
Page 20: Operating In Arc Mode
2. Press one or more output buttons: ▪ If the selected button flashes, that output to set to ARC mode. ▪ If the selected button stops flashing, ARC mode is disabled for that output. The LOCK button flashes. VS-88H2A – Operating VS-88H2A via Front Panel Buttons... - Page 21 The flashing 7-segment display LED shows the selected output number and ARC (for example, OUT 3) is routed to the selected balanced audio output (for example, OUT 8). An HDMI OUT ARC is routed to a balanced stereo audio output port. VS-88H2A – Operating VS-88H2A via Front Panel Buttons...
- Page 22 The LOCK button flashes until the changes are saved. The device exits the ARC mode and returns to Video switching mode. The ARC can be routed to HDMI inputs and to any of the balanced audio outputs. HDMI output is set to ARC mode. VS-88H2A – Operating VS-88H2A via Front Panel Buttons...
- Page 23 HDMI input or not. Inputs can be set either to the Step-in mode or the ARC mode. 1. Press and hold EDID and ALL simultaneously until both buttons illuminate and the device enters ARC mode: VS-88H2A – Operating VS-88H2A via Front Panel Buttons...
- Page 24 “0” under an output number indicates that the audio output is muted. 3. Press an ARC enabled input button (for example IN 1) to select the input destination port. The corresponding 7-segment display LED flashes. VS-88H2A – Operating VS-88H2A via Front Panel Buttons...
-
Page 25: Storing And Recalling A Setup
An analog audio input is routed to an HDMI input. Storing and Recalling a Setup VS-88H2A can store up to 16 setups. Each setup includes the video and audio current switching state, the output audio volume and balance, the EDID, the ARC/audio mode, and the switch mode and speed. -
Page 26: Setting Switching Mode
Manual mode (IN 1): inputs are switched to outputs via the front panel buttons. ▪ Priority mode (IN 2): the VS-88H2A switches the source with the highest priority to output. ▪ Last connected mode (IN 3): the last detected active source is switched to the output. -
Page 27: Copying Edid
3. Press a disconnected output button. 4. Press EDID. Wait for about 5 seconds for the device to copy the default EDID to the selected inputs. EDID is copied from the default. VS-88H2A – Operating VS-88H2A via Front Panel Buttons... -
Page 28: Operating Via Ethernet
Figure Figure 8: Local Area Connection Properties Window 4. Highlight either Internet Protocol Version 6 (TCP/IPv6) or Internet Protocol Version 4 (TCP/IPv4) depending on the requirements of your IT system. VS-88H2A – Operating VS-88H2A via Front Panel Buttons... - Page 29 The Internet Protocol Properties window relevant to your IT system appears as shown in Figure 9 Figure Figure 9: Internet Protocol Version 4 Properties Window Figure 10: Internet Protocol Version 6 Properties Window VS-88H2A – Operating VS-88H2A via Front Panel Buttons...
- Page 30 You can connect the Ethernet port of VS-88H2A to the Ethernet port on a network hub or using a straight-through cable with RJ-45 connectors. Configuring Ethernet Port You can set the Ethernet parameters via the embedded Web pages. VS-88H2A – Operating VS-88H2A via Front Panel Buttons...
-
Page 31: Using Embedded Web Pages
• Viewing About Us Page on page 55. To browse the VS-88H2A web pages: 1. Open your Internet browser. 2. Type the IP address of the device in the address bar of your browser. For example, the default IP address:... -
Page 32: Switching And Setting Ports
Viewing and Adjusting Input Settings on page 32. ▪ Switching an Input to an Output on page 34. ▪ Switching a Pattern to an Output on page 35. ▪ Switching Audio in Breakaway Mode on page 36. VS-88H2A – Using Embedded Web Pages... - Page 33 The adjustment sequence presented here is only an example. You can adjust the output settings in any other order. 3. Click . The output settings window appears: Figure 15: Switching Page – Editing the Output Button Settings VS-88H2A – Using Embedded Web Pages...
- Page 34 Input signal HDCP status – supports HDCP ( ) or does not support HDCP ( ▪ Input status – a source is connected ( ) or not connected ( ) to the input. Input settings are adjusted. VS-88H2A – Using Embedded Web Pages...
- Page 35 8. Select an ARC source for input 1: either from analog inputs IN 1 to IN 8, or from HDMI outputs 1 to 8. The selected port routes its audio signal to HDMI input 1. VS-88H2A – Using Embedded Web Pages...
- Page 36 Figure 20: Switching Page – AFV Tab 3. Click an output button or check the Outputs box. The button turns purple. 4. Click an Input button. The button turns purple. The selected input is switched to the output. VS-88H2A – Using Embedded Web Pages...
- Page 37 Figure 21: Switching Page – Switching a Pattern to an Output 3. Select an output button or check the Outputs box. 4. Select a pattern. The selected pattern is switched to the selected output. VS-88H2A – Using Embedded Web Pages...
- Page 38 The selected button turns purple with a black frame ▪ Click a Digital or Analog button (under the Inputs column). The selected button turns purple with a blue frame Analog Output 3 is switched to D6 VS-88H2A – Using Embedded Web Pages...
- Page 39 4. Switch an ARC input to a selected output. For example, switch ARC 1 to output 8: ▪ Click an analog output button ▪ Click an ARC button Analog Output 8 is switched to ARC 1 An ARC is switched to an output. VS-88H2A – Using Embedded Web Pages...
-
Page 40: Changing Device Settings And Upgrading Firmware
After changing the Subnet mask you need to turn the VS-88H2A power off and then on again. • If DHCP is checked, reload the Web page with the new IP address. Ethernet settings are changed. VS-88H2A – Using Embedded Web Pages... - Page 41 1. In the Navigation pane, click Device Settings. The Device Settings page appears (Figure 24). 2. Click BROWSE and select the new firmware file. 3. Click START UPGRADE and follow the instructions on-screen. Firmware is updated. VS-88H2A – Using Embedded Web Pages...
-
Page 42: Managing Web Page Security
2. Set Activate Security to ON for Web page password protection. The following window appears: Figure 27: Authentication Page – Enter Password Message 3. Enter the previous password (empty, by-default). 4. Click Confirm. The following message appears: Figure 28: Authentication Page – Security Activation Message VS-88H2A – Using Embedded Web Pages... - Page 43 6. Type the User Name (Admin, by default) and Password (left empty by default). Figure 30: Authentication Page – Password Protection 7. Click Log In. 8. Select Authentication from the Navigation pane. Figure 31: Authentication Page – Setting the Admin Password VS-88H2A – Using Embedded Web Pages...
- Page 44 Figure 34: Authentication Page – Admin Icon Security Enabled VS-88H2A embedded webpage is password protected. To access Web pages without using the password: 1. In the Navigation pane, click Authentication. The Authentication page appears. Figure 35: Authentication Page – Password Protected VS-88H2A – Using Embedded Web Pages...
- Page 45 The page reloads and can be accessed without entering the password. The top right side of the Web page displays the security icon: Figure 38: Authentication Page – Admin Icon Security Disabled VS-88H2A embedded webpage is not password protected. VS-88H2A – Using Embedded Web Pages...
-
Page 46: Setting The Timeout
ON – The audio signal routed to the output remains active when the video source (coming from a different input) is deactivated. • OFF – The audio signal routed to the output is deactivated together with the deactivation of the video source (coming from a different input). Timeouts are set. VS-88H2A – Using Embedded Web Pages... -
Page 47: Setting Switching Modes
Figure 40: Auto Switch Settings Page 2. Select an output and set the switching mode to Manual, Priority or Last connected: ▪ In the Manual mode (see Figure 40), the outputs are switched manually to the selected output. VS-88H2A – Using Embedded Web Pages... - Page 48 In the Last connected mode, select the inputs that are included in the last connected scan that will be switched to the selected output: Figure 42: Auto Switch Settings Page – Last Connected Mode Switching mode is set. VS-88H2A – Using Embedded Web Pages...
-
Page 49: Setting Step-In Devices
Setting Step-in Devices Use the Step-In Settings page to manage Step-in devices (for example Kramer DIP-30). If a step-in device is not connected to VS-88H2A, the following page appears: Figure 43: Step-In Settings Page (Step-in Device is not Connected) To manage a step-in device: 1. - Page 50 The selected step-in button is routed to all the checked outputs. Any time the output Step-in configuration changes, press the STEP-IN button on the Step-In device to update the configuration. Selecting Echo sends an instruction via VS-88H2A RS-232 port. Step-in device is controlled. VS-88H2A – Using Embedded Web Pages...
-
Page 51: Managing Edid
Reading EDID from an Output To copy an EDID from an output to an input: 1. In the Navigation pane, click EDID Management. The EDID Management page appears. Figure 46: EDID Management Page – Select an EDID Source VS-88H2A – Using Embedded Web Pages... - Page 52 Kramer Electronics Ltd. 2. Select the EDID source: a connected output. When reading from an output, make sure that the output is connected to an acceptor. Figure 47: EDID Management Page – Select an EDID output VS-88H2A – Using Embedded Web Pages...
- Page 53 5. Click OK. The following message appears: Figure 50: EDID Management Page – Loading the EDID from Output to Input 6. Click OK. EDID is copied from a selected, connected output to the selected inputs. VS-88H2A – Using Embedded Web Pages...
- Page 54 Reading EDID from an Input To read the EDID from an input to another input/s: 1. In the Navigation pane, click EDID Management. The EDID Management page appears. 2. Select an input from the list (on the left). VS-88H2A – Using Embedded Web Pages...
- Page 55 Reading EDID from a File To read the EDID from a file: 1. In the Navigation pane, click EDID Management. The EDID Management page appears. 2. Click File BROWSE and open the EDID file. VS-88H2A – Using Embedded Web Pages...
- Page 56 5. Click OK. 6. Follow the instructions on-screen. EDID is copied from a file. When viewing the 7-segment display in the EDID mode, the input with EDID read from a file will display “L”. VS-88H2A – Using Embedded Web Pages...
-
Page 57: Viewing About Us Page
Kramer Electronics Ltd. Viewing About Us Page VS-88H2A About page lets you view the webpage version and Kramer Electronics Ltd details. Figure 56: About Page VS-88H2A – Using Embedded Web Pages... -
Page 58: Upgrading Firmware
The latest version of K-UPLOAD and installation instructions can be downloaded from our website at: www.kramerav.com/support/product_downloads.asp. Note that in order to use the micro-USB port, you need to install the Kramer USB driver, available at: www.kramerav.com/support/product_downloads.asp. VS-88H2A – Upgrading Firmware... -
Page 59: Technical Specifications
Shipping Dimensions (W, D, H) 52.5cm x 33cm x 10.7cm (20.7” x 13” x 4.2”) Net Weight 2.5kg (5.5lbs) approx. Shipping Weight 3.4kg (7.4lbs) approx. Accessories Included Rack ears, power cord Specifications are subject to change without notice at www.kramerav.com VS-88H2A – Technical Specifications... -
Page 60: Default Communication Parameters
Front panel buttons: power off the device, press and hold the LOCK, EDID and STO buttons simultaneously for 3 seconds while powering the device, and then release. “#factory” command. Protocol 3000: Web Pages: In the Device Settings page, click Reset. VS-88H2A – Technical Specifications... -
Page 61: Input Or Output Resolutions
1440*480I60 3840*2160P24 480P60 1280*960P60 1440*240P60 3840*2160P23 480P59 1280*768P60 1440*480P60 1080P60 480i60 1280*768P60rb 720*576P50 1080P59 480i59 1152*864P75 1440*576I50 1080P50 1920*1200P60rb 1024*768P75 1280*768P75 1080P30 1680*1050P60 1024*768P70 1280*800P60 1080P29 1680*1050P60rb 1024*768P60 1360*768P60 1080P25 1600*1200P60 848*480P60 1280*1024P75 1080P24 1600*900P60rb 800*600P75 VS-88H2A – Technical Specifications... -
Page 62: Default Parameters
Default switching mode - Manual, IN1 to OUT1,etc for 2,to 8 manual/auto Default EDID Kramer default EDID with "monitor name"= "VS-88UH2A" Lock EDID state Not locked Video Signal loss timeout (no 5V) Video Signal loss timeout (5V is on) -
Page 63: Default Edid
1152 x 864p at 70Hz - VESA STD 1280 x 960p at 60Hz - VESA STD Report information Date generated... 5/25/2021 Software revision..2.60.0.972 Data source....Real-time 0xB700 - NB: improperly installed Operating system..6.2.9200.2 Raw data 00,FF,FF,FF,FF,FF,FF,00,2D,B2,ED,03,01,00,00,00,14,1A,01,03,80,34,20,78,E2,B3,25,AC,51,30,B4,26, 10,50,54,FF,FF,80,81,8F,81,99,A9,40,61,59,45,59,31,59,71,4A,81,40,02,3A,80,18,71,38,2D,40,58,2C, 45,00,A0,5A,00,00,00,1E,00,00,00,FF,00,32,39,35,2D,38,38,33,34,35,30,31,30,30,00,00,00,FC,00,56, 53,2D,38,38,48,32,41,0A,20,20,20,20,00,00,00,FD,00,38,4C,1E,53,11,00,0A,20,20,20,20,20,20,01,9B VS-88H2A – Technical Specifications... - Page 64 Detailed timing #4..1366x768p at 60Hz (16:9) Modeline...."1366x768" 101.610 1366 1894 1943 2086 768 772 777 813 +hsync +vsync Detailed timing #5..720x576p at 50Hz (4:3) Modeline...."720x576" 27.370 720 728 841 880 576 578 596 621 -hsync -vsync VS-88H2A – Technical Specifications...
- Page 65 Date generated... 19/02/2019 Software revision..2.70.0.989 Data source....Real-time 0x0071 Operating system..6.1.7601.2.Service Pack 1 Raw data FF,FF,FF,FF,FF,FF,00,2D,B2,00,12,00,00,00,00,0E,1A,01,03,80,34,20,78,E2,B3,25,AC,51,30,B4,26 , 10,50,54,2 D,CF,00,A9,C0,81,00,A9,40,61,59,45,59,31,59,71,4F,81,40,02,3A,80,18,71,38,2D,40,58,2C , 45,00,0 F,24,21,00,00,1E,00,00,00,FD,00,38,4C,1E,53,11,00,0A,20,20,20,20,20,20,00,00,00,FC,00,56, 4 D,2D,31,30,48,32,0A,20,20,20,20,20,00,00,00,F7,00,00,08,42,A2,20,00,00,00,00,00,00,00,00,01,AF , 02,03,23 C1,50,90,05,02,14,1F,20,22,5D,5F,61,62,64,66,67,69,6B,23,09,07,07,83,01,00,00,65,03,0C , 00,10,03,51,03 D0,05,21,F0,2D,00,58,31,45,00,0F,1A,21,00,00,9E,51,13,54,D0,32,E0,2D,10,10,31,45 , BA,88,21,00,00,1E,11,21,56,D0,52,00,2D,30,10,31,45,80,BA,88,21,00,00,1E,B1,27,56,D0,52,00,2D , 30,10,31,45,80,BA,88,21,00,00,1E,B1,0A,D0,A0,20,40,2D,20,08,71,22,01,80,E0,21,00,00,00,00,F1,CF VS-88H2A – Technical Specifications...
-
Page 66: Protocol 3000
Kramer Electronics Ltd. Protocol 3000 Kramer devices can be operated using Kramer Protocol 3000 commands sent via serial or Ethernet ports. Understanding Protocol 3000 Protocol 3000 commands are a sequence of ASCII letters, structured according to the following. • Command format:... -
Page 67: Protocol 3000 Commands
8 – HDMI OUT 8 9 – Analog OUT 1 10 – Analog OUT 2 11 – Analog OUT 3 12– Analog OUT 4 13– Analog OUT 5 14– Analog OUT 6 15– Analog OUT 7 16– Analog OUT 8 VS-88H2A – Protocol 3000... - Page 68 5 – HDMI OUT 5 6 – HDMI OUT 6 7 – HDMI OUT 7 8 – HDMI OUT 8 – Connection connection_mode mode 0 – manual 1 – priority switch 2 – last connected switch VS-88H2A – Protocol 3000...
- Page 69 EEPROM and Option 2: used when powering ~nn@BAUDbaud_rate1,baud_rate2,...<CR><LF> Default baud rate is 115200 (on factory reset). Only works with devices supporting this command (if ERR 002 is returned, the default baud rate is used). VS-88H2A – Protocol 3000...
- Page 70 #ETH-PORTport_type,port_id<CR> for TCP to port 12457: (2000 – 65535) #ETH-PORT0,12457<CR> FEEDBACK If the port number ~nn@ETH-PORTport_type,port_id<CR><LF> you enter is already in use, an error is returned. The port number must be within the following range: 0-(2^16-1). VS-88H2A – Protocol 3000...
- Page 71 On/Off 0 – HDCP Off 1 – HDCP On – Name of a specific cmd_name HELP Get command list or COMMAND Get the command list: help for specific #HELP<CR> #HELP<CR> command command. FEEDBACK 1. Multi-line: ~nn@Devicecmd_name,cmd_name…<CR><LF> VS-88H2A – Protocol 3000...
- Page 72 4 – HDMI OUT 4 5 – HDMI OUT 5 6 – HDMI OUT 6 7 – HDMI OUT 7 8 – HDMI OUT 8 – On/Off (enable/disable) switch custom label – Custom label string label_txt VS-88H2A – Protocol 3000...
- Page 73 It is not mandatory to enable the permission system in order to use the device In each device, some connections allow logging in to different levels. Some do not work with security at all. Connection may logout after timeout. VS-88H2A – Protocol 3000...
- Page 74 3 – Analog OUT 3 4 – Analog OUT 4 5 – Analog OUT 5 6 – Analog OUT 6 7 – Analog OUT 7 8 – Analog OUT 8 – On/Off mute_mode 0 – Off 1 – On VS-88H2A – Protocol 3000...
- Page 75 1 – Try to use DHCP. If the Network ID, by default, is 0, which is unavailable, use the IP set by the factory or using the net- the Ethernet control ip or net-config command. port. VS-88H2A – Protocol 3000...
- Page 76 3 – Step-in out 3 4 – Step-in out 4 5 – Step-in out 5 6 – Step-in out 6 7 – Step-in out 7 8 – Step-in out 8 Setting ‘1’ says that the corresponding action must be executed. VS-88H2A – Protocol 3000...
- Page 77 – Preset number preset PRST-RCL Recall saved preset COMMAND Recall preset 1: list. #PRST-RCLpreset<CR> #PRST-RCL1<CR> FEEDBACK In most units, video ~nn@PRST-RCLpreset<CR><LF> and audio presets with the same number are stored and recalled together by commands #PRST-STO and #PRST-RCL. VS-88H2A – Protocol 3000...
- Page 78 0 – module doesn’t support Step- 1 – module supports Step-in None – 8 in_count – Number of cntl_btn_count control buttons on module – Type2… typeN – Input in_src type according to num_of_inputs 0 – Undefined 2 – HDMI VS-88H2A – Protocol 3000...
- Page 79 8 – HDMI OUT 8 – Signal type signal_src 0 – No signal 2 – HDMI – 14 decimal digits, serial_num Get device serial COMMAND Get the device serial number: number. #SN?<CR> #SN?<CR> factory assigned FEEDBACK ~nn@SNserial_num<CR><LF> VS-88H2A – Protocol 3000...
- Page 80 This is a legacy command. New Step- 4 – HDMI OUT 4 in modules support the 5 – HDMI OUT 5 ROUTE command. 6 – HDMI OUT 6 7 – HDMI OUT 7 8 – HDMI OUT 8 VS-88H2A – Protocol 3000...
- Page 81 3 – Analog OUT 3 4 – Analog OUT 4 5 – Analog OUT 5 6 – Analog OUT 6 7 – Analog OUT 7 8 – Analog OUT 8 – Volume level 0 to vol_level 100%; VS-88H2A – Protocol 3000...
-
Page 82: Result And Error Codes
(Reserved) ERR_RESERVED_8 (Reserved) ERR_RESERVED_9 (Reserved) ERR_RESERVED_10 (Reserved) ERR_RESERVED_11 (Reserved) ERR_RESERVED_12 (Reserved) ERR_EDID_CORRUPTED EDID corrupted ERR_NON_LISTED Device specific errors File has the same CRC – no changed ERR_SAME_CRC ERR_WRONG_MODE Wrong operation mode ERR_NOT_CONFIGURED Device/chip was not initialized VS-88H2A – Protocol 3000... - Page 83 This limited warranty gives you specific legal rights, and you may have other rights which vary from country to country or state to state. This limited warranty is void if (i) the label bearing the serial number of this product has been removed or defaced, (ii) the product is not distributed by Kramer Electronics or (iii) this product is not purchased from an authorized Kramer Electronics reseller.
- Page 84 SAFETY WARNING Disconnect the unit from the power supply before opening and servicing For the latest information on our products and a list of Kramer distributors, visit our website where updates to this user manual may be found. We welcome your questions, comments, and feedback.
Need help?
Do you have a question about the VS-88H2A and is the answer not in the manual?
Questions and answers