
Related Manuals for Kramer VSM-4x4HFS


Summary of Contents for Kramer VSM-4x4HFS
- Page 1 K R A ME R E LE CT R O N IC S L TD . USER MANUAL MODEL: VSM-4x4HFS 4x4 Seamless Matrix Switcher/Multi-Scaler P/N: 2900-300362 Rev 1...
-
Page 4: Table Of Contents
Figure 3: Connecting the VSM-4x4HFS Presentation Switcher / Scaler Figure 4: The VSM-4x4HFS Video Wall Operation Mode Figure 5: Connecting the VSM-4x4HFS in the Video Wall Operation Mode Figure 6: VSM-4x4HFS Bezel Correction Figure 7: Connecting the VSM-4x4HFS in the Dual Operation Mode... - Page 5 Figure 8: the VSM-4x4HFS QUAD Operation Mode Input Orientation Figure 9: Connecting the VSM-4x4HFS in the Quad Operation Mode Figure 10: Local Area Connection Properties Window Figure 11: Internet Protocol Version 4 Properties Window Figure 12: Internet Protocol Version 6 Properties Window...
-
Page 6: Introduction
Introduction Welcome to Kramer Electronics! Since 1981, Kramer Electronics has been providing a world of unique, creative, and affordable solutions to the vast range of problems that confront video, audio, presentation, and broadcasting professionals on a daily basis. In recent years, we have redesigned and upgraded most of our... -
Page 7: Getting Started
Achieving the Best Performance To achieve the best performance: Use only good quality connection cables (we recommend Kramer high- performance, high-resolution cables) to avoid interference, deterioration in signal quality due to poor matching, and elevated noise levels (often associated with low quality cables) ... -
Page 8: Safety Instructions
Kramer Electronics has made arrangements with the European Advanced Recycling Network (EARN) and will cover any costs of treatment, recycling and recovery of waste Kramer Electronics branded equipment on arrival at the EARN facility. For details of Kramer’s recycling arrangements in your particular country go to our recycling pages at http://www.kramerelectronics.com/support/recycling/. -
Page 9: Overview
The VSM-4x4HFS is a high−performance 4x4 Seamless Matrix Switcher/Multi- Scaler that allows switching between inputs via a clean video CUT (frame-to-frame switching with no glitches). The VSM-4x4HFS can perform as a matrix switcher, a 2x2 video wall, and also features dual and quad multi-viewing options. -
Page 10: Defining The Vsm-4X4Hfs 4X4 Seamless Matrix Switcher/Multi-Scaler
Via the Ethernet with built-in Web pages The VSM-4x4HFS is housed in a 19” 1U rack mountable enclosure, with rack “ears” included, and is fed from a 100-240 VAC universal switching power supply. Defining the VSM-4x4HFS 4x4 Seamless Matrix Switcher/Multi-Scaler This section defines the VSM-4x4HFS. -
Page 11: Figure 1: Vsm-4X4Hfs 4X4 Seamless Matrix Switcher/Multi-Scaler Front Panel
Figure 1: VSM-4x4HFS 4x4 Seamless Matrix Switcher/Multi-Scaler Front Panel Feature Function IR LED Lights when the unit accepts IR remote commands IR Receiver Receives signals from the remote control transmitter OUTPUT/WINDOW In the MATRIX mode: select the output to which the input is switched (A, B, C or D) -
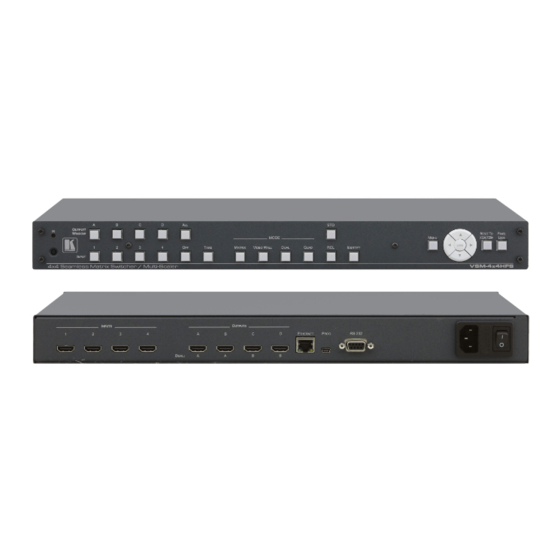
Page 12: Figure 2: Vsm-4X4Hfs 4X4 Seamless Matrix Switcher/Multi-Scaler Rear Panel
Press and hold for about 4 seconds to toggle resetting the video resolution to XGA or 720p I Button PANEL LOCK Button Press and hold for about 2 seconds to lock/unlock the front panel buttons Figure 2: VSM-4x4HFS 4x4 Seamless Matrix Switcher/Multi-Scaler Rear Panel Feature Function INPUT HDMI Connectors... -
Page 13: Installing In A Rack
Installing in a Rack This section provides instructions for rack mounting the unit. VSM-4x4HFS - Installing in a Rack... -
Page 14: Connecting And Operating The Vsm-4X4Hfs
5.1.1 Connecting the VSM-4x4HFS in the Matrix Operation Mode To connect the VSM-4x4HFS in the MATRIX mode, as illustrated in the example in Figure 3, do the following: 1. Connect up to four HDMI sources (for example, laptops and/or Blu-ray disk players) to the HDMI INPUT connectors (from INPUT 1 to INPUT 4). -
Page 15: Figure 3: Connecting The Vsm-4X4Hfs Presentation Switcher / Scaler
Section 6.3 The ETHERNET port, see Section 6.4 Figure 3: Connecting the VSM-4x4HFS Presentation Switcher / Scaler 5.1.2 Operating in the Matrix Mode To select the inputs via the front panel buttons/IR remote control transmitter: 1. Select the Matrix operation mode. -
Page 16: The Video Wall Mode
In the video wall mode the audio of the selected input is routed to one of the outputs. Figure 4: The VSM-4x4HFS Video Wall Operation Mode 5.2.1 Connecting the VSM-4x4HFS in the Video Wall Operation Mode To connect the video wall as illustrated in Figure 5, do the following: 1. -
Page 17: Figure 5: Connecting The Vsm-4X4Hfs In The Video Wall Operation Mode
Figure 5: Connecting the VSM-4x4HFS in the Video Wall Operation Mode 5.2.2 Operating in the Video Wall Mode To select the inputs via the front panel buttons/IR remote control transmitter: 1. Select the Video Wall operation mode. 2. Press an input to switch to the output. -
Page 18: Figure 6: Vsm-4X4Hfs Bezel Correction
In the example in Figure 6 the top photo shows the video wall before bezel connection and the lower photo shows the corrected image on the video wall. Figure 6: VSM-4x4HFS Bezel Correction VSM-4x4HFS - Connecting and Operating the VSM-4x4HFS... -
Page 19: The Dual Mode
The Dual Mode In the Dual operation mode the VSM-4x4HFS is set as a 4x2 switcher with picture-in- picture capabilities that outputs two identical A outputs and two identical B outputs (see Figure The dual outputs display any two selected input signals together on one screen. -
Page 20: Figure 7: Connecting The Vsm-4X4Hfs In The Dual Operation Mode
Figure 7: Connecting the VSM-4x4HFS in the Dual Operation Mode Note that in this example “Show” is selected in the BORDER menu item (see Section 6.2.1) to display all the borders. 5.3.2 Operating in the Dual Mode To select the inputs via the front panel buttons/IR remote control transmitter: 1. -
Page 21: The Quad Mode
QUAD mode (this order cannot be configured): Figure 8: the VSM-4x4HFS QUAD Operation Mode Input Orientation 5.4.1 Connecting the VSM-4x4HFS in the Quad Operation Mode To connect the VSM-4x4HFS in the QUAD mode as illustrated in Figure 9, do the following: 1. -
Page 22: Figure 9: Connecting The Vsm-4X4Hfs In The Quad Operation Mode
Figure 9: Connecting the VSM-4x4HFS in the Quad Operation Mode Note that in this example “Only Selected” is selected in the BORDER menu item (see Section 6.2.1) to display only the border of the selected output. VSM-4x4HFS - Connecting and Operating the VSM-4x4HFS... -
Page 23: Controlling The Vsm-4X4Hfs
The infrared remote control transmitter (see Section 6.5) Controlling via the Front Panel Buttons The VSM-4x4HFS includes the following front panel buttons: Input selector buttons for selecting the required INPUT, HDMI (1 to 4) and OUTPUT/WINDOW selector buttons (A to D) ... - Page 24 Switching Inputs to Outputs The switching procedures are different for each of the four operation modes. Note that incomplete operations on the VSM-4x4HFS timeout after 15 seconds. Matrix Mode To switch an input to an output in the Matrix mode: 1.
- Page 25 The selected input is switched to all outputs. 6.1.1.2 Disconnecting an Input from an Output To disconnect an input from an output: 1. Press the required OUTPUT button. The selected output Illuminates. 2. Press the OFF button. The selected output is disconnected. VSM-4x4HFS - Controlling the VSM-4x4HFS...
- Page 26 The TAKE Button You can choose to work in the At Once or the Confirm mode. When the VSM-4x4HFS operates in the At Once mode, pressing an output-input combination implements the action immediately. In the Confirm mode, the TAKE button must be pressed to activate the switch.
- Page 27 INPUT buttons. The stored setups are saved in the non-volatile memory. Note that you can also store and recall a setup via the OSD menu (see Section 6.2.1) and the Web pages (see Section VSM-4x4HFS - Controlling the VSM-4x4HFS...
- Page 28 Muting the audio output – press and hold (for 3 seconds) the ALL button to toggle between muting (blocking out the sound) and enabling the audio output Resetting the machine – press the MENU Button while plugging the power to reset the machine VSM-4x4HFS - Controlling the VSM-4x4HFS...
-
Page 29: Using The Osd Menu
Using the OSD Menu The control buttons let you control the VSM-4x4HFS via the OSD menu. Press the: MENU button to enter the menu The default timeout is set to 10 seconds ENTER button to accept changes and to change the menu settings ... - Page 30 OUT C, OUT D, Default or FILE INPUT 4 Set the output from which the EDID is read to input 4: OUT A, OUT B, OUT C, OUT D, Default or FILE Note that EDID does not support 4k2k and 3D VSM-4x4HFS - Controlling the VSM-4x4HFS...
- Page 31 VIDEO QUAD 3: IN 1, IN 2, IN 3 or IN 4 VIDEO QUAD 4: IN 1, IN 2, IN 3 or IN 4 Select the AUDIO SOURCE: IN 1, IN 2, IN 3 or IN 4 EXIT Exit the source mode VSM-4x4HFS - Controlling the VSM-4x4HFS...
- Page 32 2 minutes if no input is present. This is useful, for example, when the output is connected to a projector, and the projector will automatically shut down when it has no input VSM-4x4HFS - Controlling the VSM-4x4HFS...
-
Page 33: Connecting To The Vsm-4X4Hfs Via Rs-232
Click to exit the main menu Connecting to the VSM-4x4HFS via RS-232 You can connect to the VSM-4x4HFS via an RS-232 connection using, for example, a PC. Note that a null-modem adapter/connection is not required. To connect to the VSM-4x4HFS via RS-232, connect the RS-232 9-pin D-sub rear... -
Page 34: Operating Via Ethernet
6.4.1 Connecting the Ethernet Port Directly to a PC You can connect the Ethernet port of the VSM-4x4HFS directly to the Ethernet port on your PC using a crossover cable with RJ-45 connectors. This type of connection is recommended for identifying the VSM-4x4HFS with the factory configured default IP address. -
Page 35: Figure 10: Local Area Connection Properties Window
4. Highlight either Internet Protocol Version 6 (TCP/IPv6) or Internet Protocol Version 4 (TCP/IPv4) depending on the requirements of your IT system. 5. Click Properties. The Internet Protocol Properties window relevant to your IT system appears as shown in Figure 11 Figure VSM-4x4HFS - Controlling the VSM-4x4HFS... -
Page 36: Figure 11: Internet Protocol Version 4 Properties Window
Figure 11: Internet Protocol Version 4 Properties Window Figure 12: Internet Protocol Version 6 Properties Window VSM-4x4HFS - Controlling the VSM-4x4HFS... -
Page 37: Figure 13: Internet Protocol Properties Window
8. Click Close. 6.4.2 Connecting the Ethernet Port via a Network Hub or Switch You can connect the Ethernet port of the VSM-4x4HFS to the Ethernet port on a network hub or using a straight-through cable with RJ-45 connectors. 6.4.3... -
Page 38: Controlling Via The Infrared Remote Control Transmitter
Controlling via the Infrared Remote Control Transmitter You can control the VSM-4x4HFS from the infrared remote control transmitter: Keys Function POWER Toggle the power save mode ON or OFF IDENTIFY Identify the inputs on each output INFO Press to indicate on each... -
Page 39: Using The Ir Remote Control In The Dual Mode
Figure 15 shows the remote control with dual mode operation instructions. Note that these instructions are further detailed in the following pages. Figure 15: IR Remote Control Transmitter Dual Mode Shortcuts VSM-4x4HFS - Controlling the VSM-4x4HFS... - Page 40 B (i) POP A: press AUDIO 1/AUDIO 2 to select the Left/Right audio source for A POP B: press the AUDIO 3/AUDIO 4 to select the Left/Right audio source for B (i) VSM-4x4HFS - Controlling the VSM-4x4HFS...
- Page 41 Press the OK button to swap between main and PIP windows (n) 6.6.2 Using the Transmitter in the Dual Mode (2) To use the DUAL mode Shortcuts: To select the inputs to switch to the outputs: For PIP/POP A: For PIP/POP B: VSM-4x4HFS - Controlling the VSM-4x4HFS...
- Page 42 To set the audio source: For PIP/POP A: For PIP/POP B: To perform various PIP mode operations (make sure you are in the PIP mode): VSM-4x4HFS - Controlling the VSM-4x4HFS...
- Page 43 VSM-4x4HFS - Controlling the VSM-4x4HFS...
-
Page 44: Firmware Upgrade Via Usb
To upgrade the firmware: 1. Connect the VSM-4x4HFS USB connector to the PC via a USB cable while the power supply is disconnected. 2. Connect the power supply and turn the VSM-4x4HFS on. The PC automatically connects with the VSM-4x4HFS and a file folder opens on screen (same as would open when using a Memory stick). -
Page 45: Using The Embedded Web Pages
Using the Embedded Web Pages The Web pages let you control the VSM-4x4HFS via the Ethernet. The Web pages include all the OSD items and more, and are accessed using a Web browser and an Ethernet connection. Before attempting to connect: ... -
Page 46: The Routing Page
Routing page that is also the first page that appears following the loading page. The routing page includes a tab for each of the four operation modes. Figure 16: The Routing Page VSM-4x4HFS - Using the Embedded Web Pages... -
Page 47: Figure 17: The Matrix Tab Output Resolution
NO SIGNAL in this example). To switch an Input to an Output in the Matrix mode click an output and then click an input button to switch to that output. Open the Res drop-down-box to select the output resolution. VSM-4x4HFS - Using the Embedded Web Pages... -
Page 48: Figure 18: The Matrix Tab - Set The Output Resolution
Click the edit icon to edit the input button. This window lets you edit the input label: Figure 19: The Matrix Tab – the Input Edit Window Type a label name (for example, DVD Player): VSM-4x4HFS - Using the Embedded Web Pages... -
Page 49: Figure 20: The Matrix Tab - Type The New Label
Web pages: Figure 21: The Matrix Tab – View the Label Click to exit the input editing window. 8.2.1.2 Storing and Recalling a Configuration Click the Store button to store a configuration: VSM-4x4HFS - Using the Embedded Web Pages... -
Page 50: Figure 22: The Matrix Tab - Store A Configuration
Figure 23: The Matrix Tab – Recall a Configuration 1. Select one of the four presets. The configuration is uploaded. 2. Click the icon to exit the preset window. VSM-4x4HFS - Using the Embedded Web Pages... -
Page 51: Figure 24: The Video Wall Tab
8.2.1.2) and set the output resolution. 8.2.2.1 Bezel Correction Set the horizontal and vertical bezel correction (see Section 5.2) via the video Wall tab: Figure 25: The Video Wall Tab – Bezel Correction VSM-4x4HFS - Using the Embedded Web Pages... -
Page 52: Figure 26: The Dual Tab - Pop Mode
8.2.1.2) and set the output resolution. Figure 26 shows the POP mode: Figure 26: The Dual Tab – POP Mode Figure 27 shows the PIP mode: Figure 27: The Dual Tab – PIP Mode VSM-4x4HFS - Using the Embedded Web Pages... -
Page 53: Figure 28: The Dual Tab - Pip Position
Click one of the four input buttons to switch an input to each output. You can edit the input label (see Section 8.2.1.1), store and recall a Quad configuration (see Section 8.2.1.2), set the borders and set the output resolution. VSM-4x4HFS - Using the Embedded Web Pages... -
Page 54: The Device Settings Page
Figure 29: The Quad Tab The Device Settings Page The device Settings window (in Figure 30) lets you upgrade the firmware and set the Ethernet parameters. Figure 30: The Device Settings Page VSM-4x4HFS - Using the Embedded Web Pages... -
Page 55: Figure 31: The Device Settings Page - Ethernet Settings
Set changes button. Note that: When changing the IP number, the change is immediate and the Web page reloads with the new IP number (see Figure 32). Figure 31: The Device Settings Page – Ethernet Settings VSM-4x4HFS - Using the Embedded Web Pages... -
Page 56: Figure 32: The Device Settings Page - Ip Number Settings
Click the Factory reset button to reset the device. Note that you will have to type the new IP into your URL after reset is complete (about 10 seconds). Figure 34: The Device Settings Page – Factory Reset VSM-4x4HFS - Using the Embedded Web Pages... -
Page 57: The Output Settings Page
For each output you can set the output label, the HDCP state, as well as the Contrast, Brightness, Saturation and Hue. Click the Reset All buttons to reset the output settings for all outputs. VSM-4x4HFS - Using the Embedded Web Pages... -
Page 58: The Hdcp Settings Page
The HDCP Settings Page The HDCP settings page summarizes the HDCP data for the inputs and outputs and lets you change them. Figure 36: The HDCP Settings Page VSM-4x4HFS - Using the Embedded Web Pages... -
Page 59: The Edid Page
Figure 38 shows how to select a resolution from the list and select one or more inputs. To copy, click the Copy button: Figure 38: The EDID Page – Copying the Native Timing VSM-4x4HFS - Using the Embedded Web Pages... -
Page 60: Figure 39: The Edid Page - Copying The Default
The EDID page displays the machine name, selected resolution, the audio channels and deep color support. After clicking the Copy button, the EDID page shows the copy EDID results: Figure 40: The EDID Page –The Copy EDID Results VSM-4x4HFS - Using the Embedded Web Pages... -
Page 61: The About Page
The About Page The VSM-4x4HFS About page lets you view the Web page version and Kramer Electronics Ltd details. Figure 41: The About Page Save or Upload a Configuration The VSM-4x4HFS Web page lets you upload a saved configuration or save a configuration. -
Page 62: Technical Specifications
Full Factory Reset Go to : Menu-> FACTORY DEFAULT -> Change the option to YES and press Enter Use “FACTORY” command P3000 Front panel buttons Press the MENU Button while plugging the power to reset the machine VSM-4x4HFS - Technical Specifications... -
Page 63: Table Of Supported Input Resolutions
1024x768p70 1360x768p60 1920x1080p60 (1080p60) 1024x768p75 1366x768p60RB 1920x1200p60RB 1024x768p85 1366x768p60 1152x864p70 1400x1050p60RB Table of Supported Output Resolutions Resolution Resolution Resolution Native 1080p50 1440x900 480p 1080p60 1600x900 576p 1024x768 1600x1200 720p50 1280x800 1680x1050 720p60 1280x1024 1920x1200 1080p24 1366x768 VSM-4x4HFS - Technical Specifications... -
Page 64: The Vsm-4X4Hfs Rs-232 Communication Protocol
The VSM-4x4HFS RS-232 Communication Protocol The VSM-4x4HFS can be operated using serial commands from a PC, remote controller, or touch screen. The unit communicates using the default Kramer Protocol 3000. 10.1 Protocol 3000 Kramer Protocol 3000 syntax (see section 10.1.1) ... - Page 65 Note: A string can contain more than one command. Commands are separated by a pipe ( '|' ) character. Message starting character '#' – For host command/query '~' – For machine response Device address (Optional, for K-NET) K-NET Device ID followed by '@' VSM-4x4HFS - The VSM-4x4HFS RS-232 Communication Protocol...
- Page 66 You can directly enter all commands using a terminal with ASCII communications software, such as HyperTerminal, Hercules, etc. Connect the terminal to the serial or Ethernet port on the Kramer device. To enter CR press the Enter key. ( LF is also sent but is ignored by command parser).
-
Page 67: Kramer Protocol 3000 Commands
#NET-IP NTIP Set device IP address #NET-IP? NTIP? Get device IP address #NET-MAC? NTMC? Get MAC address #NET-MASK NTMSK Set device subnet mask #NET-MASK? NTMSK? Get device subnet mask #BRIGHTNESS #CONTRAST #CONTRAST? #IMAGE-PROP VSM-4x4HFS - The VSM-4x4HFS RS-232 Communication Protocol... -
Page 68: Kramer Protocol 3000 - Detailed Commands
1366x768p60 720x576p50 (576p) 1400x1050p60RB 800x600p56 1400x1050p60 800x600p60 1440x900p60RB 800x600p72 1440x900p60 800x600p75 1440x900p75 800x600p85 1600x900p60RB 1024x768p60 1600x1200p60 1024x768p70 1680x1050p60RB 1024x768p75 1680x1050p60 1024x768p85 1920x1080p23 (1080p23) 1152x864p70 1920x1080p24 (1080p24) 1152x864p75 1920x1080p25 (1080p25) 1280x720p25 (720p25) 1920x1080p29 (1080p29) VSM-4x4HFS - The VSM-4x4HFS RS-232 Communication Protocol... - Page 69 End User Public Get: Description Syntax Reset device to factory default Set: #FACTORY␍ configuration Get: Response ~nn@FACTORY␠OK␍␊ Notes This command deletes all user data from the device. The deletion can take some time. VSM-4x4HFS - The VSM-4x4HFS RS-232 Communication Protocol...
- Page 70 Command Type – System-mandatory PROT-VER? Command Name Permission Transparency Set: PROT-VER? Get: End User Description Syntax Set: Get : Get protocol version #PROT-VER?␍ Response ~nn@PROT-VER␠3000:version␍␊ Parameters Version – Format: XX.XX where X is a decimal digit VSM-4x4HFS - The VSM-4x4HFS RS-232 Communication Protocol...
- Page 71 Command Command Name Permission Transparency Set: Get: VERSION? End User Description Syntax Set: Get : Get version number #VERSION?␍ Response ~nn@VERSION␠firmware_version␍␊ Parameters firmware_version – Format: XX.XX.XXXX where the digits group are: major.minor.build version VSM-4x4HFS - The VSM-4x4HFS RS-232 Communication Protocol...
- Page 72 (button press, device menu and similar) or genlock status changed Notes Set HDCP working mode on device input : – HDCP_ON [default] HDCP supported HDCP not supported – HDCP OFF HDCP support changes following detected sink – MIRROR OUTPUT VSM-4x4HFS - The VSM-4x4HFS RS-232 Communication Protocol...
- Page 73 Command Type - System Command Name Permission Transparency Set: Get: INFO-IO? End User Public Description Syntax Set: Get: Get in/out count #INFO-IO?␍ Response ~nn@INFO-IO?␠IN␠ inputs_count, OUT␠outputs_count␍␊ Parameters IN inputs_count = 4 OUT outputs_count = 4 VSM-4x4HFS - The VSM-4x4HFS RS-232 Communication Protocol...
- Page 74 Command Type - System Command Name Permission Transparency Set: Get: PRST-LST? End User Public Description Syntax Set: Get: Get saved preset list #PRST-LST?␍ Response ~nn@PRST-LST␠ preset, preset, … ␍␊ Parameters Preset = 1,2,3,4 VSM-4x4HFS - The VSM-4x4HFS RS-232 Communication Protocol...
- Page 75 Get: Response ~nn@PRST-STO␠ preset␍␊ Parameters preset – 1,2,3 or 4 Notes In most units, video and audio presets with the same number are stored and recalled together by commands #PRST-STO and #PRST-RCL VSM-4x4HFS - The VSM-4x4HFS RS-232 Communication Protocol...
- Page 76 After execution, response is sent to the com port from which the Get was received Response is sent after every change in input signal status ON to OFF, or OFF to ON VSM-4x4HFS - The VSM-4x4HFS RS-232 Communication Protocol...
- Page 77 After execution, response is sent to the com port from which the Set /Get was received After execution, response is sent to all com ports if VID-RES was set by any other external control device (button press, device menu and similar) VSM-4x4HFS - The VSM-4x4HFS RS-232 Communication Protocol...
- Page 78 To connect with a randomly assigned IP by DHCP, specify the device DNS name (if available) using the command “NAME”. You can also get an assigned IP by direct connection to USB or RS-232 protocol port if available. For proper settings consult your network administrator. VSM-4x4HFS - The VSM-4x4HFS RS-232 Communication Protocol...
- Page 79 Command Name Permission Transparency Set: NET-MAC? Get: End User Description Syntax Set: Get : Get MAC address #NET-MAC?␍ Response ~nn@NET-MAC␠mac_address␍␊ Parameters mac_address – Unique MAC address. Format: XX-XX-XX-XX-XX-XX where X is hex digit. VSM-4x4HFS - The VSM-4x4HFS RS-232 Communication Protocol...
- Page 80 (button press, device menu and similar) Notes Value limits can vary for different devices Value is a property of input connected to current window. Changing window input source might cause changes in this value (refer device definitions) VSM-4x4HFS - The VSM-4x4HFS RS-232 Communication Protocol...
- Page 81 After execution, response is sent to all com ports if CMD-NAME was set any other external control device (button press, device menu and similar) or genlock status was changed Notes Sets the image properties of the selected scaler VSM-4x4HFS - The VSM-4x4HFS RS-232 Communication Protocol...
- Page 82 After execution, response is sent to all com ports if CMD-NAME was set any other external control device (button press, device menu and similar) or genlock status was changed Notes Displays the OSD of the selected Scaler VSM-4x4HFS - The VSM-4x4HFS RS-232 Communication Protocol...
-
Page 83: Error Codes
For new products with 14 digit serial numbers, use only the last 11 digits 10.2.3 Error Codes Error Description No error Protocol syntax error, 1st char isn’t '#' Command not available in command list Parameter is out of range Protocol busy, UART ring buffer is overflow VSM-4x4HFS - The VSM-4x4HFS RS-232 Communication Protocol... - Page 85 For the latest information on our products and a list of Kramer distributors, visit our Web site where updates to this user manual may be found. We welcome your questions, comments, and feedback. Web site: www.kramerelectronics.com E-mail: info@kramerel.com SAFETY WARNING...
Need help?
Do you have a question about the VSM-4x4HFS and is the answer not in the manual?
Questions and answers