
Related Manuals for Kramer ASPEN-32UFX


Summary of Contents for Kramer ASPEN-32UFX
- Page 1 USER MANUAL MODEL: ASPEN-32UFX, ASPEN-1616UX, VS-8UFX 12G SDI Matrix Switcher P/N: 2900-300846 Rev 1 www.kramerAV.com...
-
Page 2: Table Of Contents
Kramer Electronics Ltd. Contents Introduction Getting Started Overview Defining ASPEN-32UFX, ASPEN-1616UX, VS-8UFX 12G SDI Matrix Switcher Installing in a Rack Connecting ASPEN-32UFX, ASPEN-1616UX, VS-8UFX Connecting ASPEN 32UFX, ASPEN 1616UX Connecting VS-8UFX Configuring ASPEN-32UFX, ASPEN-1616UX, VS-8UFX Configuring – Web Pages Configuring – Front Panel Operating ASPEN-32UFX, ASPEN-1616UX, VS-8UFX Operating –... -
Page 3: Introduction
Kramer Electronics Ltd. Introduction Welcome to Kramer Electronics! Since 1981, Kramer Electronics has been providing a world of unique, creative, and affordable solutions to the vast range of problems that confront the video, audio, presentation, and broadcasting professional on a daily basis. In recent years, we... -
Page 4: Overview
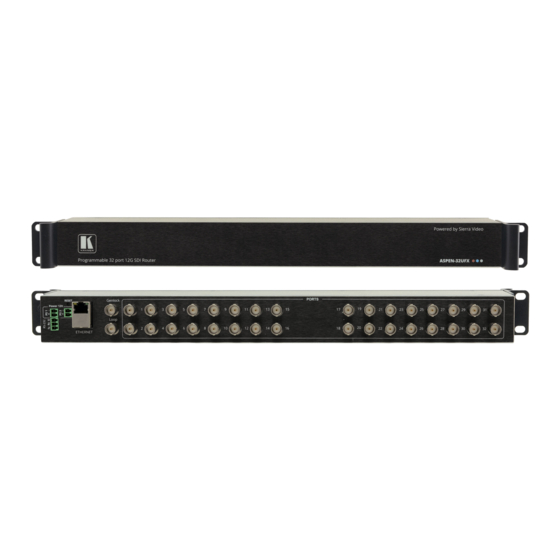
European Advanced Recycling Network (EARN) and will cover any costs of treatment, recycling and recovery of waste Kramer Electronics branded equipment on arrival at the EARN facility. For details of Kramer’s recycling arrangements in your particular country go to our recycling pages at www.kramerav.com/support/recycling. - Page 5 Kramer Electronics Ltd. are 4” deep. included rack ears. ASPEN-32UFX ASPEN-1616UX ASPEN-32UFX, ASPEN-1616UX, VS-8UFX – Introduction...
-
Page 6: Defining Aspen-32Ufx, Aspen-1616Ux, Vs-8Ufx 12G Sdi Matrix Switcher
PORTS BNC Connectors (1 to 32) ASPEN-1616UX: Connect to SDI sources. INPUT BNC Connectors (1 to 16) ASPEN-1616UX: Connect to SDI acceptors. OUTPUT BNC Connectors (1 to 16) ASPEN-32UFX, ASPEN-1616UX, VS-8UFX – Defining ASPEN-32UFX, ASPEN-1616UX, VS-8UFX 12G SDI Matrix Switcher... - Page 7 RS-232 (G,Rx,Tx) Terminal Block Connect to a PC or remote controller. Connector ETHERNET RJ-45 Connector Connect to a PC via LAN for unit control and firmware upgrade via the web pages. ASPEN-32UFX, ASPEN-1616UX, VS-8UFX – Defining ASPEN-32UFX, ASPEN-1616UX, VS-8UFX 12G SDI Matrix Switcher...
- Page 8 The device powers up and loads the factory default values: IP address: 192.168.1.39; Mask: 255.255.0.0; Gateway 192.168.0.1. Power Socket Connect to AC power source. Power Switch Switch for turning the unit ON and OFF. ASPEN-32UFX, ASPEN-1616UX, VS-8UFX – Defining ASPEN-32UFX, ASPEN-1616UX, VS-8UFX 12G SDI Matrix Switcher...
-
Page 9: Installing In A Rack
19" rack. • Detachable rack ears can be removed for desktop use. • Always mount ASPEN-32UFX, ASPEN-1616UX, VS-8UFX in the rack before connecting any cables or power. ASPEN-32UFX, ASPEN-1616UX, VS-8UFX – Installing in a Rack... -
Page 10: Connecting Aspen-32Ufx, Aspen-1616Ux, Vs-8Ufx
2. Connect the LAN to the ETHERNET RJ-45 Connector 3. Connect a control device (for example, computer or serial controller) to the RS-232 Terminal Block Connector 4. If required, connect a genlock source to the GENLOCK BNC Connector ASPEN-32UFX, ASPEN-1616UX, VS-8UFX – Connecting ASPEN-32UFX, ASPEN-1616UX, VS-8UFX... -
Page 11: Connecting Vs-8Ufx
5. If required, connect the next SDI switcher in a daisy chain to the LOOP BNC Connector -OR- terminate the connector with 75Ω. 6. Connect the power cord to the Power Socket ASPEN-32UFX, ASPEN-1616UX, VS-8UFX – Connecting ASPEN-32UFX, ASPEN-1616UX, VS-8UFX... -
Page 12: Configuring Aspen-32Ufx, Aspen-1616Ux, Vs-8Ufx
Kramer Electronics Ltd. Configuring ASPEN-32UFX, ASPEN-1616UX, VS-8UFX ASPEN-32UFX, ASPEN-1616UX, VS-8UFX enable you to configure settings in the following ways: • Configuring – Web Via Ethernet using built-in, user-friendly web pages (see Pages on page 10). • Protocol 3000 commands (see Protocol 3000 Commands on page 34). - Page 13 The embedded web pages appear with the Video Switching page open. Figure 8: Embedded Web Pages with Video Switching Page Open 3. Use the navigation pane on the left to open the desired web page. ASPEN-32UFX, ASPEN-1616UX, VS-8UFX – Configuring ASPEN-32UFX, ASPEN-1616UX, VS-8UFX...
- Page 14 To define ASPEN-32UFX interchangeable ports: 1. Click Video Switching. The Video Switching page appears. Figure 9: ASPEN-32UFX Embedded Web Pages – Video Switching Page 2. Click the Settings icon in the upper left corner. ASPEN-32UFX, ASPEN-1616UX, VS-8UFX – Configuring ASPEN-32UFX, ASPEN-1616UX, VS-8UFX...
- Page 15 Kramer Electronics Ltd. The Ports setup page appears. Figure 10: ASPEN-32UFX Embedded Web Pages – Video Switching > Ports Setup Page 3. For each port, click Input or Output. The port changes to the selected mode. 4. When you are finished defining ports, click Close.
- Page 16 1. Define each port as an input or output (for ASPEN-32UFX VS-8UFX Defining Interchangeable Ports on page 12). Switching – Web Pages 2. Switch inputs to outputs (see on page 21). 3. Click Device Settings. ASPEN-32UFX, ASPEN-1616UX, VS-8UFX – Configuring ASPEN-32UFX, ASPEN-1616UX, VS-8UFX...
- Page 17 Disable the Save button for the selected Preset to prevent losing the currently saved configuration by selecting the Locked checkbox. Loading Saved Configurations – Web Pages To load a saved configuration, see on page 22. ASPEN-32UFX, ASPEN-1616UX, VS-8UFX – Configuring ASPEN-32UFX, ASPEN-1616UX, VS-8UFX...
- Page 18 2. In the Ethernet Settings section, change the network settings as required and click Set. –OR– If you want the device to obtain a DHCP IP, under DHCP, click ON. 3. Click Set. ASPEN-32UFX, ASPEN-1616UX, VS-8UFX – Configuring ASPEN-32UFX, ASPEN-1616UX, VS-8UFX...
- Page 19 The unit name cannot include any spaces, can be up to 63 characters and can include only letters, numbers, hyphens and underscores. 3. Click Set. The unit name is changed. The first 15 characters of the unit name are used by the NetBIOS protocol. ASPEN-32UFX, ASPEN-1616UX, VS-8UFX – Configuring ASPEN-32UFX, ASPEN-1616UX, VS-8UFX...
- Page 20 A password must contain 5 to 15 alphanumeric characters and no spaces. 2. Click Change. A warning appears. Figure 17: Password Change Warning 3. Click OK. The password is changed, and the login window appears (Figure ASPEN-32UFX, ASPEN-1616UX, VS-8UFX – Configuring ASPEN-32UFX, ASPEN-1616UX, VS-8UFX...
- Page 21 2. Click Click to select file. A file browser appears. 3. Open the relevant firmware file. 4. Click Upload. The firmware uploads to the device. Caution: Do not power cycle or operate the device during firmware upgrade. ASPEN-32UFX, ASPEN-1616UX, VS-8UFX – Configuring ASPEN-32UFX, ASPEN-1616UX, VS-8UFX...
-
Page 22: Configuring - Front Panel
The VS 8UFX front panel enables you to view the device firmware version and IP address. To view device information: • Press the INFO Button The device firmware version and IP address appear on the LCD Display Panel ASPEN-32UFX, ASPEN-1616UX, VS-8UFX – Configuring ASPEN-32UFX, ASPEN-1616UX, VS-8UFX... -
Page 23: Operating Aspen-32Ufx, Aspen-1616Ux, Vs-8Ufx
2. Click the circle in the switching table that corresponds to the input row and output column that you want to switch. For example, in the switching table below, click the first circle in the column for output 22. ASPEN-32UFX, ASPEN-1616UX, VS-8UFX – Operating ASPEN-32UFX, ASPEN-1616UX, VS-8UFX... - Page 24 Loading Saved Configurations – Web Pages The embedded web pages enable you to load preset input/output definitions (for ASPEN- 32UFX VS-8UFX) and switching configurations. Saving Configuration – Web Page To save a configuration, see on page 14. ASPEN-32UFX, ASPEN-1616UX, VS-8UFX – Operating ASPEN-32UFX, ASPEN-1616UX, VS-8UFX...
-
Page 25: Operating - Front Panel Buttons
2. Press the required blue input PORT Buttons The selected input is switched to the selected output and the change is reflected in the LCD display. ASPEN-32UFX, ASPEN-1616UX, VS-8UFX – Operating ASPEN-32UFX, ASPEN-1616UX, VS-8UFX... - Page 26 The selected PORTS Button flashes red and the preset configuration appears on the LCD display. 3. Click the TAKE Button The configuration is loaded and the PORTS Buttons light normally. ASPEN-32UFX, ASPEN-1616UX, VS-8UFX – Operating ASPEN-32UFX, ASPEN-1616UX, VS-8UFX...
-
Page 27: Technical Specifications
Web pages and Protocol 3000 (ASPEN-32UFX, API via Ethernet and remote ASPEN-1616UX) RS-232 User Interface Indicators Port buttons LEDs, LCD display (VS-8UFX) Controls Switching buttons, web pages and Protocol 3000 API via Ethernet and remote RS-232 ASPEN-32UFX, ASPEN-1616UX, VS-8UFX – Technical Specifications... - Page 28 2.7kg (6.0lbs) approx. Accessories Included Power adapter/ cord, rack ears Optional For optimum range and performance use the recommended Kramer cables available at www.kramerav.com/product/ASP EN-32UFX Specifications are subject to change without notice at www.kramerav.com ASPEN-32UFX, ASPEN-1616UX, VS-8UFX – Technical Specifications...
-
Page 29: Default Communication Parameters
Stop Bits: Parity: None Command Format: ASCII Command Example: Route INPUT 1 to OUTPUT 5: #X-ROUTE OUT.SDI.5.VIDEO.1,IN.SDI.1.VIDEO.1<CR> Ethernet IP Address: 192.168.1.39 Subnet mask: 255.255.0.0 Default gateway: 192.168.0.1 TCP Port #: 5000 Maximum TCP Ports: ASPEN-32UFX, ASPEN-1616UX, VS-8UFX – Technical Specifications... -
Page 30: Resetting The Unit
For factory reset, press and hold for more than 5 seconds. To perform a factory reset on the device using the web pages: 1. Click Device Settings. The Device Settings page appears (Figure 12). 2. Click Factory reset. ASPEN-32UFX, ASPEN-1616UX, VS-8UFX – Technical Specifications... -
Page 31: Protocol 3000
Kramer Electronics Ltd. Protocol 3000 ASPEN-32UFX, ASPEN-1616UX, VS-8UFX 12G SDI Matrix Switcher can be operated using the Kramer Protocol 3000 serial commands. The command framing varies according to how you interface with the ASPEN-32UFX, ASPEN-1616UX, VS-8UFX. Generally, a basic video input switching command that routes a layer 1 video signal to HDMI out 1 from HDMI input 2 (ROUTE 1,1,2), is entered as follows: •... -
Page 32: Understanding Protocol 3000
A separate response is sent for every command in the chain. Kramer Protocol 3000 Syntax The Kramer Protocol 3000 syntax uses the following delimiters: ␍ = Carriage return (ASCII 13 = 0x0D) •... -
Page 33: Extended Protocol 3000
␍␊ Extended Protocol 3000 In addition to the standard Protocol 3000 syntax, newer Kramer products use extended syntax to improve user experience and provide easier deployment and configuration. For products with many ports and of different types, the extended syntax describes commands and their parameters in a more intuitive, user-friendly format. - Page 34 <index> – Indicates a specific channel number when there are multiple channels of the same type Signal ID: <port_id>.<signal_type>.<index> also means: <<direction_type>.<port_type>.<index>>.<signal_type>. <channel_index> Examples: IN.HDMI.1.VIDEO.1 (refers to video channel 1 of HDMI input port 1) OUT.HDMI.1.AUDIO.1 (refers to audio channel 1 of HDMI output port 1) ASPEN-32UFX, ASPEN-1616UX, VS-8UFX – Protocol 3000...
-
Page 35: Other Rules
In routing commands, first specify the target output(s), then the source input. Example: #X-ROUTE OUT.ANALOG_AUDIO.1.AUDIO.1,IN.HDMI.1.AUDIO.1 Brackets ‘[‘ and ‘]’ are reserved Protocol 3000 characters that define a list of parameters as in [a,b,c,d]. Example: to route video input 3 to outputs 1,4,6,7: ROUTE 1,[1,4,6,7],3<cr> ASPEN-32UFX, ASPEN-1616UX, VS-8UFX – Protocol 3000... -
Page 36: Protocol 3000 Commands
PROT-VER Get device protocol version PRST-LOCK Set/get a preset as read-only PRST-RCL Recall saved preset list PRST-STO Store current connections to preset RESET Reset device Get device serial number VERSION Get device firmware version ASPEN-32UFX, ASPEN-1616UX, VS-8UFX – Protocol 3000... - Page 37 End User Public Get: Description Syntax #␍ Set: Protocol handshaking Get: Response ~nn@␠OK␍␊ Notes Validates the Protocol 3000 connection and gets the device number. Used to identify the availability of the device. Example #<CR> ASPEN-32UFX, ASPEN-1616UX, VS-8UFX – Protocol 3000...
- Page 38 ~nn@FACTORY␠OK␍␊ Parameters Response Triggers Notes This command deletes all user data from the device. The deletion can take some time. You must power cycle the device for the changes to take effect. Example #FACTORY<CR> ASPEN-32UFX, ASPEN-1616UX, VS-8UFX – Protocol 3000...
- Page 39 #LOCK-FP␠Lock/Unlock␍ Set: Lock the front panel Get the front panel lock state #LOCK-FP?␍ Get: Response ~nn@LOCK-FP␠Lock/Unlock␍␊ Parameters Lock/Unlock – 0 (unlock), 1 (lock) Response Triggers Notes Example Lock the front panel buttons: #LOCK-FP 1<CR> ASPEN-32UFX, ASPEN-1616UX, VS-8UFX – Protocol 3000...
- Page 40 The Line_num parameter is optional. If no value is entered, the default Line_num is 10. Used for advanced troubleshooting. Helps find error root causes and gets details not displayed in the error code number. Example Get the last 5 lines or the device log: #LOG-TAIL? 5<CR> ASPEN-32UFX, ASPEN-1616UX, VS-8UFX – Protocol 3000...
- Page 41 – string of up to 63 alpha-numeric chars (can include hyphen, not at the beginning or end) Response Triggers Notes The first 15 characters of the unit name are used by the NetBIOS protocol. Example Set the unit name to Alpha: #NAME Alpha<CR> ASPEN-32UFX, ASPEN-1616UX, VS-8UFX – Protocol 3000...
- Page 42 – port number from the front panel (1-n) direction – IN (input), OUT (output) Response Triggers Notes This command applies only to ASPEN-32UFX and VS-8UFX. Example Set port #5 to be an output: #PORT-DIRECTION 5,OUT<CR> ASPEN-32UFX, ASPEN-1616UX, VS-8UFX – Protocol 3000...
- Page 43 Get the preset read-only status Response Set / Get: ~nn@PRST-LOCK␠preset_Index,mode␍␊ Parameters preset_Index- preset number 1–8 mode – ON, OFF Response Triggers Notes Prevents users from accidentally overwriting a preset. Examples Lock Preset 3: #PRST-LOCK 1,ON<CR> ASPEN-32UFX, ASPEN-1616UX, VS-8UFX – Protocol 3000...
- Page 44 Get: Response ~nn@PRST-STO␠preset␍␊ Parameters preset – preset number, 1–8 Response Triggers Notes Examples Save the current input/output definitions (for ASPEN-32UFX VS-8UFX) and switching configuration under Preset 3: #PRST-STO 3<CR> ASPEN-32UFX, ASPEN-1616UX, VS-8UFX – Protocol 3000...
- Page 45 Get: Get device serial number Response ~nn@SN␠serial_number␍␊ Parameters serial_number – 11 decimal digits, factory assigned Response Triggers Notes This device has a 14-digit serial number, only the last 11 digits are displayed Example #SN?<CR> ASPEN-32UFX, ASPEN-1616UX, VS-8UFX – Protocol 3000...
- Page 46 – XX.XX.XXXX where the digit groups are: major.minor.build version Response Triggers Notes Example #VERSION?<CR> Authentication Commands Command Description LOGIN Set/get protocol permission LOGOUT Cancel current permission level PASS Set/get password for login level SECUR Set/get current security state ASPEN-32UFX, ASPEN-1616UX, VS-8UFX – Protocol 3000...
- Page 47 Functions Permission Transparency LOGOUT Set: Not Secure Public Get: Description Syntax #LOGOUT␍ Set: Cancel current permission level Get: Response ~nn@LOGOUT␠OK␍␊ Parameters Response Triggers Notes Logs out from User or Administrator permission levels Example #LOGOUT<CR> ASPEN-32UFX, ASPEN-1616UX, VS-8UFX – Protocol 3000...
- Page 48 – password for the login_level. Up to 15 printable ASCII chars. Response Triggers Notes The default password is an empty string Example Set the password for the Admin protocol permission level to 33333: #PASS Admin,33333<CR> ASPEN-32UFX, ASPEN-1616UX, VS-8UFX – Protocol 3000...
- Page 49 Get routing status of all output ports PORTS-LIST Get the port list of this device SIGNALS-LIST Get the signal ID list of this device X-ROUTE Send routing command to matrix / Get routing status ASPEN-32UFX, ASPEN-1616UX, VS-8UFX – Protocol 3000...
- Page 50 The response is returned in one line and terminated with ␍␊. The response format lists port IDs separated by commas. This is an Extended Protocol 3000 command. Example Get the list of ports for this device: #PORTS-LIST?<CR> ASPEN-32UFX, ASPEN-1616UX, VS-8UFX – Protocol 3000...
- Page 51 2 signal ids for each physical port, one as an input and one as an output. This is an Extended Protocol 3000 command. Example Get signal ID list for this device: #SIGNALS-LIST?<CR> ASPEN-32UFX, ASPEN-1616UX, VS-8UFX – Protocol 3000...
- Page 52 VIDEO and 1 are, respectively, the default <signal_type> and <index> in this command and are implied even if not written: #X-ROUTE OUT.SDI.5,IN.SDI.1 is interpreted as: #X-ROUTE OUT.SDI.5.VIDEO.1,IN.SDI.1.VIDEO.1 This is an Extended Protocol 3000 command. Example Route INPUT 1 to OUTPUT 5: #X-ROUTE OUT.SDI.5.VIDEO.1,IN.SDI.1.VIDEO.1<CR> -OR- #X-ROUTE OUT.SDI.5,IN.SDI.1<CR> ASPEN-32UFX, ASPEN-1616UX, VS-8UFX – Protocol 3000...
- Page 53 – time in microseconds, 0–99999 Response Triggers Notes Configures the maximum delay in microseconds between arrival of a picture frame and its routing is executed Examples Set the genlock delay to 20 microseconds: #GENLOCK-TIME-MICROSEC 20<CR> ASPEN-32UFX, ASPEN-1616UX, VS-8UFX – Protocol 3000...
- Page 54 ETH-PORT Set/get Ethernet port protocol. NET-CONFIG Set/get a network configuration. NET-DHCP Set/get DHCP mode NET-DNS Get DNS address NET-GATE Set/get gateway IP NET-IP Set/get IP address NET-MAC Get MAC address NET-MASK Set/get subnet mask ASPEN-32UFX, ASPEN-1616UX, VS-8UFX – Protocol 3000...
- Page 55 – network mask, in the following format: xxx.xxx.xxx.xxx gateway – network gateway, in the following format: xxx.xxx.xxx.xxx Response Triggers Notes Example Set the device network parameters to IP address 192.168.113.10, net mask 255.255.0.0, and gateway 192.168.0.1: #NET-CONFIG 0,192.168.113.10,255.255.0.0,192.168.0.1<CR> ASPEN-32UFX, ASPEN-1616UX, VS-8UFX – Protocol 3000...
- Page 56 If dns_id is out of the defined DNS range, Error Code #3 (ERR_PARAMETER_OUT_OF_RANGE) is returned. If no dns_id is defined, Error Code #3 is returned for any dns_id. Notes Example Get the DNS address for this device: #NET-DNS?<CR> ASPEN-32UFX, ASPEN-1616UX, VS-8UFX – Protocol 3000...
- Page 57 Get IP address Response ~nn@NET-IP␠ip_address␍␊ Parameters ip_address – IP address, in the following format: xxx.xxx.xxx.xxx Response Triggers Notes Consult your network administrator for correct settings. Example Set the IP address to 192.168.1.39: #NET-IP 192.168.001.039<CR> ASPEN-32UFX, ASPEN-1616UX, VS-8UFX – Protocol 3000...
- Page 58 - format: xxx.xxx.xxx.xxx Response Triggers The subnet mask limits the Ethernet connection within the local network Consult your network administrator for correct settings. Notes Example Set the subnet mask to 255.255.0.0: #NET-MASK 255.255.000.000<CR> ASPEN-32UFX, ASPEN-1616UX, VS-8UFX – Protocol 3000...
- Page 59 Electronics products, this product must be insured during shipment, with the insurance and shipping charges prepaid by you. If this product is returned uninsured, you assume all risks of loss or damage during shipment. Kramer Electronics will not be responsible for any costs related to the removal or re- installation of this product from or into any installation.
- Page 60 SAFETY WARNING Disconnect the unit from the power supply before opening and servicing For the latest information on our products and a list of Kramer distributors, visit our Web site where updates to this user manual may be found. We welcome your questions, comments, and feedback.
Need help?
Do you have a question about the ASPEN-32UFX and is the answer not in the manual?
Questions and answers