Table of Contents
Advertisement
Quick Links
Advertisement
Table of Contents

Related Manuals for AV Access 4KEX100-H2


Summary of Contents for AV Access 4KEX100-H2
- Page 1 4KEX100-H2 4K@60 444 HDR HDBaseT Extender User Manual...
- Page 3 AV Access Technology Limited assumes no responsibility for any inaccuracies that may be contained in this document. AV Access Technology Limited also makes no commitment to update or to keep current the information contained in this document.
- Page 4 Important Safety Instructions Do not expose this device to rain, moisture, dripping or splashing. No objects filled with liquids, such as vases, shall be placed on the device. Do not install or place this unit in a bookcase, built-in cabinet, or in another ...
-
Page 5: Table Of Contents
Table of Contents Table of Contents Table of Contents ....................1 Introduction ......................2 Overview ..........................2 Features ............................ 2 Package Contents ........................2 Panel ............................4 Front Panel........................4 Rear Panel ........................5 Installation and Application................. 6 Brackets Installation ......................6 Steps to install the device in a suitable location .......... -
Page 6: Introduction
Supports bi-directional IR and RS232 pass-through. Slim profile, space saving and easy-to-install. *Note: 4KEX100-H2 supports Dolby Vision only if the data rate is less than or equal to 10.2Gbps. Package Contents Before you start the installation of the product, please check the package... - Page 7 Introduction Receiver x1 Power Adapter (DC 18V 1A) with US Pins x1 IR Emitter x1 Broadband IR Receiver (30 KHz ~ 50 KHz) x1 Phoenix Male Connector (3.5mm, 3 Pins) x 2 Mounting Brackets (with Screws) x 4 ...
-
Page 8: Panel
Introduction Panel Front Panel Transmitter/Receiver Name Description On/Off: The device is powered on/off. Power LED Status LED Blinking: The device is working properly. Off: The device is not working properly. On: HDCP protected content is being transmitted. Blinking: Non-HDCP protected content is being HDCP LED transmitted. -
Page 9: Rear Panel
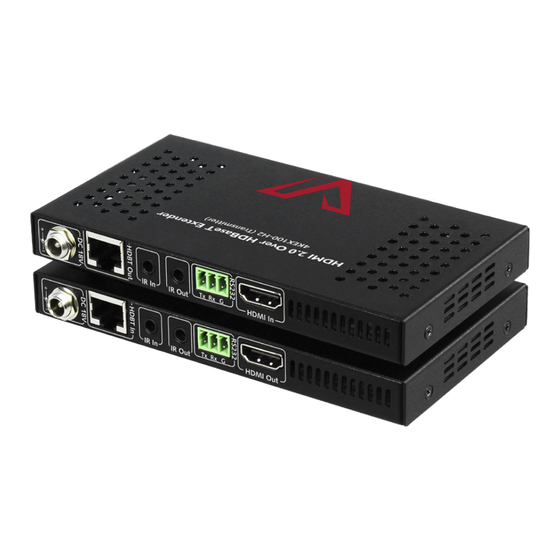
Introduction Rear Panel Transmitter Receiver Name Description a&1 DC 18V Connect to the DC 18V power adapter provided. Connect to HDBT In of the receiver via a Cat 5e/6/7 HDBT Out cable. Connect to HDBT Out of the transmitter via a Cat 5e/6/7 HDBT In cable. -
Page 10: Installation And Application
Installation and Application Installation and Application Brackets Installation Note: Before installation, please ensure HDEX40-L is disconnected from the power source. Steps to install the device in a suitable location Attach the installation bracket to the enclosure using the screws that were provided in the package separately. -
Page 11: Ir Cable Operation
Installation and Application IR Cable Operation Cable Type IR Emitter: Connect to the "IR Out" port of the device. Broadband IR Receiver (30-50 KHz): connect to the "IR In" port of the device. Using the IR Emitter Insert the IR emitter plug into the “IR Out” jack located on the transmitter or receiver. - Page 12 Installation and Application IR Signal Emission Controlled Device IR Emitter IR Receiver Example 3: When connected to control system, ensure the IR emitter is over against the IR receiver's front side instead of its flat side (see below picture): IR Receiver IR Emitter IR Receiver IR Emitter...
- Page 13 Installation and Application IR Receiver TIVO BOLT Note: Products from AV Access do not support Bluetooth control, the introduction above applies to device with IR control capability only. Here is a list about different devices' control method. Device Control Method...
-
Page 14: Application
Installation and Application Application Power Supply Blu-ray Player Connect the power Connect the IR Emitter adapter provided to Connect an HDMI provided to IR Out of the the transmitter/receive r. source to HDMI In transmitter/receiver. of the transmitter Transmitter Connect HDBT Out of the transmitter to HDBT In of the receiver. -
Page 15: Rs232 Operation
RS232 Operation RS232 Operation RS232 ports can be used for bi-directional RS232 signal pass-through between the transmitter and receiver. RS232 Device RS232 cable Transmitter HDBT OUT Cat X cable RS 232 Po rt Connected RS23 2 Dev ice Pin s Receiver HDBT IN RS232 cable... -
Page 16: Specifications
Specifications Specifications Technical Video Signal Type HDMI with 4K@60Hz 4:4:4, HDCP 2.2, HDR, 3D Input/Output Resolution Up to 4096x2160@60Hz, including Support 4K@60Hz/4K@30Hz/1080P/1080i/720P Fully supports audio formats in HDMI 2.0 Audio Format Supported specification, including PCM, Dolby TrueHD, Dolby Atmos, DTS-HD Master Audio, DTS:X Max Data Rate 18 Gbps General... -
Page 17: Trouble Shooting
Trouble Shooting Trouble Shooting No Power Ensure the power is on. Ensure you use the power adapter provided in the package. No Picture or Video Flash Ensure all devices are on, and all cables are qualified and connected ... -
Page 18: Warranty
The warranty has expired. The defects are caused by the fact that the product is repaired, dismantled or altered by anyone that is not from an AV Access Technology Limited authorized service partner. The defects are caused by the fact that the product is used or handled improperly, roughly or not as instructed in the applicable User Guide. - Page 20 AV Access Technology Limited V1.0.0...
Need help?
Do you have a question about the 4KEX100-H2 and is the answer not in the manual?
Questions and answers