
Related Manuals for Shining 3D Transcan C


Summary of Contents for Shining 3D Transcan C
- Page 1 Transcan C A Professional 3D Scanner for Diverse Industries User Manual Getting Started with Transcan C...
-
Page 2: Equipment List
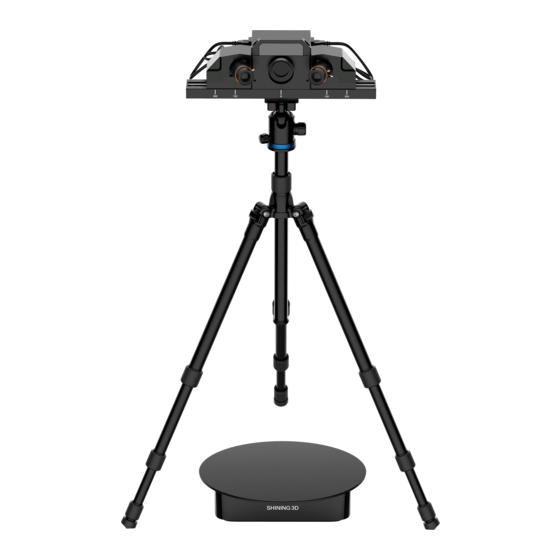
Preparation Equipment List Power cable*2 Scanner head Power adapter*2 Calibration board Device connection Calibration board bracket cable (150mm/300mm) Calibration pad Marker Turntable Turntable connection cable USB drive Tripods Light Box Recommendation Power:60W lumen:12000-13000LM input voltage:110-240V color temperature:5500K±200K Computer Requirements Recommended setting OS: Win10,64 bits CPU:I7-8700 or higher Graphics card:NVIDIA GTX1060 or higher... -
Page 3: Hardware Installation
Hardware Installation Scanner Adjustment STEP 1. Open the tripod and place it on the ground. Adjust the tripod’s three feet. 2. Adjust the lock ② to release and adjust vertical slide rod to an appropriate height, and the lock ② needed to be locked after the adjustment. - Page 4 Hardware Installation Turntable connection STEP 1.Connect the turntable connection cable ⑤ into the turntable USB port ①. 2.Connect the turntable connection cable ④ into computer USB port. 3.Connect the turntable power cable ③ into the turntable port ②. 4.Plugin the power adapter to power source. STEP Lightbox connection (optional) 1.
-
Page 5: Software Download
Software Download Open http://www.einscan.com/support/download/。 STEP Select your scanner model to download the software. Follow the guide to finish software installation. STEP Equipment Adjustment 1.Software installation 2.Software activation 3.Scanner adjustment 4.Select scanning range 5.Adjust camera position according to the range 6.Adjust projector focus 7.Adjust camera angle 8.Adjust camera aperture 9.Adjust camera focus... - Page 6 Calibrate Calibration is the process to ensure the device will scan with the optimal accuracy and scan quality. When the software installed the first time, it automatically goes to calibration interface. Different calibration boards are used for scanning ranges of 300mm and 150mm.
-
Page 7: Scan Process
Scan Process Scan preparation Create /Import project Non-texture Texture scan vscan Check working distance Select turntable mode, brightness, and resolution Scan Edit Scanning Data Alignment Continue to scan Scan completed Data Data Data Create Mesh measurement reservation post-processing... - Page 8 Scan technics Hard-to-scan objects Transparent object Strongly surface reflective objects Shiny and black object Solution Spray on the surface Recommend not to scan Objects that undergo deformation Hollow objects such as Eiffel Tower souvenirs Hair and similar lint-like structures...
- Page 9 Summarize Scan Range(mm) 150 X 96 300 X 190 ≤0.05 Accuracy(mm) Point Distance(mm) 0.03;0.07;0.11 0.06;0.15;0.23 Marker Alignment; Feature Alignment; Alignment Mode Manually Alignment...
- Page 10 Technical support Register at support.shining3d.com for support or contact through: For more videos of the scanners, please follow our YouTube channel “ SHINING 3D” . APAC Headquarters EMEA Region SHINING 3D Tech. Co., Ltd. SHINING 3D Technology GmbH. Hangzhou, China...
Need help?
Do you have a question about the Transcan C and is the answer not in the manual?
Questions and answers