Advertisement
Available languages
Available languages
Quick Links
H-9752, H-9753
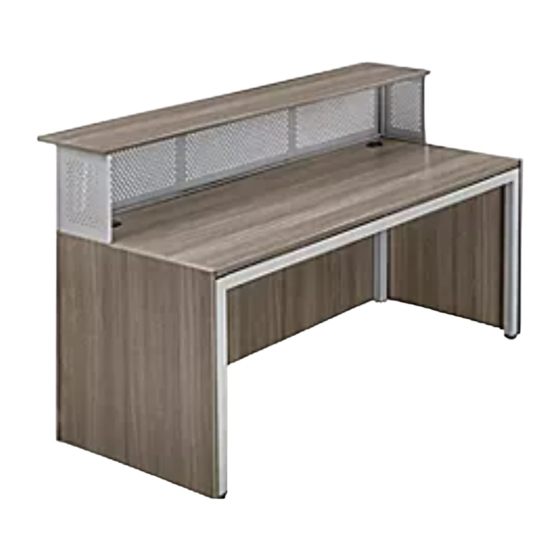
DOWNTOWN
RECEPTION DESK
TOOLS NEEDED
Phillips
Allen Wrench
Screwdriver
(included)
M6 x 12 mm Bolt x 31
Camlock x 6
10.25" Foam Strip x 2
NOTE: Assemble on smooth, non-marring
surface to avoid scratching.
• Use Allen wrench to tighten bolts.
• Use Phillips screwdriver to tighten camlock
pins, camlocks and screws.
• Check that all parts are included.
1.
Fit support rail over corresponding bracket on leg. Use
four M6 x 12 mm bolts to secure each side of support
rail. Repeat for remaining support rail.
(See Figure 1)
To continue desk assembly (H-9752), proceed
to step 2 below.
To continue L-Desk assembly (H-9753), proceed
to L-Desk Assembly on page 4.
PAGE 1 OF 21
1-800-295-5510
uline.com
RECEPTION DESK PARTS
M6 x 65 mm Bolt x 10
Base Bracket x 2
11.75" Foam Strip x 6
DESK ASSEMBLY
Three Person Assembly
Recommended
L-Bracket x 7
M4 x 16 mm Screw x 4
Floor Glide x 4
Figure 1
Support Rail
Leg
Allen Wrench
Para Español, vea páginas 8-14.
Pour le français, consulter les pages 15-21.
Camlock Pin x 6
M6 x 15 mm Bolt x 8
72.5" Foam Strip x 1
Black Grommet Cap
Silver Grommet Cap
x 2
Follow hole patterns on frame as shown.
M6 x 12 mm Bolt
Dowel x 4
x 2
0222 IH-9752
Advertisement

Related Manuals for U-Line H-9752


Summary of Contents for U-Line H-9752
- Page 1 M6 x 12 mm bolts to secure each side of support rail. Repeat for remaining support rail. (See Figure 1) To continue desk assembly (H-9752), proceed to step 2 below. To continue L-Desk assembly (H-9753), proceed to L-Desk Assembly on page 4.
- Page 2 DESK ASSEMBLY CONTINUED 2. Place desktop panel upside down with holes facing 5. Place assembled panels around the outside of up. With second person, turn assembled frame assembled frame with modesty panel on the same upside down. Use 10 M6 x 65 mm bolts (included side as grommet holes.
- Page 3 DESK ASSEMBLY CONTINUED Attach two base brackets to legs opposite of modesty 8. Insert floor glides into legs. (See Figure 7) panel with four M4 x 16 mm screws. (See Figure 6) Figure 7 Figure 6 M4 x 16 mm Screw Base Bracket 9.
- Page 4 L-DESK ASSEMBLY NOTE: Parts for L-Desk are included in 3. Place desktop panels upside down with holes facing Reception Desk parts list on page 1 and up. With two or three people, turn over assembled L-Desk frame. Use 16 M6 x 65 mm bolts (included Reception L-Desk parts list on page 3.
- Page 5 L-DESK ASSEMBLY CONTINUED 6. Place assembled panels around the outside of 8. Install three camlock pins and insert two dowels assembled L-Desk frame with modesty panel on the in leg panel (4). Insert three camlocks into same side as grommet holes. (See Figure 12) corresponding holes in L-Desk return modesty panel (5).
- Page 6 L-DESK ASSEMBLY CONTINUED 11. Use four M6 x 12 mm bolts to secure panels to 12. Attach base brackets to legs on inside corners with L-Brackets. (See Figure 16) four M4 x 16 mm screws. Attach connector bracket with four M4 x 16 mm screws to secure L-Desk modesty panel to adjacent leg panel.
- Page 7 TRANSACTION COUNTER ASSEMBLY CONTINUED COMPLETED RECEPTION DESK 2. With second person, turn assembled transaction counter upright. Use eight M6 x 15 mm bolts to secure to desktop. (See Figure 19) Figure 19 M6 x 15 mm Bolt COMPLETED RECEPTION L-DESK 3.
- Page 8 Repita la operación con el riel de soporte restante. (Vea Diagrama 1) Para continuar el ensamble del escritorio (H-9752), proceda al paso 2 a continuación. Llave Allen Perno M6 x 12 mm Para continuar el ensamble del escritorio en L (H-9753), proceda al Ensamble del Escritorio en L en la página 12.
- Page 9 CONTINUACIÓN DE ENSAMBLE DEL ESCRITORIO 2. Coloque la cubierta boca abajo con los orificios 5. Coloque los paneles ensamblados alrededor del hacia arriba. Con ayuda de otra persona, voltee el exterior del armazón ensamblado con el recato en el armazón ensamblado al revés. Use 10 pernos M6 x mismo lado que los orificios para ojal.
- Page 10 CONTINUACIÓN DE ENSAMBLE DEL ESCRITORIO Fije dos soportes de base a las patas del lado 8. Inserte las tapas niveladoras en las patas. opuesto al recato con cuatro tornillos M4 x 16 mm. (Vea Diagrama 7) (Vea Diagrama 6) Diagrama 7 Diagrama 6 Tornillo M4 x 16 mm Soporte de...
- Page 11 ENSAMBLE DEL ESCRITORIO EN L NOTA: Las Partes del Escritorio de Recepción 3. Coloque las cubiertas de escritorio boca abajo con en L están incluidas en la lista de partes del los orificios hacia arriba. Entre dos o tres personas, volteen el armazón ensamblado del Escritorio en Escritorio de Recepción en la página 8 y la lista de partes del Escritorio de Recepción en L...
- Page 12 CONTINUACIÓN DEL ENSAMBLE DEL ESCRITORIO EN L 6. Coloque los paneles ensamblados alrededor del 8. Instale tres pasadores de tuerca minifix e inserte exterior del armazón ensamblado del Escritorio en dos taquetes en el panel de la pata (4). Inserte tres L con el recato en el mismo lado que los orificios tuercas minifix en los orificios correspondientes en el para ojal.
- Page 13 CONTINUACIÓN DEL ENSAMBLE DEL ESCRITORIO EN L 11. Use cuatro pernos M6 x 12 mm para asegurar los 12. Fije dos soportes de base a las patas del lado paneles a los soportes en L. (Vea Diagrama 16) opuesto al recato con cuatro tornillos M4 x 16 mm. Fije el recato del escritorio en L con el panel de la pata adyacente utilizando el soporte de unión y tres Diagrama 16...
- Page 14 CONTINUACIÓN DE ENSAMBLE DEL MOSTRADOR ESCRITORIO DE RECEPCIÓN COMPLETO 2. Con ayuda de una segunda persona, enderece el mostrador ensamblado. Use ocho pernos M6 x 15 mm para asegurarlo a la cubierta del escritorio. (Vea Diagrama 19) Diagrama 19 Perno M6 x 15 mm ESCRITORIO DE RECEPCIÓN EN L COMPLETO 3.
- Page 15 M6 x 12 mm pour fixer chaque côté de la barre de soutien. Répétez l'opération pour l'autre barre de soutien. (Voir Figure 1) Pour continuer le montage du bureau (H-9752), ARRÊT passez à l'étape 2 ci-dessous. Pour continuer le montage du bureau en L ARRÊT...
- Page 16 MONTAGE DU BUREAU SUITE 2. Placez la surface du bureau à l'envers avec les trous 5. Disposez les panneaux montés autour du cadre vers le haut. À deux, tournez le cadre monté à l'envers. monté auparavant en plaçant le panneau cache- Fixez le cadre à...
- Page 17 MONTAGE DU BUREAU SUITE Fixez deux supports de base aux pieds se trouvant 8. Insérez les patins de plancher dans les pieds. sur le côté opposé du panneau cache-jambes (Voir Figure 7) avec quatre vis M4 x 16 mm. (Voir Figure 6) Figure 7 Figure 6 Vis M4 x 16 mm...
- Page 18 MONTAGE DU BUREAU EN L REMARQUE : Les pièces du bureau en L figurent 3. Placez les surfaces de bureau à l'envers avec les sur la liste des pièces du bureau d'accueil à la trous vers le haut. À deux ou à trois personnes, page 15 et celles du bureau d'accueil en L à...
- Page 19 MONTAGE DU BUREAU EN L SUITE 6. Disposez les panneaux montés autour du cadre 8. Installez trois goujons d'excentrique et insérez deux du bureau en L monté auparavant en plaçant le chevilles dans le panneau de pied (4). Insérez trois panneau cache-jambes sur le même côté...
- Page 20 MONTAGE DU BUREAU EN L SUITE 11. Fixez les panneaux aux supports en L avec quatre 12. Fixez les supports de base aux pieds sur les coins boulons M6 x 12 mm. (Voir Figure 16) intérieurs avec quatre vis M4 x 16 mm. Installez le support de connexion avec quatre vis M4 x 16 mm pour fixer le panneau cache-jambes du bureau en Figure 16...
- Page 21 MONTAGE DU GUICHET SUITE BUREAU D'ACCUEIL ASSEMBLÉ 2. À deux, tournez le guichet monté à l'endroit. Fixez-le à la surface du bureau avec huit boulons M6 x 15 mm. (Voir Figure 19) Figure 19 Boulon M6 x 15 mm BUREAU D'ACCUEIL EN L ASSEMBLÉ 3.
Need help?
Do you have a question about the H-9752 and is the answer not in the manual?
Questions and answers