
Related Manuals for La Spaziale S11 BRIO


Summary of Contents for La Spaziale S11 BRIO
- Page 1 INSTRUCTIONS FOR USE AND MAINTENANCE REV 01 La Spaziale SpA Via E. Duse, 8 40033 Casalecchio di Reno Bologna - (Italy) tel. +39 051 611.10.11 fax. +39 051 611.10.40 MUM S11MINIBRIO_ENG REV01 info@laspaziale.com www.laspaziale.com...
-
Page 2: General Description Of The Machine
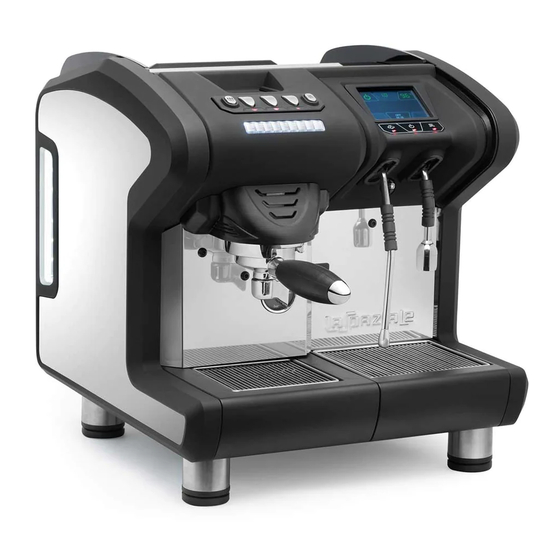
GENERAL DESCRIPTION OF THE MACHINE: MUM S11MINIBRIO_ENG REV01... - Page 3 1) WATER TANK FILLING LID 2) CUP HOLDER TRAY 3) WATER TANK ACCESS LID 4) DELIVERY GROUP PUSHBUTTON PANEL 5) DELIVERY GROUP LED STATUS BAR 6) COFFEE DELIVERY GROUP N. 1 7) DRIP TRAY COFFEE MODULE 8) PRESSURE MANOMETER GROUP 1 PUMP 9) HOT WATER SPOUT FOR INFUSIONS 10) DRIP TRAY WATER DELIVERIES 11) STEAM NOZZLE...
- Page 4 GENERAL DESCRIPTION OF THE CONTROL PANEL: MUM S11MINIBRIO_ENG REV01...
- Page 5 1) DELIVERY GROUP PURGE FUNCTION BUTTON 2) GROUP 1 SHORT COFFEE DELIVERY BUTTON 3) DELIVERY BUTTON 1 LONG COFFEE / 2 COFFEES (according to appliance parameters) DELIVERY GROUP 4) GROUP CONTINUOUS DELIVERY BUTTON 5) DELIVERY GROUP ON / STBY BUTTON 6) STEAM DELIVERY BUTTON (IF STEAM BOILER IS ON) 7) APPLIANCE ON/ STBY BUTTON 8) INFUSED WATER DELIVERY BUTTON (IF STEAM BOILER IS ON)
- Page 6 WATER MAINS CONNECTION SETUP (OPTIONAL): ¾ GAS WATER MAINS CONNECTION N.B.: Do not apply excessive force when connecting the hose to the fitting. MUM S11MINIBRIO_ENG REV01...
- Page 7 APPLIANCE DATA PLATE Remove the delivery group drip tray to view the appliance data plate: MUM S11MINIBRIO_ENG REV01...
- Page 8 READ THE FOLLOWING WARNINGS CAREFULLY AS THEY PROVIDE IMPORTANT SAFETY INFORMATION ON APPLIANCE USE AND MAINTENANCE This appliance must be used solely for its intended purpose and installed in a suitable place for such use. Any other use is to be considered improper and therefore hazardous.
-
Page 9: Installation
The appliance is supplied without water in the boiler, to avoid damage from exposure to low temperatures; for this very reason, if the appliance is unused for a long time, water should be removed from the boiler before disconnecting it. Failure to comply with the above may impair the safety of the appliance and its service life. - Page 10 INSERTING RESIN BAG TO SOFTEN WATER A resin bag is supplied with the appliance, which is necessary for softening water before use (removal of limescale). Remove the resin bag from its packaging and thoroughly rinse under running water for around 1 minute. Remove the water tank cover 1 (PAGE2), lift the cover below and place the bag in the tank: Correctly reposition the items to close the tank compartment.
- Page 11 AUTOMATIC CYCLE FOR THE FILLING OF THE GROUP DELIVERY WATER CIRCUIT UPON INITIAL START-UP REFER TO THE COMPONENTS KEY ON PAGES 2-4 WHEN FOLLOWING THE INSTRUCTIONS BELOW 1) Insert the plug into the power socket. The LED 13 (PAGE4) will flash to indicate that the appliance is connected to the electrical mains (STANDBY).
- Page 12 Upon reaching the minimum level, the Display will read: Press on the "START FILLING CYCLE", ensure the Coffee tray 7 (PAGE2) of Delivery Group 6 (PAGE2) are in position. The appliance will now start an automatic filling cycle of the delivery group, which will last 30 seconds; during this time, water will start coming out of delivery group 6 (PAGE2).
- Page 13 Once the filling cycle finishes, the Display will read: Press the button to end the water cycle filling procedure, only required when commissioning the appliance. The Display will return to STBY, with LED 13 (PAGE4) flashing only. MUM S11MINIBRIO_ENG REV01...
-
Page 14: Switching The Appliance On
SUPPLYING THE APPLIANCE WITH WATER: The appliance can be supplied with water (filling the water tank) in two ways, according to settings integrated in management firmware: MANUAL SUPPLY: The rear water tank (2.8 Lt capacity approximately) must be manually filled: lift the cover 1 (PAGE2) and add water. DIRECT SUPPLY FROM WATER MAINS (OPTIONAL): The rear tank is automatically filled by means of the hose supplied and connected to the lower appliance fitting as illustrated on PAGE 6 REFER TO THE FILLING METHOD PRE-INSTALLED ON THE APPLIANCE, OR SET DURING INSTALLATION BY AN... - Page 15 In this case, the Display will indicate that the water level in the rear tank is insufficient. Consequently, manual filling is required: proceed as described here below: FILLING THE WATER TANK (MANUAL WATER TANK FILLING): Lift the cover 1 (PAGE2) and fill the tank with cold drinking water until the no water warning message is no longer displayed and the side panel LEDS 15 (PAGE2) are no longer flashing.
- Page 16 SWITCHING ON THE COFFEE DELIVERY GROUP: Press button 5 (PAGE4) to switch on the coffee delivery group. The following will be displayed on the main display: The front LED bar 5 (PAGE2) and leds of delivery pushbutton panel selections 4 (PAGE2) will light up. As the delivery group heats up, the temperature value (expressed in °C) is displayed in red.
- Page 17 To disable the delivery groups, press the relative button 5 (PAGE4) for longer than half a second. The front LED bar 5 (PAGE2) will switch off. TURNING ON THE STEAM BOILER: With the appliance switched on, press the button on the Touchscreen display to enable steam boiler heating (hot water for infusions/steam).
-
Page 18: Preparing Coffee
PREPARING COFFEE: When the correct operating temperature of the delivery group is reached (value in °C in green), proceed as follows: 1. Unhook the filter holder of the display group (6) PAGE2. 2. Load ground coffee (use coffee doser supplied), take care not to leave any coffee powder on the upper edge of the filter holder, and press using the coffee press supplied. -
Page 19: Hot Water Delivery For Infusions
HOT WATER DELIVERY FOR INFUSIONS: With the steam boiler ON and pressurised (approximately 1 - 1.2 bars, as shown on the main Display), position a frothing jug underneath the hot water delivery spout 9 (PAGE2). Press the hot water delivery button 8 (PAGE4). Hot water delivery will begin. When the desired amount has been delivered, press again the button 8 (PAGE4) to stop delivery. - Page 20 N.B.: If no PIN is entered after 5 seconds, the display will return to the main screen. The default PIN can be changed in the specific menu by following the procedure described in the relevant chapter. When the correct PIN is confirmed, the following will appear on the Display: Use the buttons to scroll through the menus, and select the desired Area to access them.
-
Page 21: Parameters Menu
Press the button to exit the settings Menu. PARAMETERS MENU: By selecting the button, the following will be displayed: MUM S11MINIBRIO_ENG REV01... - Page 22 DELIVERY GROUP TEMPERATURE MENU: Select the Menu to access the Menu for adjusting Coffee Delivery Temperature. The following will appear on the Display: Use the buttons to modify coffee delivery temperature relative to the Coffee Delivery Group. Press to confirm the set value and return to the Parameters Menu. The operating temperature of the delivery group is modified solely for the purpose of improving the in-cup result, depending on the coffee blend used.
- Page 23 BOILER PRESSURE MENU: Select the Menu to access the menu where Steam Boiler pressure can be adjusted. The following will appear on the Display: Use the buttons to change (SET) steam boiler operating pressure. Press to confirm the set value and return to the Parameters Menu. Steam boiler operating pressure is solely modified to change steam delivery power, so that the milk emulsion is optimised.
- Page 24 COFFEE DOSES MENU: Select the Menu to enter the menu for adjusting and saving delivered coffee amounts relative to buttons 2-3 (PAGE4) of the Delivery Group. The following will appear on the Display: Proceed to prepare 1 coffee / 2 coffees, as described in the chapter on Page 18: During delivery, once the desired volume of coffee is reached, stop delivery by pressing the delivery button once more (PAGE4).
-
Page 25: Purge Menu
PURGE MENU: Select the Menu to access the Parameters Menu for setting the "PURGE" (washing) duration of the delivery group, enabled by pressing button 1 (PAGE4), without the filter holder hooked on. The following will appear on the Display: With the buttons "PURGE"... -
Page 26: Settings Menu
SETTINGS MENU Select the Menu and the following will appear on the Display: Use the buttons to scroll down the Menus: MUM S11MINIBRIO_ENG REV01... -
Page 27: Language Menu
Select the relative Area to access it. Press the button to exit the settings Menu. LANGUAGE MENU: Select the Menu to access the displayed language settings Menu. The following will appear on the Display: Select the Country to select the relative language. Press the button to exit the settings Menu. - Page 28 TIMER ON / STBY MENU: Select the Menu to access the ON and OFF Time Programming Menu of the appliance. It is also possible to select a function (DELIVERY GROUP, STEAM BOILER) for each daily on and off time slot (3 in total). The following will appear on the Display: Select OFF to exit the Menu (the TIMER function will not be enabled), or select ON and the following will appear on the display: Select the...
- Page 29 The example shows a screenshot of the ON and OFF time settings for MONDAY. Select the button on the first time slot, to set relative ON and OFF times. The following will appear on the Display: Use the + and - buttons to set relative ON and OFF times for the first time slot. Use the button to return to the previous screen: Select the GR1 or Boiler buttons and a FLAG...
- Page 30 When this is complete, select the button to exit the ON/ STBY TIMER Menu. N.B.: With the TIMER function enabled, the current hour will alternate with the next OFF for the TIMER on the main Display: MUM S11MINIBRIO_ENG REV01...
- Page 31 With the appliance OFF for the TIMER, the next day and ON time for the TIMER is visible on the main Display: N.B: Use button 7 (PAGE4) to force appliance switch-on. As of now the TIMER will be disabled WATER TANK FILLING MENU: Select the Menu to access the parameters for Water Tank filling.
- Page 32 Select if the appliance is programmed for Manual Water Tank filling. Select if the appliance is directly connected to the water mains (OPTIONAL). N.B.: When the MANUAL mode is selected, the operator must manually fill the water tank using compartment 1 (PAGE2) when the “no water in tank”...
- Page 33 The following will appear on the Display: Select ON to enable the ECO BOILER function. Press the button to exit the Menu. With the ECO BOILER ON function, ECO will light up in green on the main Display: MUM S11MINIBRIO_ENG REV01...
- Page 34 N.B.: With ECO BOILER= ON, STEAM BOILER activity (hot water / steam delivery) is limited by appliance firmware. If the delivery of large quantities of steam and/or hot water is required for infusions, leave ECO BOILER= OFF. CHANGE PIN MENU: Select the Menu to change the DEFAULT PIN required to access menus.
- Page 35 TIME CONTROL MENU: Select the Menu to enable the coffee extraction time control function during delivery. With this function, the user can verify the suitability of product delivery time set by machine installation parameters, and if necessary, adjust "granulometry" (grind) and/or "weight" (amount of ground coffee in filter holder) parameters. The following will be displayed on the main Display: Select YES to enable the function and the following will appear on the Display: Use + and - to modify the tolerance time applied to the coffee delivery time.
- Page 36 With this function enabled, during normal appliance operation, the reference time for the specific selection currently being completed is shown on the left (time automatically memorised upon programming delivered product volume), under the corresponding delivery group temperature on the main Display; the actual time of current delivery is shown on the right. With real time value red = extraction time non-conformity With real time value green = extraction time conformity N.B: The purpose of this function is solely to give the user an idea of delivered product conformity based on its extraction time.
- Page 37 AUTO STANDBY MENU Selecting the Menu it is possible to activate the function of “auto shutdown” of the appliance after a certain period of programmable inactivity (“energy saving” function) After such programmed time, in which the machine does not make coffee, steam or hot water deliveries, the machine moves from ON status to STANDBY status (off).
- Page 38 It is possible to set a time from 15 to 60 minutes. When the function is active , the symbol appears on the main screen, showing the remaining time before the auto shutdown. Each time a new delivery is made (coffee , hot water for tea or steam ) the remaining time is reset and restarts for the preset value in the Menu. MUM S11MINIBRIO_ENG REV01...
- Page 39 EASY MODE MENU: Select the Menu to access the Menu where the delivery group and steam boiler can be stopped from being switched on and off separately, and the time that the settings menu access button is held down for can be extended. This mode is also called the appliance's “Simplified USE mode”...
- Page 40 When ON is selected, the function is enabled and when OFF is selected, the function is disabled. When this function is active, the lettering EASY MODE will be visible on the main screen. Press the button to exit the Settings Menu. MUM S11MINIBRIO_ENG REV01...
- Page 41 DISPLAY LOGOS MENU: Select the Menu to access the function for importing images that can be viewed on the TFT display. Before entering the DISPLAY LOGOS Menu, lift the rubber cover and insert the USB key into port 12 (PAGE2). The key must contain one or more valid images in its ROOT folder (see specifications below).
- Page 42 When the desired image is displayed, press STANDBY and this image will become the new display image when the appliance is in STBY mode. Press SCREENSAVER and the selected image will become the new display image whenever the appliance is inactive for more than 10 seconds. After the last image on the USB Key has been previewed, the following will appear on the display: Press the STANDBY and/or SCREENSAVER buttons to reset the DEFAULT settings for the 2 functions (STBY: No image displayed;...
-
Page 43: Counters Menu
If the image is invalid or there are no images on the USB Key, the following will appear on the display: Exit the Load Bitmap Menu by pressing the button, remove the USB Key and reposition the rubber cover. COUNTERS MENU: Select the Menu to access the Menu where any set coffee, steam and infused water delivery counters can be viewed. - Page 44 Select the Menu and the following will appear on the Display: The amount of coffees that have been delivered can be viewed, and this is split into TOTAL (non-resettable) and PARTIAL (resettable) figures. To reset PARTIAL counters, select the button and the following will appear on the display: Select YES to reset the partial counters, and select NO to not reset them.
- Page 45 Select the Menu and the following will appear on the Display: The amount of water deliveries for infusions can be viewed, and this is split into a TOTAL (non-resettable) and PARTIAL (resettable) figures. If necessary, reset the PARTIAL counters by following the procedure described above. Select the Menu and the following will appear on the Display: The amount of steam dispenses can be viewed, and this is split into a TOTAL (non-resettable) and PARTIAL (resettable) figures.
-
Page 46: Maintenance Menu
MAINTENANCE MENU: Select the Menu and the following will appear on the Display: Press the button to exit the Settings Menu. Select the Menu to access the Menu where the service life of the water softener resin bag can be set in litres. This bag is used to remove limescale from the Water Tank. -
Page 47: Calendar Menu
“L/Max” is the maximum service life of the resin filter (modifiable according to the manufacturer's instructions using the + and - buttons). The warning is the value in litres that has been reached, which appears on the main display when it is time to replace the resin filter N.B: By setting the value of LTMAX and WARNING to 0, the AUTONOMY field is automatically changed to CONSUMPTION. - Page 48 Change the parameters using the + and - buttons. Press the button to exit the Settings Menu. INFO MENU: Select the Menu to view general appliance info: Press the button to exit the Settings Menu. MUM S11MINIBRIO_ENG REV01...
- Page 49 UPDATING APPLIANCE MANAGEMENT FIRMWARE: Appliance management firmware can be updated using a USB key. Firmware updates are necessary to ensure optimal appliance performance and to leverage all the latest available features. To update firmware, proceed as follows: Put the appliance into STBY mode by pressing button 7 (PAGE4). Unplug the power cable from the mains.
-
Page 50: External Structure
Every 3 days After disconnecting the appliance, remove the sprayheads using the key specifically supplied for this purpose; ensure all holes are clear. brush thoroughly and Follow the sequence illustrated here to reassemble all parts. A. Fixing screw B. Small sprayhead C. - Page 51 INNER TANK Clean the inside of the water tank as follows: N.B: Always use protective gloves in order to avoid being scratched. 1) Switch the appliance off using the button 7 (PAGE4) and disconnect the power plug from the electrical mains. 2) Lift the metal sheet cover 3 (PAGE2) MUM S11MINIBRIO_ENG REV01...
- Page 52 3) Disconnect the water suction hoses (A) and drain hoses (B): N.B: Tube “B” is only present if the appliance is fitted with an installed water mains connection kit. MUM S11MINIBRIO_ENG REV01...
- Page 53 4) Lift the lid of the tank: 5) Remove the tank, take care not to spill any water inside: MUM S11MINIBRIO_ENG REV01...
- Page 54 6) Clean the inside of the tank and remove any limescale, using an abrasive sponge if necessary. 7) Now reposition all previously-removed components by following the aforementioned steps in reverse order. Be sure to correctly reposition the tank and connect all previously disconnected silicone hoses. PLEASE NOTE: Every day after the last shift and after daily cleaning, turn off the appliance by pressing button 7 (PAGE4), and unplug the appliance from the mains.
- Page 55 MANAGEMENT OF OPERATING WARNINGS: DELIVERY GROUP TEMPERATURE NOT REACHED WARNING Appliance-stopping warning. If during the brew group’s initial heating phase, the temperature does not reach at least 50°C within 5 minutes, the icon will appear in the place where relative group temperature is displayed. Reset the warning by turning off and switching the respective group back on, using button 5 (PAGE4).
- Page 56 HIGH BOILER PRESSURE WARNING Steam boiler-stopping warning only. If, when the steam boiler is turned on at the start of the day, the pressure exceeds 1.6 bars, the icon will appear in the place of the steam boiler on/off button. The warning is reset by pressing (turning off) this button on the main display.
- Page 57 THE WATER TANK IS BEING FILLED (VERSIONS CONNECTED DIRECTLY TO THE WATER MAINS ONLY – OPTIONAL) When the water tank is being automatically filled with water, the icon will appear. When the correct water level is reached, the icon will disappear.
- Page 58 AUTOMATIC COFFEE DOSING SYSTEM FAULT WARNING Non-appliance stopping warning. If, when delivering coffee via the programmable buttons 2-3 (PAGE4), the volumetric control system cannot determine how much coffee has been delivered, the icon will appear in the place where that group’s temperature is displayed. The warning is automatically reset by manually stopping the beverages being delivered, using buttons 2-3 (PAGE4).
- Page 59 POWER BOARD CONNECTIONS: MUM S11MINIBRIO_ENG REV01...
- Page 60 KEY: M0 = CONNECTION WITH DISPLAY BOARD M1 = CONNECTION DELIVERY RELAY 24Vac RL1: RELAY EV delivery GR1 RL2: not used RL3: RELAY EV load Steam boiler RL4: RELAY EV delivery H2O RL5: RELAY EV STEAM delivery / M.A.T. RL6: not used RL7: not used RL8: RELE EV inbound water connection to water mains (OPTIONAL) RL9: FREE...
- Page 61 MC4 = RS232 SERIAL CONNECTION M5-M6 = NOT USED M9 = STATIC RELAYS CONNECTION: RS1: PILOTING STATIC RELAY GR1 RS2: not used RS3: PILOTING STATIC RELAY STEAM BOILER M10 = CONNECTIONS 230VaC (F3 = FUSE LINE 230Vac) F = PHASE IN ST = NOT USED P2 = NOT USED P1 = OUT PUMP GR1...
-
Page 62: Display Board Connections
DISPLAY BOARD CONNECTIONS: KEY: MC1 = CONNECTION WITH TFT DISPLAY MC2 = PROGRAMMING CONNECTION X1 = BUZZER M0 = CONNECTION WITH POWER BOARD MUM S11MINIBRIO_ENG REV01... - Page 63 M4 = CONNECTION TEMPERATURE PROBE PT1000 DELIVERY GROUPS (PT1 = GR1; PT2 = not used) M7 = CONNECTION STEAM BOILER PRESSURE SENSOR M8 = CONNECTION STEAM BOILER WATER LEVEL M12 = RS232 SERIAL CONNECTION M14 = LED R/L WATER TANK M15 = CONNECTION KEYBOARD ON/STBY –...
- Page 64 REV. 01/2022 La Spaziale SpA Via E. Duse, 8 40033 Casalecchio di Reno Bologna - (Italy) tel. +39 051 611.10.11 fax. +39 051 611.10.40 info@laspaziale.com www.laspaziale.com MUM S11MINIBRIO_ENG REV01...
Need help?
Do you have a question about the S11 BRIO and is the answer not in the manual?
Questions and answers